User Manual
Manuals
Brands
SeeedStudio Manuals
Data Communication and Human Input Devices
SenseCAP Wireless CO2 Sensor LoRaWAN EU868
1
2
3
4
5
6
7
8
9
10
Table Of Contents
1 Product Introduction
2 Key Parameters of the Sensor Node
2.1 Introduction of Key Parameters
2.2 Get Device EUI, App EUI and Key
3 Connect to Gateway and Servers.
3.1 Configuration Overview
3.2 Connect to the SenseCAP Gateway (Recommend Product)
3.3 Connect to a Standard LoRaWAN Gateway
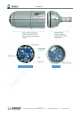
3.3.1 Power On
3.3.2 Sensor Node Working Status
3.3.3 Connect to the Gateway (LPS8) and TTN Server
1) Gateway Registration on TTN
2) Create an Application
3) Sensor Node Registration on TTN
4) Gateway Settings
5) Power on
6) Checking Data on the TTN
4 How to Modify the Key Parameters
4.1 Preparation
4.2 Modify the Device EUI, App EUI & Key and Data Interval
4.3 Modify the Sub-band
4.4 Modify the Data Interval Remotely
5 Decoding
5.1 Packet Parsing
5.1.1 Example 1 - Air Temperature & Humidity Sensor:
5.1.2 Example 2 - CO2 Sensor:
5.1.3 Example 3 - Soil Moisture and Temperature Sensor:
5.1.4 Example 4 – Light Intensity Sensor:
5.1.5 Example 5 – Barometric Pressure Sensor:
5.2 Battery Information
6 Device Installation
6.1 Installing Sensor Node
6.1.1 Installing the Sensor Node Bracket
6.1.2 Installing Sensor Nodes
6.1.3 Dos and Don’ts in Installing Sensor Probes
7 Trouble Shooting
7.1 Sensor Node not join the network, how to do?
7.2 Why is the new sensor’s battery not 100%?
7.3 Why can't I get into configuration mode with the USB to TTL serial tool?
7.4 Support
User Manual
© 2008
-
2019
Seeed Technology Co., Ltd.
All rights re
served.
www.seeed.cc
9
/
37
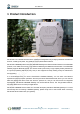
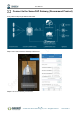
Connect to the
SenseCAP Gateway (Recomme
nd Produc
t)
It only takes 4
steps t
o get start
ed and instal
l.
Step1: Scan c
ode to bind
the
Gateway and
Sensors
.
Step2: T
urn on the G
atew
ay
and
Sens
ors.
1
...
...
7
8
9
10
11
...
...
37