
Quick Start Guide

20
20
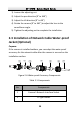
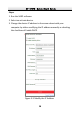
1). Loosen the adjusting nut.
2). Adjust the pan direction [0° to 360°].
3). Adjust the tilt direction [0° to 90°].
4). Rotate the camera [0° to 360°] to adjust the lens to the
surveillance angle.
5). Tighten the adjusting nut to complete the installation.
Installation of Network Cable Water-proof 2.3
Jacket (Optional)
Purpose:
If the camera is installed outdoor, you can adapt the water-proof
accessory for the network cable after the camera is secured on the
installation surface.
①
②
③
④
⑤
⑥ ⑦
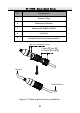
Figure 2-6 Water-proof Accessory Components
Table 2-1 Components
No.
Components
1
Camera’s Network Interface Socket
2
O-Type Gasket
ST-IP4FB·Quick Start Guide