
User Manual


Page.22.
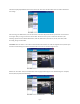
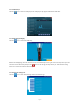
IPC Test Interface:
Local IP: This is the tester’s IP address. Click “Edit“ to enter “IP setting“ and change the tester ‘s IP address settings.
IP camera type: Click on the IP Camera type to select the Manufacturer and model number of the integrated IP camera.
IPC Cameras IP: Enter the IP camera’s IP address manually or click “Search” to auto-scan for the IP camera’s IP address.
It is better to directly connect the IP camera to the tester so the search results will only display the camera’s IP address. If
the tester is connected to a PoE switch, it will find and display several IP address.
IPC User Name: Enter the IP camera’s user name.
IPC Password: Enter the IP camera’s password.
IPC Port: When you select the IP camera type, it will default the camera’s port number and doesn’t need to be changed.
After all settings are completed, click “Enter” to view the live video.
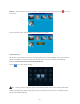
Once you are viewing video on the IPC Test app, you will see the “Video Menu” icon on the top right. This button will
give you access to Snapshot, Record, Photo, Playback, PTZ, and Set. Please refer to the ONVIF section to use these
functions. (pg. 18)
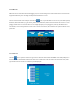
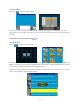
3.3.5 IP address scanner
Connect your network cable to the LAN port of the IP BUDDY+ meter and then click the icon to open the IP address
scanner. Set your IP address search range by changing the Start and End IP addresses. Click the “Start” button to scan the
IP address range. You can also input an IP address in the Port Number Scan to scan for open ports.