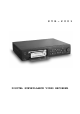
S V R – 2 0 0 1 DIGITAL SURVEILLANCE VIDEO RECORDER
CONTENTS I. SAFETY........................................................2 II.KEY FEATURES..................................................3 III. HARDWARE....................................................6 IV. SPECIFICATIONS...............................................8 V. OPERATION.....................................................9 A.TURN ON THE MACHINE (POWR)...............................9 B. DISPLAY SWITCHING (FULL).................................10 C. PLAY (PLAY)..............................
I. SAFETY 1. To reduce the risk of electric shock, do not remove cover and try to fix something. Refer services to qualified service professionals. 2. Connect all equipments to properly grounded power outlet. 3. Avoid using the electrical outlets controlled by wall switches or timer switches. 4. Keep the unit away from the potential sources of electromagnetic interference. 5. Do not use a damaged or frayed power cord. 6.
II. KEY FEATURES Digital recording The SVR-2001 rectifies the drawbacks that commonly found in the conventional Time Lapse VCR video tape recorders, such as shorter recording time, deteriorating video images on reused tapes, slower searching speed, non-playable on PC, and inconvenience of long-term storage. Removable H.D.D design It is easy to remove the SVR-2001 hard drive for upgrading, rotating, and playing on PC. VCR-like controls It looks like security VCR and controls like security VCR.
Built-in Timer and Date generator The SVR-2001 provides automatic timer data to the recorded video clip files. Easy and fast video clip search The SVR-2001 archives video in a classified list and provides easy search function for fast video retrieval and replay. Line integrity function The SVR-2001 can auto detect and auto alert for the video input channel line integrity. Two loops of alarm I/O terminals The SVR-2001 provides two loops of input and output (dry contact) terminals.
The SVR-2001 includes free PC replay software - proprietary DigiAV Player. User may connect removable SVR hard drive to a PC or notebook for reviewing.
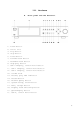
III. Hardware A. Front panel and the buttons1. 1. Power button 2. H.D.D. slot 3. Play button 4. Stop button 5. Pause button 6. Forward seek button 7. Backward seek button 8. Step play button 9. CCD 2 display, cursor multi button 10. CCD 1 display, cursor multi button 11. CCD 3 display, cursor multi button 12. Volume knob 13. Record, play LED indicator 14. Record button 15. Archive Query button 16. System setup, enter button 17. Exit, escape button 18. Display mode switching button 19.
B. Back panel and the terminals 21. 22. 23. 24. 25. 26. 27. 28. 29.
IV. SPECIFICATIONS General Required Power : AC 110 ~ 240V 50/60Hz Power Consumption : 45W Operating Temperature : +5℃ ~ +50℃ Operating Humidity : 20 ~ 80% Dimensions : 420.0mm(W) x 87.8mm(H)x 318.0mm (D) Weight : 5.
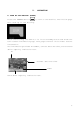
V. OPERATION A. TURN ON THE MACHINE (POWER) Press the "POWER" button to turn on the machine. The initial-page will show up in the booting. After the booting, the SVR-2001 is in the standby status and shows the full-screen-information page. This page consists of the video and the information. The information provides ID number, current date and time, and the hard drive capacity indication bar. ID Current date and time Video Hard drive capacity indication bar.
B. DISPLAY SWITCHING (Main Page) (FULL) (Full-screen page) (Full-screen-info page) The display switching function provides three different display modes, the Main page, the Full-Screen page and the Full-Screen-Information page. Press the "FULL" button to switch from the standard (the Main page) to the Full-Screen display or reverse to the standard video display. C. PLAY (PALY) When a video file clip is selected from the archive (refer to I.
D. RECORD (REC) When the SVR-2001 is in the standby status, press the "REC" button to start recording manually. When recording, the screen will show the "REC" in red and the time scale indications. The scheduled recording and the alarm-driven recording are just a few of many functions provided by the SVR-2001.
E. PAUSE (PAUSE) Press the "PAUSE" button to suspend the video playback. The screen will show "PAUSE" in gray and the time scale indications. To cancel the pause, press the button again. F. STOP (STOP) To stop playback or recording, press the "STOP" button to do it. The SVR-2001 will go to the standby status. G.
find image sections faster, rather than play through the whole video file clip normally. The interval can be pre-set at the different lengths: 0.5, 1, 2, 5,and 10 minutes, (refer to Chapter VI: SYSTEM SETTINGS). While in playback, press either backward or forward "SEEK" button for fast backward seeking or fast forward seeking based on preset time length interval and continues to play. H.
I. FIND THE RECORD (QUERY) To find a video file clip in the archive by using the QUERY function. Press the "QUERY" button to start the search. The "PLAY QUERY" menu page provides three ways of searching, "ALL FILES", "ALARM" and "PLAY ALL". Select "ALL FILES" to search for all the video clips in the archive Select "ALARM" to search for only the alarm-driven video clips in the archive Select "PLAY ALL" to play all the video clips in the archive from the first one. 1.
Press the "STOP" button to delete that video file clip. 2. ALARM : Select the "ALARM" sub-menu to go into the list of all the alarm-driven video file clips. Use the cursor buttons (the multifunction buttons) to select a video file clip. Press the "PLAY" button to play that video file clip. Press the "STOP" button to delete that video file clip. 3. PLAY ALL : Select "PLAY ALL" sub-menu and press the "PLAY" button to play all the video file clips in the archive from the oldest one.
J. STEP PLAYING (STEP) To inspect a video file clip while playing, press "STEP" button to play it step by step (little by little). Every step displays a very short section of a video file clip, then it pause. To return to the normal continuous playing, press the "PLAY" button. K. SYSTEM SETTINGS (SET/ENT) When SVR-2001 is in the standby status, press the "SET/ENT" button to go to the system-setting-menu page, or this button can be used for setup confirmation.
L. VOLUME (VOLUME) This "VOLUME" knob is to adjust the audio output level when playing a video clip. Turn it clockwise to increase the volume, anti-clockwise to reduce the volume.
VI. SYSTEM SETTINGS When the SVR-2001 is in the standby status, press the "SET/ENT" button to go to the system-setting-menu page. The control buttons used in the processes of all the settings are indicated at the bottom of every setting menu and sub-menu pages. The "SET/ENT" button is to confirm the setting or enter into the next setting level. The "ESC" button is to exit or abort the setting and back to previous page. The "UP", "DOWN", "LEFT", "RIGHT" cursor buttons are to move among settings.
* QUERY The "QUERY" sub-menu page provides two factors of searching for the video file clips (the records) in the archive, ("SELECT" and "TIME FRAME"). 1. SELECT : The "SELECT" factor defines the video file clip classifications that are searching for : ("ALL FILES" or "ALARM"). ALL FILES : Search for all the video file clips in the archive. ALARM : Search for only the alarm-driven video file clips in the archive. 2. TIME FRAME : The "TIME FRAME" factor defines the time frame of the searching.
When playing a video file clip, use the "SEEK" function to jump or skip at an interval (pre-set). Jump forward or backward over the video clip in order to find the desired sections faster than to go through the whole video file clip. The "SEEK" sub-menu page is for setting the "SEEK" interval. Use the cursor buttons to select the interval of 0.5, 1, 2, 5, and 10 minute. B. RECORD settings ( RECORD ) In the system-setting-menu page, select the "RECORD" sub-menu to go into the "RECORD" sub-menu page.
* SCHEDULE The SVR-2001 provides three kinds of the schedule recording, "RESERVE", "DAILY" and "INTERVAL". 1. RESERVE: "RESERVE" provides one-time-scheduled recording. It automatically does the recording according to the programmed time frame in the "RESERVE" sub-menu page. When the SVR-2001 executes the "RESERVE" recording, it will show the "RESERVE" indicator on the screen. 2. DAILY "DAILY" provides time-scheduled daily recording.
3. INTERVAL "INTERVAL" provides programmable routinely sequent interval recording. In the "INTERVAL" sub-menu, it has settings for the "INTERVAL" and the "REC LENGTH". The "INTERVAL" is the intermission between the each two recordings. Set the "INTERVAL" number for the intermission length in minute. The "REC LENGTH" is the length of each time interval recording. Set the "REC LENGTH" number for the recording length in minute.
* TIME LAPSE The SVR-2001 has both the real-time recording and the time-lapse recording modes. It defaults at the "CONTINOUS" as the real time recording mode. To use the time-lapse recording, go to "TIME LAPSE" sub-menu page to switch to the time-lapse mode. The 5 1 1 1 60 30 15 10 time-lapse mode are : SEC 1 FRM : SEC 15 FRM SEC 5 FRM SEC 1 FRM SEC 1 FRM SEC 1 FRM SEC 1 FRM SEC 1 FRM * REC QUALITY SVR-2001 has five recording quality levels, "A GRADE", "B GRADE", "C GRADE", "D GRADE", and "E GRADE".
GRADE A: Algorithm: No limited video data size for capturing and storing. Best for high-end CCD cameras, focus 50% or bigger on objects and active motion pictures. Highest video data amount needed to be processed for active and frequent changes in pictures. Examples: ATMs and non-staff banking Stations GRADE B: Algorithm: Limits video data size larger capacity for capturing and storing. Best for high rate of motion pictures or dramatic changes in light.
SVR-2001 Recording Duration 1. Single channel recording (color) (60% still and 40% movement, 30GB hard disk capacity) 2. Grade Time(hours) Days A 94 3.9 B 119 4.9 C 126 5.3 D 130 5.4 E 187 7.8 4 channels recording (color) (60% still and 40% movement, 30GB hard disk capacity) Grade Time(hours) Days A 62 2.6 B 82 3.4 C 88 3.6 D 91 3.8 E 137 5.7 Reference : Actually duration could be different upon different environment and different hard disk capacity. C.
Select “VIDEO ADJ” sub-menu to go to video adjustment. There are four adjustments, "BRIGHTNESS", "CONTRAST", "HUE", and "SATURATION". Select “AUDIO ADJ” sub-menu to go to the audio gain adjustment. The gain control from 00 to 15 different level. D. I/O TERMINAL SETTINGS ( I/O TERMNL ) In the system-setting-menu page, select the "I/O TERMNL" to go to the "I/O TERMNL" sub-menu page. The SVR-2001 provides two sets of input terminals and two sets of output terminals.
* O/P PRESET The SVR-2001 can preset the status of the two output, the "output 1" and the "output 2" to be at " N.C. " (NORMAL CLOSE) or "N.O."(NORMAL OPEN) respectively. * INPUT 1 Each input terminal has its respective setting sub-menu. The "INPUT 1" sub-menu is used to set "OUTPUT", "TRIGGER", "CAPTURE", and "PRE CAPTURE". 1. OUTPUT The SVR-2001 provides two sets of output terminals. Those two output terminals can be set for the responses to the triggering input.
ways: "TIMER ON" (CLOSED CIRCUIT ) ," TIMER OFF" (OPEN CIRCUIT) ,and "IDLE" (no response) For example, if the output device is a light or a siren, choose "TIMER ON.". So, when "Input 1" triggers, the circuit relay of the output dry contact will become "CLDSED CIRCUIT", that means the light will be turn on or the siren will be turned on ; choose "TIMER OFF".
3. CAPTURE This is to set the recording length of the alarm-driven capture recording. It can be set to a limited recording length or continuous recording. The limited recording length can be set up to 60 minutes long. The continuous recording will start recording from the time trigger until to be stopped manually. To set it at the continuous recording, switch the setting to "CONTIUNE". 4. PRE CAPTURE This is to enable the pre-alarm-driven video recording.
E. SYSTEM MANAGEMENT (SYSTEM) In the system-setting-menu page, select the "SYSTEM" sub-menu to go to the "SYSTEM" sub-menu page. The "SYSTEM" sub-menu page shows a list of 6 sub-menus, "DEFAULT", "ID NO.", "PASSWORD", "LANGUAGE", "DATE/TIME", and "HDD UTILITY". * DEFAULT This is to default all the default settings back to the original manufacturer's settings.
* ID NO. This is to set an ID number to the SVR-2001. When select the "ID NO." sub-menu, it will show a keyboard on the screen. Use that keyboard to input the ID number. The ID has to be TWO TO TEN digits. It could be both numbers and/or letters. Press ENT button to input the letter; press PLAY button to confirm. * PASSWORD This is to set a password to the SVR-2001. The password is to protect the system from spectators. When the "PASSWORD" sub-menu is selected, it will display a keyboard on the screen.
* LANGUAGE SVR-2001 provides three languages, English, Simplified Chinese Character and Traditional Chinese Character. Select the "LANGUAGE" sub-menu to choose the language version. DATE/TIME This is to set the current time for SVR-2001. Enter the "DATE/TIME" sub-menu page to set the year, the month, the date, the hour, the minute and the second for the current time. * HDD UTILITY This is to set H.D.D. mode. A selection can be made from three setting modes. "STATUS", "SCAN" and "FORMAT".
1. STATUS The "STATUS" sub-menu page shows a scale bar indicating the used HDD capacity status and the number (MB) indicating unused HDD capacity. A selection can be made between "ALERT" and "OVERWRITE" for a situation that the HDD is full. ALERT : Select "ALERT", the unit will sound the alarm when the HDD is near full. The HDD will keep recording until it used up all the capacity spaces. OVERWRITE : Select "OVERWRITE", the unit will overwrite the oldest file in the HDD when it is full. 2.
F. SYSTEM INFORMATION (INFORMATION) In the system-setting-menu page, select "INFORMATION" to go to the "INFORMATION" sub-menu page. The "INFORMATION" sub-menu page provides all the system setting information of the unit. There are three "INFORMATION" sub-menu pages, "INFORMATION 1", "INFORMATION 2", and "INFORMATION 3".
VII.
VIII. Q&A Q: What if I forgot the password? A: If you forgot the password created, use the master password "0U*5/2V8Q+" to regain the access to the system-setting- menu page. The master password will default password to blank and you have to recreate your new password. Q: What if the hard disk drive is going to be full? A: The SVR-2001 will alert an alarm when the hard disk drive capacity is below 350MB.
Q: What are the meanings of the indications appearing on the Main page? A: "PLAY": Playing the video file clip. "STOP": The video file clip has played and finished. "PAUSE": Pausing the playing of the video file clip.