User’s Guide App Based Pan-Tilt iSecurity WiFi Camera For Smartphone and Tablet (Standalone or IWACHALARM Add-On) Model: SM-821DTH
© Copyright 2016 This manual is furnished under license and may be used or copied only in accordance with the terms of such license. Except as permitted by such license, no part of this publication may be reproduced, stored in a retrieval system, or transmitted, in any form or any means, electronic, mechanical, recording, or otherwise, including translation to another language or format, without the prior written permission of SecurityMan.
Limitation of Liability The liability of SecurityMan Inc, arising from this warranty and sale shall be limited to a refund of the purchase price. In no event shall SecurityMan be liable for costs of procurement of substitute products or services, or for any lost profits, or for any consequential, incidental, direct or indirect damages, however caused and on any theory of liability, arising from this warranty and sale.
Table of Contents Introduction Features Contents Product Basics Hardware setup Mobile device setup (Smartphone / tablet) Adding the camera to the app (Smart Config Method) APP (camera live) live view and settings Live View Icons Back Live View Snapshot Refresh Talk Stream Quality Settings Settings menu and options Camera Name DID Firmware Version Library Version Check upgrade Change Change admin password Motion detection Push notificat
Introduction The SecurityMan SM-821DTH combines a high-quality color video camera with the flexibility of remote pan/tilt operations using Smartphone and tablet. It is equipped with 3.6mm lens and 720P video resolution allows user to view close or distant objects with exceptional quality. In addition, due to the small file sizes produced by the H. 264 video compression it has the ability to record for a long period of time before beginning to overwrite older events.
When using this product, the safety precautions below must be taken to avoid possible legal liabilities and damages. Retain and follow all product safety and operating instructions. Observe all warnings in the product operating instructions. To reduce the risk of bodily injury, electric shock, fire and damage to the equipment, observe the following precautions. PLEASE NOTE that under certain circumstances, audio/video recording may be PROHIBITED by law.
• DO NOT touch, shake or hold the antenna. Touching, shaking or holing the antenna might influence the receiving of electromagnetic wave, and thereby influence the receiving effect. • DO NOT use the camera in complex environment, the obstruction of stumbling block will affect the electromagnetic wave and influence the receiving range. Wall, tree and other stumbling block might absorb, reflect the electromagnetic wave, and influence the receiving range.
Product Basics Light Sensor Night Vision LED’s Speaker Antenna Power LED Microphone Ethernet Port Reset Button DC In Pair Button Mounting Socket Micro SD Slot HARDWARE SETUP Screw in the cameras antenna and insert your Micro SD memory card (not included) into the tf slot. Then insert the female end of the cameras AC adapter into the DC in port located behind the camera and the other end into a wall outlet closest to you.
MOBILE DEVICE SETUP (Smartphone/Tablet) Open the App Store (iOS) or Google Play (Android) on your mobile device. Then search for and install the “CAMERALIVE” application. ADDING THE CAMERA TO THE THE APP (Smart Config Method) The CAMERALIVE app has a built in “user friendly” step-by-step interactive guide that you can follow when adding the camera. IMPORTANT: • Make sure your Smartphone or tablet is connected to “the same Wi-Fi network as the one you want to put the new camera on”.
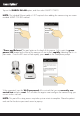
Tap on the SEARCH IN LAN option, and then select SMART CONFIG. NOTE: The included Ethernet cable is NOT required when adding the camera using our recommended SMART CONFIG method. “Press and Release” the pair button on the back of the camera. At this point the green power LED located on the front of the camera will start to flash rapidly indicating that it is in pair mode. Once the LED starts to flash rapidly, press next on the Smartphone prompt.
Once your camera has been detected by the app the green power LED on the camera should start to flash steady. When prompted, give your camera a name (front door, living room, etc) input the default camera password 123456 and tap save. Once completed, your camera will be added to the device list area.
APP (CAMERA LIVE) LIVE VIEW AND SETTINGS To access your camera, simply launch the CAMERA LIVE app on our mobile device then tap on the camera you want to view to bring up the live view. When you have a live view of the camera image, you can then swipe up, down, left & right to move the camera in the corresponding direction (SM-821DTH only). LIVE VIEW ICONS 1. 2. 3. 4. 5. 6. 7.
BACK Tapping on the Back option will return you to the previous screen. LIVE VIEW Cameras live feed. SNAPSHOT Takes a snapshot of the current live view and saves it to your phones photo album. REFRESH Refreshes the connection between the phone and the camera, and should only be used when the live view becomes frozen, disconnected or unstable. TALK Pressing and holding the microphone icon allows you to speak to the person on the other end of the camera being viewed.
SETTINGS MENU AND OPTIONS The camera settings and configuration menu options allow you to change device and admin password, enable/disable motion detection recording, playback events and much more. Here is a list of options available.
CAMERA NAME Displays the camera’s name DID The Device ID (DID) section provides you with the cameras ID which is used to add the camera to the app, unique to each device and is not configurable. FIRMWARE VERSION The Firmware Version section displays the cameras current firmware version and is not configurable. LIBRARY VERSION The Library Version section displays the cameras current library version and is not configurable.
EVENT LIST (VIDEO PLAYBACK) NOTE: For best results, we recommend using a Micro SD card class 6 or higher (Support up to 32GB). The Event List option is to view and playback recorded events that are stored on the Micro SD card inserted into the back of the camera. To playback video events simply tap on the event list option and then set the period (day, week, month) and a date range. When set, tap on load.
The load option will bring up all the events stored for the set search criteria. Locate the event you want to playback and tap on it to play it. OVERWRITE The overwrite option enables and disables the out overwrite feature. Enabling the loop record feature allows the camera to loop back to begin deleting old files stored on your memeory card to make room for new files.
VIDEO ROTATION Video Rotation allows you to change the cameras flip the live view so that you can mount the camera upside down. Options include normal, horizontal, vertical and 180 degrees. To change the image orientation, simply tap on the video rotation option and select from the options provided. SET DATE & TIME The set date & time option allows you to set the cameras time zone and enable/disable daylight savings.
WIFI Used to change or connect the camera to your Wi-Fi network. To connect or change the network, simply tap on the WIFI option, select the WIFI network you want to connect too. Then enter the password associated to the selected network and tap join to connect to the network. PERSONAL CLOUD STORAGE The personal cloud storage option allows you to configure the camera too store all motion detection snapshot pictures to your personal Dropbox (recommended) or Baidu (commonly used overseas countries) account.
Create a directory (Camera, Security, etc) name for the recordings to be stored in and select the account type (Dropbox or Baidu). Now tap on account settings to login to the storage type account. Enter the storage credentials, click on the sign in option when done and then tap on the apply option to apply the settings. NOTE: please check your Dropbox periodically to make sure the communication between the camera and the Dropbox account is still linked.
APPLY Applies all the changes made to the camera ADDING A CAMERA TO APP (Alternative Methods) The CAMERALIVE app has multiple “user friendly” step-by-step interactive guides that you can follow when adding a new camera to the app. Below are all methods that can be used with step by step instructions on how to use them.
Search In LAN QR Scan Manual Input SEARCH IN LAN The Search In LAN option consist of 3 methods that add your new camera to your wireless network and Smartphone all in one shot.
SMART CONFIG Please refer to the “adding the camera to the app (SMART CONFIG Method)” section at the start of this user’s manual. Adding camera using SMART CONFIG method do not required Ethernet connection. BROADCAST IN LAN The Broadcast in LAN option performs a search for cameras currently connected to your network. NOTE: If SMART CONFIG method is already setup, BROADCAST IN LAN may be used as an alternative setup for secondary Smartphone device and so on.
Identify the DID (device ID) that corresponds to the Serial ID printed on your cameras QR code and select it. Once selected, you will be prompted to give your camera a name (front door, living room, etc). After naming your camera, input the default camera password 123456 and tap save. Once completed, your camera will be added to the device list area. AP MODE The AP Mode option requires you to connect to the camera directly so that you can manually configure its settings.
Select the Wi-Fi network you want to put the camera on, input the Wi-Fi password associated with the selected network and press ok. Wait for your camera to reboot and press next. Identify the DID (device ID) that corresponds to the Serial ID printed on your cameras QR code and select it. Once selected, you will be prompted to give your camera a name (front door, living room, etc). After naming your camera, input the default camera password 123456 and tap save.
QR SCAN The QR Scan option does not require you to setup any network or WIFI information (for wifi setup refer to SMART CONFIG or AP MODE or simply connect the included Ethernet cable to your router) and is a quick and easy way to add a camera to a secondary device (wife, kids, etc) once it the camera has already been added to a network. When you are ready, launch the app and tap on the + (add) symbol located to the bottom left corner of the screen to begin adding the new camera.
Once your QR code has been scanned, you will be prompted to give your camera a name (front door, living room, etc). After naming your camera, input the default camera password 123456 and tap save. Once completed, your camera will be added to the device list area.
Tap on the Manual Input option, and then manually input the serial id number (alpha numeric) located underneath the camera into the DID field. Once you are done inputting the serial ID, give your camera a name (front door, living room, etc). After naming your camera, input the default camera password 123456 and tap save. Once completed, your camera will be added to the device list area.
Specifications SM-821DTH Lens 1/4 “ CMOS color Pan-Tilt WiFi/ Sensor OV9712 Eth IP Camera Focal Length 3.6mm Pan-Tilt Control 260:Horizontal 120:Vertical (no zoom) Viewing Angle 50 degree System P2P (Cloud Technology) Video Compression H.264 Resolution 720P HD (1280x720), VGA (640x480), QVGA (320x240) Video Rate 30fps Motion Detection Yes Transmission Wired Ethernet or Wi-Fi NIC Interface 10/100Mbps (IEEE802.3, RJ45) Protocols TCP/IP, DHCP, SMTP,HTTP, UPNP WiFi Interface 802.
www.securitymaninc.