Digia II User Manual
Copyright Copyright © 2006, GE Security, Inc. All rights reserved. This document may not be copied in whole or in part or otherwise reproduced without prior written consent from GE Security except where specifically permitted under US and international copyright law. Document number/revision: 1058007A (December 2006). Disclaimer The information in this document is subject to change without notice. GE Security, Inc.
iii 2. Term. This Agreement is effective until terminated. You may terminate this Agreement by uninstalling all components of the Software from all Computing Devices and returning the Licensed Product to GE Security. GE Security may terminate this Agreement if You breach any of these terms and conditions. Upon termination of this Agreement for any reason, You agree to uninstall all components of the Software and return the Licensed Product to GE Security.
iv Digia II User Manual Restricted rights legend. The Licensed Product is provided with restricted rights. In the event the United States Government or an agency thereof is granted a license, the following additional terms apply: Restricted Computer Software, as defined in the Commercial Computer Software–Restricted Rights clause at Federal Acquisition Regulations 52.
v Contents Preface . . . . . . . . . . . . . . . . . . . . . . . . . . . . . . . . . . . . . . . . . . . . . . . . . . . . . . . . . . . . . . . . . . . . . . . . . . . . . . . . . . . . . . . . vii Conventions used in this document . . . . . . . . . . . . . . . . . . . . . . . . . . . . . . . . . . . . . . . . . . . . . . . . . . . . . . . . . . . . . . . . . .vii Safety terms and symbols . . . . . . . . . . . . . . . . . . . . . . . . . . . . . . . . . . . . . . . . . . . . . . . . . . . . . . . . . . .
vi Digia II User Manual
vii Preface This is the GE Digia II User Manual for models Digia 204, Digia 209, and Digia 216. This document includes an overview of the product and detailed instructions explaining: • • how to install the unit; and how to set up the unit. There is also information describing how to contact technical support if you have questions or concerns.
viii Digia II User Manual
Chapter 1 Introduction This chapter provides an overview of your Digia II, including things you need to know to begin configuring and using your Digia II. In this chapter: Product overview . . . . . . . . . . . . . . . . . . . . . . . . . . . . . . . . . . . . . . . . . . . 2 Features . . . . . . . . . . . . . . . . . . . . . . . . . . . . . . . . . . . . . . . . . . . . . . . 2 Front panel . . . . . . . . . . . . . . . . . . . . . . . . . . . . . . . . . . . . . . . . . . . . . 2 Back panel . . . . . . .
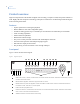
2 Digia II User Manual Product overview Digia II incorporates all of the benefits of digital video recording, is simple to install, and operates similar to a VCR. Highly efficient compression technology and superior resolution for recorded images make the Digia II stand out among other DVRs. Features • • • • • • • • • • Triplex operation for recording and playback. Built in MPEG-4 codec with configurable quality.
Chapter 1 Introduction G LIVE. Press this to return to live video. H EXPORT. Press this to begin the export functionality. I DISPLAY. Press this to change the display to show 1, 4, 9, or 16 channels of video. J MENU. Press this to access the main menu. K Channel buttons. Press one of these buttons to bring up that video channel on the monitor in live video mode. Also use these to input numbers for passcode entry.
4 Digia II User Manual C Monitor output BNC. Connect this to a monitor to view Digia II output. D SVGA connector. Connect a computer monitor to view a Digia II output. E Ethernet port. Use an Ethernet cable to connect Digia II to a computer network. F Alarm output connections. Connect to apprpopriate devices (siren, buzzer, etc.). G Alarm input connections. Connect alarms here. H Audio in/out. Connect speakers and/or microphone here. I 19 VDC power connector. Connect the power source here.
Chapter 1 Introduction C Playback status bar. The playback status bar appears when you enable the OSD (onscreen display) in the Display menu. There are three parts to this display bar, which are: • Record date - Displays the date when the video was recorded. • P01 - Displays that video is currently playing back from the hard drive. • Percentage - Displays the location on the hard drive where the video was recorded. • Playback status - Displays the direction and speed of playback.
6 Digia II User Manual
Chapter 2 Installation This chapter provides the steps to begin installing your Digia II. In this chapter: Installation . . . . . . . . . . . . . . . . . . . . . . . . . . . . . . . . . . . . . . . . . . . . . . . .
8 Digia II User Manual Installation Be sure to install your Digia II in an area that secure, away from water, heat, dust, dirt, and other substances that may damage the unit. To install Digia II, do the following: 1. Connect a camera to any one of the camera BNC connections. 2. Connect a microphone or another audio input device to the audio input connector. 3. Connect speakers or another audio output device to the audio output connector of the unit. 4.
Chapter 3 Setup This chapter provides an description of your Digia II’s main menu. In this chapter: Main menu . . . . . . . . . . . . . . . . . . . . . . . . . . . . . . . . . . . . . . . . . . . . . . . 10 Camera . . . . . . . . . . . . . . . . . . . . . . . . . . . . . . . . . . . . . . . . . . . . . . . 11 Record . . . . . . . . . . . . . . . . . . . . . . . . . . . . . . . . . . . . . . . . . . . . . . . 12 Schedule . . . . . . . . . . . . . . . . . . . . . . . . . . . . . . . . . . . . . . . . . . . .
10 Digia II User Manual Main menu To access the main menu, press the Menu button. You will be asked for a passcode. Enter either your admin passcode, or your user passcode. The default admin passcode is 4444, and the default user passcode is 1234. Note: If you log on with a user passcode, you will only be able to access the Display and Information menus, and the search and export features. All other menus and features will be inaccessible.
Chapter 3 Setup Camera Figure 5 shows the Camera menu options. Figure 5. Camera Digia II Menu - Camera << Camera 1 Title Recording Frame Rate Quality Level Covert Sequence List DWELL time Brightness Contrast Saturation >> CH01_ _ _ _ _ Continuous 1 f/s 6-Highest 03 Sec(s) 50 % 50 % 50 % Select EXPORT to Copy Settings Select DISPLAY to Paste Settings Table 1. Camera submenu Menu item Description Camera # Each camera has its own submenu.
12 Digia II User Manual Record Figure 6 shows the Record submenu. Figure 6. Record Digia II Menu - Record Resolution Pre-Alarm Audio Auto Delete Mode Disk Overwrite Table 2. 2CIF Disable Continuous Record submenu Menu item Description Resolution Choose the resolution you want to record at. Choose from CIF, 2CIF, and D1/4CIF. Pre-alarm Check this box to record prealarm video. Audio Check this box to record audio. Auto delete mode Choose the interval at which to automatically delete footage.
Chapter 3 Setup Schedule The Schedule submenu has submenus of its own. Those menus are Time periods and a schedule menu for each camera. Time periods Figure 7 shows the Time periods submenu. Figure 7. Time periods Digia II Menu - Schedule << Time Periods # 1 2 3 4 5 6 7 8 Table 3.
14 Digia II User Manual Camera # (1 - 16) Figure 8 shows the Camera submenu. Note: Your number of cameras will depend on which model of Digia II you have and how many cameras or channels it is capable of. Figure 8. Camera schedule Digia II Menu - Schedule << # 1 2 3 4 5 6 7 8 Table 4.
Chapter 3 Setup Alarms Figure 9 shows the Alarms submenu. Figure 9. Alarms Digia II Menu - Alarms << Alarm 1 Alarm Alarm Frame Rate Quality Level Alarm Duration Sensor Type Event Buzzer Alarm to Full Screen eMail Notification Video Loss Motion Detection Motion Sensitivity >> Disable 10 f/s 6-Highest 05 Sec(s) NC Disable 7 Select EXPORT to Copy Settings Select DISPLAY to Paste Settings Table 5. Alarms submenu Menu item Description Alarm # The current alarm being edited.
16 Digia II User Manual Network The Network submenu has three of its own submenus. They are Network configuration, Network email, and Network DDNS. Network configuration Figure 10 shows the Network configuration submenu. Figure 10. Network configuration Digia II Menu - Network << Network Configuration Data Port 00554 HTTP Port 00080 Control Port 01600 Client Access Bandwidth Saving 8192 Network type IP Address Subnet Mask Gateway DNS Server Table 6. >> DHCP 000.000.000.000 000.000.000.000 000.000.
Chapter 3 Setup Table 6. Network configuration submenu (continued) Menu item Description Gateway The IP address to the gateway router the unit is getting its network connection from. If you choose static as a network type, you can set the gateway the same was as you set the IP address. DNS server The IP address to the DNS server you wish to use. If you choose static as a network type, you can set the DNS server address the same way as you set the IP address.
18 Digia II User Manual Network DDNS Figure 12 shows the Network DDNS submenu. Figure 12. Network DDNS Digia II Menu - Network << Network DDNS DDNS Services DDNS Server tzo.com >> User _ _ _ _ _ _ _ _ _ _ _ _ Password ***************** ***************** Record ID _ _ _ _ _ _ _ _ _ FQDN _ _ _ _ Table 8. _ _ _ _ _ _ _ _ _ _ _ _ _ _ _ _ _ _ _ _ _ _ _ _ _ _ _ _ _ _ _ _ Network DDNS submenu Menu item Description DDNS services Check this box to enable DDNS service on the Digia II.
Chapter 3 Setup Display Figure 13 shows the Display submenu. Figure 13. Display Digia II Menu - Display OSD TimeStamp Sequence Alarm Display Table 9. Disable Display submenu Menu item Description OSD Check this box if you want the playback and record status bars to display. Timestamp Choose between Disable, Top, or Bottom to have the timestamping display. Note: If you enable timestamp, the timestamp becomes a permanent part of the recording and cannot be removed from recorded video.
20 Digia II User Manual System The System submenu has two submenus of its own. They are System date&time and System admin. System date&time Figure 14 shows the System date&time. Figure 14. System date&time Digia II Menu - System << System Date&Time Date/Time Format Set Date Set Time Daylight Savings Start On From End On From MM-DD-YYYY 12-19-2006 03:06:54p >> 12 HR TUE APR LAST SUN 02:00a to 03:00a OCT LAST SUN 03:00a to 02:00a Time Synchronize Time Server 220.130.158.
Chapter 3 Setup Table 10. System date&time menu options (continued) Menu item Description Time synchronize Check this box if you want the Digia II to synchronize it’s time clock to an external source. Time server Set the IP address of the external source you want to use as your time synchronizing server. Time zone Choose between GMT, GMT+(1, 2, 3, 3:30, 4, 4:30, 5, 5:30, 5:45, 6, 6:30, 7, 8, 9, 9:30, 10, 11, 12, and 13), and GMT-(12, 11, 10, 9, 8, 7, 6, 5, 4, 3:30, 3, 2, and 1).
22 Digia II User Manual Table 11. System admin submenu (continued) Menu item Descriptions Admin passcode Enter an admin passcode. Confirm Confirm the admin passcode. User passcode Enter a user passcode. Confirm Confirm the user passcode. Network passcode Enter a network passcode. Confirm Confirm the network passcode. Information Figure 16 shows the Information submenu. Figure 16.
Chapter 3 Setup Table 12. Information submenu (continued) Menu item Description Record time From The date the unit started recording. To Either the current date or the last date the unit was recording.
24 Digia II User Manual Search Digia II allows you to search through your recorded video by a multitude of search criteria. To search your video, do the following: 1. Press the Search button on the front panel. 2. The Search menu displays (Figure 17). Choose whether you want to search by time or filters by highlighting the option next to Search By and pressing Enter. Press up or down to switch the option, and then press Enter again to set the choice. Figure 17.
Chapter 3 Setup 13. When you are finished viewing the video, press the Search button to return to the Event list, or press the Live button to return to live video. Note: When you are in the Event list page, you must hit Menu to escape out to the Search menu.
26 Digia II User Manual Export You can export recorded video in a file to a USB device. To export recorded video, do the following: 1. Press the Export button on the front panel of the Digia II. 2. The Export menu will display telling you what video is available to export (Figure 18). Figure 18.
Chapter 3 Setup Enter and directional buttons You can use the Enter and directional buttons for a variety of tasks. Shuffle camera views In a multiple-channel display mode, you can customize where each camera view is displayed. To shuffle the camera views, do the following: 1. Press Display until you are in the multiple-channel view you want to be in. You must at least be in the 2 x 2 display. If your unit is capable of more channels, you can also be in the 3 x 3 or 4 x 4 display. 2. Press Enter once.
28 Digia II User Manual Figure 20. Shuffled view CH02 CH01 Select CH03 12-19-2006 TUE R01 CH03 01% FAN 10:39:32a 5. After you make your first switch, the Select message moves to the next channel (Figure 20). Repeat steps 3 and 4 above to customize the display as much as you’d like. 6. When you are finished, press Enter again. The unit will remember your customized views for all displays (2x2, 3x3, or 4x4).
Chapter 3 Setup Figure 22. Zoom in CH01 12-19-2006 TUE R01 Zoom 01% FAN 10:39:32a 4. Use the directional buttons to navigate through the zoomed in screen. 5. Press Enter again to exit back to regular live video.
30 Digia II User Manual
Chapter 4 Troubleshooting, maintenance, support This chapter provides information to help you contact technical support in case you need assistance with your GE equipment. In this chapter: Troubleshooting . . . . . . . . . . . . . . . . . . . . . . . . . . . . . . . . . . . . . . . . . . . 32 Troubleshooting your Digia II . . . . . . . . . . . . . . . . . . . . . . . . . . . . . 32 Contacting technical support . . . . . . . . . . . . . . . . . . . . . . . . . . . . . . . . . 34 Online publication library .
32 Digia II User Manual Troubleshooting This section provides information to help you diagnose and solve various problems that may arise while configuring or using your GE product and offers technical support contacts in case you need assistance. (See Contacting technical support on page 34.) Troubleshooting your Digia II • I cannot log onto Digia II main menu. 1. Make sure you are using the correct admin passcode (default: 4444) or user passcode (default: 1234).
Chapter 4 Troubleshooting, maintenance, support • The Digia II boots up to a startup screen and does not progress to live mode. The Digia II runs a self-diagnostic test upon powering up. If something is detected as a failure, such as the fan, hard drive, or Ethernet, the unit may not boot completely. Contact technical support. • DVR only records for a few hours If motion recording is not properly set up, this problem will arise. To set up motion recording, see (Alarms on page 15).
34 Digia II User Manual Contacting technical support For assistance installing, operating, maintaining, and troubleshooting this product, refer to this document and any other documentation provided. If you still have questions, you may contact technical support during normal business hours (Monday through Friday, excluding holidays, between 5 a.m. and 5 p.m. Pacific Time). Table 13. Service and support contact information Customer service Phone Technical support Toll-free: 888.GESECURity (888.437.
Appendix A Defaults This appendix provides a list of the default settings for the Digia II. In this appendix: Defaults. . . . . . . . . . . . . . . . . . . . . . . . . . . . . . . . . . . . . . . . . . . . . . . . . .
36 Digia II User Manual Defaults Table 14 lists the default settings for each property in the Digia II. Table 14.
37 Table 14.
38 Digia II User Manual Table 14.