
Installation guide
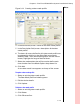
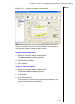
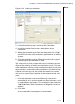
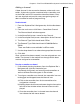

Table Of Contents
- 1 Introduction
- 2 Architectural Overview
- 3 First-Time NT500 Offline System Installation & Setup
- System requirements
- Navigating the software
- Installing the system
- Defining the system
- Setting up organization options
- Creating time and mode profiles
- Setting up hardware
- Creating cardholders and operators
- Configuring a lock using a laptop
- Configuring an office admin kit as an enrollment station
- Viewing events, diagnostic information, and reports
- Database backup and restoration
- Glossary of Terms

Chapter 3: First-Time NT500 Offline System Installation & Setup
3 – 32
Notes To define additional controller options for an access group
1 Click the Advanced tab.
2 Check the desired options:
AC 300/500 Series Controller options
■ Ignore bolted doors
■ Ignore anti-passback
■ Ignore dead bolted doors
■ Ignore 'Two Card Access' mode
Note: Bolted mode denies access to all cards presented to
the reader.
Conditional AC300/500 Series Controller options
■ Allow passage mode
■ Allow first card unlock
Note: Passage mode allows two swipes of a card to unlock
the door indefinitely and then re-lock the same door when the
card is presented twice to the reader again.
Note: Conditional options only apply when access is not con-
trolled by airlock, anti-passback, area usage limits, or two-key
access.
3 Click Add.
To update an access group
1 From the Explorer Bar’s Navigator tab, click the Access
Group icon.
2 Select an access group.
3 On the Details and Advanced tabs, enter the appropriate
information.
4 Click Update to save changes.
To delete an access group
1 From the Explorer Bar’s Navigator tab, click the Access
Group icon.
2 Select an access group.
3 Click Delete.
4 Click OK to confirm.
The icon for the access group you deleted no longer
appears in the window.