NT500 Offline Getting Started Guide • • • • • •
Copyright © 2007 Stanley Security Solutions, Inc. and Stanley Logistics, Inc. All rights reserved. Printed in the United States of America. Information in this document is subject to change without notice and does not represent a commitment on the part of Stanley Security Solutions, Inc. The software described in this document are furnished under a license agreement or nondisclosure agreement.
Contents 1 Introduction Related documents 1–2 Getting technical support 1–2 How to use this guide 1–2 2 Architectural Overview NT500 sample applications 2–3 Software features 2–7 Components and connections 2–8 3 First-Time NT500 Offline System Installation & Setup System requirements 3–2 Navigating the software 3–2 Installing the system 3–4 Defining the system 3–7 Setting up organization options 3–7 i
Creating time and mode profiles 3–17 Setting up hardware 3–26 Creating cardholders and operators 3–33 Configuring a lock using a laptop 3–40 Configuring an office admin kit as an enrollment station 3–43 Viewing events, diagnostic information, and reports 3–45 Database backup and restoration 3–49 Glossary of Terms Terms A–2 ii
C h a p t e r 1 Introduction Thank you for choosing the Stanley NT500 Security Management System. The Stanley NT500 System allows a wide variety of institutions (educational, retail, health care, property management, and so forth) to secure access control of interior and perimeter doors. The Stanley NT500 System sets new standards for performance flexibility and ease of use. The Stanley NT500 System software works with approved Windows® operating systems.
Chapter 1: Introduction Notes Related documents The following documents are available to help you install, maintain, and operate components of the NT500 System. See your Stanley Security Solutions Representative for more information.
C h a p t e r 2 Architectural Overview The Stanley NT500 Security Management System can be thought of as having two general architectural models for addressing the security needs of most customer applications. These two models can be generally categorized as “online” and “offline” . In offline mode, the Stanley NT500 System can manage readers, locks, and controllers. The Stanley NT500 Security Management Suite comes in four models.
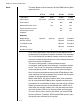
Chapter 2: Architectural Overview Notes The table below outlines features of the NT500 Security Management Suite.
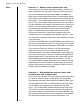
Chapter 2: Architectural Overview NT500 sample applications Notes With the use of the NT500 System software, three basic access schemes can be developed. These include: 1) An offline system in which only the battery operated electronic lock's built in memory and/or door controllers (AC512B), along with NT500 System software are used. Access is defined in the NT500 System software, while events are recorded in the electronic lock’s built in memory and/or door controllers.
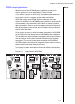
Chapter 2: Architectural Overview Notes Scenario 1 — Hollow metal entrance door only Your facility has two metal entrance/exit doors. You wish to allow employees and the public full access during business hours (from Monday through Friday 8:00 am to 6:00 pm). Both doors will be programmed with an unlock/relock schedule to make sure the doors are automatically unlocked during these hours.
Chapter 2: Architectural Overview definition of who needs access to the main entrance/exit doors only need to be updated when new employees arrive or employees part with the company. There is also an overhead dock/delivery door that you wish to have accessible only to specific employees with valid card access. This access will allow them to raise and/or lower the dock door. The final area you wish to provide access security for is an IT room housing valuable computer equipment.
Chapter 2: Architectural Overview Notes files, and access groups. The door controller can be used for the entrance/exit door that will allow public access. For the entrance/exit door, you will first want to establish the appropriate profile relationships with unlock/relock schedules and employee access, to grant access to only specific employees through the use of door mode profiles, time mode profiles, and access groups or individual cardholder access.
Chapter 2: Architectural Overview Software features Notes The following table compares the software features supported by the NT510 software license to those supported by the NT520 software license.
Chapter 2: Architectural Overview Notes Components and connections The following hardware and software components are used to create an offline Stanley NT500 System: ■ ■ ■ ■ ■ ■ ■ ■ 2–8 Stanley NT500 System software Dedicated computer, see your Stanley Security Solutions representative for complete details NT500 Locks, cylindrical (93KN), mortise (45HN) or exit hardware trim (EXN) models available with proximity, magnetic stripe or dual validation reader Card encoder (optional for magnetic stripe) Acc
Chapter 2: Architectural Overview Controllers Notes The following controllers can be used with an offline Stanley NT500 System (using NT510 or NT520 software). A controller dictates lock behavior according to defined parameters such as time, individual access rights, card presented to a reader, or activation of a Request to Exit switch. AC512 – The AC512 is a two-door controller that can manage up to two access points.
Chapter 2: Architectural Overview PDAs and Laptops Notes PDAs and Laptops are used with an offline NT500 System to transfer configuration information from the PC upon which the management software is installed to the lock and transfer history information from the lock to the PC. Figure 2.
Chapter 2: Architectural Overview Setup overview Notes In the next chapter you will find complete step-by-step instructions on the first time configuration of a Stanley NT500 System for offline use. Below is a brief outline of the main steps involved in the setup process and crossreferences that will assist you in quickly finding this information. ■ ■ ■ ■ ■ ■ ■ ■ Navigating the software, see page 3-2. Installing the software, see page 3-4. Setting up Organizational Options, see page 3-7.
Chapter 2: Architectural Overview Notes 2 – 12
C h a p t e 3 r First-Time NT500 Offline System Installation & Setup You are now ready to start setting up your Stanley NT500 offline system. The tasks described in this chapter do not include the installation of the locks themselves. The installation of locks that can be used with the Stanley NT500 System (93KN, 45HN, EXN) is fully described in the installation instruction documents listed below. Contact your Stanley Security Solutions Representative for a copy of these documents.
Chapter 3: First-Time NT500 Offline System Installation & Setup Notes System requirements Before installing the Stanley NT500 System software, it is important to confirm that your computer infrastructure meets the minimum system requirements. See you Stanley Security Solutions Representative for more information. Navigating the software The Stanley NT500 System software follows Windows® conventions. Therefore both menus and toolbars are available for navigation through the software.
Chapter 3: First-Time NT500 Offline System Installation & Setup Figure 3.
Chapter 3: First-Time NT500 Offline System Installation & Setup Notes Installing the system Make sure that you have the following components before you start installing the Stanley NT500 System: ■ Stanley NT500 System software ■ Dedicated computer, see your Stanley Security Solutions Representative for complete details ■ NT500 Locks, cylindrical (93KN), mortise (45HN) or exit hardware trim (EXN) models available with proximity magnetic stripe or dual validation reader ■ Card encoder (optional for magnetic
Chapter 3: First-Time NT500 Offline System Installation & Setup Before installing the Stanley NT500 software, also make sure that you have completed the following: Determine whether your database will use Microsoft® SQL Server, or MSDE. The Microsoft® SQL Server Desktop Engine (MSDE) must be installed on your PC before the Administration Software. If it is not, the opportunity to install it is displayed before the software options are displayed.
Chapter 3: First-Time NT500 Offline System Installation & Setup Notes later if the needs of your site change. For more information about access types see page 3-13. To set a new password When first signing into the application the default username (installer) and password (installer) should be updated. 1 Double click the Stanley NT500 desktop icon. The Login screen appears. 2 In the Login Name field, type the default login name. 3 In the Password field, type the default password. 4 Click Log On.
Chapter 3: First-Time NT500 Offline System Installation & Setup Defining the system Notes Overview It is best to take time to plan what doors, time profiles, and individuals need to be included in your access management scheme.
Chapter 3: First-Time NT500 Offline System Installation & Setup Notes 4 Click OK. The New Format window appears. Figure 3.3 Adding a new card format 5 In the Name field, enter a name for the card format. 6 In the Description field, enter a description of the card format. A popular naming scheme is to use the name of your company or department. 7 In the Type field, select the card type by using the dropdown list. 8 Using the radio buttons, select the appropriate display mode.
Chapter 3: First-Time NT500 Offline System Installation & Setup 1 Click the Layout tab. Figure 3.4 Notes New card format-Layout tab For magnetic stripe or custom Wiegand card format, the following details must be provided. Card length: The card length is the total amount of information encoded on each access card. Facility code format: A facility code generally is a unique sequence of digits that is programmed into every device and encoded on every access card that belongs to the facility.
Chapter 3: First-Time NT500 Offline System Installation & Setup Notes When you define the issue code format, you indicate: ■ the maximum number of digits in the issue code ■ the starting location of the issue code on the access cards ■ the range of issue codes that the device should accept. 2 In the Card Number Length field, type the number of digits (from 1 to 9) in the card number.
Chapter 3: First-Time NT500 Offline System Installation & Setup A total is calculated as the sum of the Card Length, Facility Code Length, and Issue Code Length. The bar at the bottom of the window indicates the card format information locations and lengths. Figure 3.5 New card format-Layout tab 6 If the issue code look ahead feature is desired, check the Issue Code Look Ahead check box. The following figure illustrates how the look ahead and issue code features are applied. Figure 3.
Chapter 3: First-Time NT500 Offline System Installation & Setup Notes The look ahead feature lets you program a magnetic stripe reader to accept an access card whose encoded issue code is higher than the current issue code recorded for the card in the lock’s database. The setting for the look ahead feature determines how many numbers higher the access card’s encoded issue code can be than the issue code on record for the card.
Chapter 3: First-Time NT500 Offline System Installation & Setup System access Notes When assigning access it is best to use the access by area functionality if there is a desire or potential that the access system will be expanded to use online functionality in the future. This guide will follow the path of defining access based on areas and access groups. This is the preferred method for defining access because it allows for future migration to Stanley NT500 online functionality.
Chapter 3: First-Time NT500 Offline System Installation & Setup Notes Figure 3.7 Welcome screen To define system access 1 From the Welcome Screen, select Set Organization Options or from the main menu select Tools > Options. The Organization Options window appears. Figure 3.
Chapter 3: First-Time NT500 Offline System Installation & Setup Access based on: Notes ■ Doors ■ Areas 3 Click the appropriate radio button to select an access option. 4 Click Apply. 5 Click OK. Access type options The administration software may provide the following access type options: Areas and access groups: Each cardholder is assigned to access groups that allow access to certain areas.
Chapter 3: First-Time NT500 Offline System Installation & Setup Organization information Notes At installation the application will prompt the user to enter organization information such as name, description, day to define as start of week, time zone, and default card format. Organization information can be added or modified using the following steps. To add organization information 1 From the Welcome Screen, select Set Organization Options or from the main menu select Tools > Options.
Chapter 3: First-Time NT500 Offline System Installation & Setup Creating time and mode profiles Notes Time profile A time profile consists of one or more time periods that can span multiple days. A time profile can be applied to an area, door, cardholder, or access group. A time profile dictates access during certain times (for example, only during office hours). To create a time profile 1 From the Explorer Bar’s Navigator tab, click the Time & Mode Profile icon.
Chapter 3: First-Time NT500 Offline System Installation & Setup Notes 6 The hours of access defined by this time profile can be selected by clicking in the white field next to each weekday label. Then, while holding down the left mouse button, highlight the range of desired times. 7 Click Add. A new time profile icon appears at the top of the screen. Figure 3.11 Creating a time profile To update a time profile 1 Select an existing time profile. The Time Profile window appears.
Chapter 3: First-Time NT500 Offline System Installation & Setup Holiday profile Notes A holiday profile can be assigned to a time profile to limit access during specified dates and times. First, a holiday profile must be defined, then it can be applied to a time profile. To define a holiday profile 1 From the Explorer Bar’s Navigator tab, click the Holiday Profile icon. 2 Click New. The Holiday Profile window appears. Figure 3.
Chapter 3: First-Time NT500 Offline System Installation & Setup Notes 8 Click Add. 9 Repeat steps 5 through 8 for additional holidays to be included in this profile. 10 Click Update when all additional holidays to be included in the profile have been defined. To apply a holiday profile to an existing time profile 1 Select an existing time profile. The Time Profile window appears. 2 Select the Holiday tab. A list of available holiday profiles appears on the left side of the window. Figure 3.
Chapter 3: First-Time NT500 Offline System Installation & Setup To delete a holiday profile Notes 1 Select a holiday profile. The Holiday Profile window appears. 2 Click Delete. 3 Click OK to confirm. The icon for the holiday profile you deleted is no longer displayed in the window. To remove a holiday profile from an existing time profile 1 Select a time profile. The Time Profile window appears. 2 Select the Holiday tab. A check appears next to any holiday profile currently applied to the time profile.
Chapter 3: First-Time NT500 Offline System Installation & Setup Door mode profile Notes When a time profile is applied to a cardholder (or access group) it determines when a cardholder has access through a door. When a mode profile is applied to a door or reader, it determines the door behavior/mode (for example, area armed or disarmed, door open or closed).
Chapter 3: First-Time NT500 Offline System Installation & Setup Figure 3.14 Notes Creating a door mode profile 4 In the Name field, enter a name for the door mode profile. 5 In the Description field, enter a description of the door mode profile. 6 The hours of access defined by this door mode profile can be selected by clicking in the white field next to each weekday label. Then, while holding down the left mouse button, highlight the range of desired times.
Chapter 3: First-Time NT500 Offline System Installation & Setup Creating a reader mode profile Notes Reader modes are used to define the security levels of dual validation readers. Reader mode profiles offer the following mode options: ■ Card (default) ■ PIN only ■ Card or PIN ■ Card and PIN To create a reader mode profile 1 From the Explorer Bar’s Navigator tab click the Time & Mode Profile icon. 2 Click New > Create New Reader Mode Profile. The Reader Mode window appears.
Chapter 3: First-Time NT500 Offline System Installation & Setup Figure 3.15 Notes Creating a reader mode profile Note: Mode options can be specified to require two-card access. In these instances, two cardholders must present cards to the reader in order to gain access. To update a reader mode profile 1 Select an existing reader mode profile. The Reader Mode window appears. 2 Edit the desired fields. 3 Click Update. To delete a reader mode profile 1 Select an existing reader mode profile.
Chapter 3: First-Time NT500 Offline System Installation & Setup Area mode profile Notes Do not create area mode profiles for offline applications. We recommend assigning access based on areas (not doors) and based on groups rather than security levels. This access type is suggested because it allows you to add online functionality later if the needs of your site change. For more information about access types see page 3-13.
Chapter 3: First-Time NT500 Offline System Installation & Setup Figure 3.16 Notes Adding a controller 3 In the Name field, enter a name for the Controller. 4 In the Description field, enter a description of the Controller. 5 Select the controller type from the drop-down list. AC301 and AC512 are the only controllers applicable to an offline system. 6 Click the checkbox next to 4-State Override if this type of monitoring of the controller is used.
Chapter 3: First-Time NT500 Offline System Installation & Setup Notes When a controller is added to the database, icons representing the number of door(s) that the controller can support appears in the door layout view. Downloading the database to the controller can be accomplished via PDA or laptop. For instructions on using a laptop to download the database updates see page 3-40. See the NT500 Transport Guide for detailed instructions regarding use of a PDA and NT500 Transport software.
Chapter 3: First-Time NT500 Offline System Installation & Setup Adding a channel Notes A door channel is the connection between a door and a controller. A channels must be associated with a controller such as the AC301 and AC512 controllers described above. Channels are required and provide a way to organize groups of doors to allow for ease of programming. To add a channel 1 From the Explorer Bar’s Navigator tab, click the Hardware icon. 2 From the main menu click New > Create New Channel.
Chapter 3: First-Time NT500 Offline System Installation & Setup Notes To remove a controller from a channel 1 Right click the controller. 2 Select Unconfigure Controller from the drop-down list. With channels, controllers and their associated door(s) now represented in the access system database, doors can be assigned to specific areas. Doors and the areas they gate are linked in the database through the door details window.
Chapter 3: First-Time NT500 Offline System Installation & Setup To update a channel Notes 1 Select a channel. 2 Update the desired information. 3 Click Update to confirm your changes. To delete a channel 1 Select a channel. 2 Click Delete. 3 Click OK to confirm. The icon for the channel deleted no longer appears in the window. Creating an access group An access group is a way to organize multiple cardholders by granting members of the group access to specific areas.
Chapter 3: First-Time NT500 Offline System Installation & Setup Notes To define additional controller options for an access group 1 Click the Advanced tab. 2 Check the desired options: AC 300/500 Series Controller options ■ Ignore bolted doors ■ Ignore anti-passback ■ Ignore dead bolted doors ■ Ignore 'Two Card Access' mode Note: Bolted mode denies access to all cards presented to the reader.
Chapter 3: First-Time NT500 Offline System Installation & Setup Creating cardholders and operators Notes Cardholders A cardholder is a person who has a card. This could be a member of staff or a visitor. The card allocated to the cardholder is only valid for specified areas and times (e.g. visitors can be prevented from entering the Development area at any time and all areas after a certain date). To add a new cardholder 1 From the Explorer Bar’s Navigator tab, click the Cardholder icon. 2 Select New.
Chapter 3: First-Time NT500 Offline System Installation & Setup Notes Category: The category of the cardholder (selected from a drop-down list). The Customization facilities can be used to create/edit categories. The category determines the format of the ID card. Photo: A photo of the cardholder. The photo can be captured from an image file, Twain device or Video device using the Capture button (see the Using the Capture Utility section).
Chapter 3: First-Time NT500 Offline System Installation & Setup 3 The card number can be manually entered or automatically populated if an office admin kit is being used. 4 Enter the Issue code. 5 On the Cards tab, click Set PIN. 6 Enter a PIN number (up to 9 digits long) and confirm. 7 Click OK. Note: If only PIN numbers will be used for access control, it is important not to duplicate PIN numbers in the database.
Chapter 3: First-Time NT500 Offline System Installation & Setup Notes Selecting 'None' allows access to the selected areas at all times. 4 Click the checkboxes next to the time profiles to specify the areas the time profile applies to. 5 If required, repeat for Profile 2. To assign cardholder access group details 1 Select the Access Groups tab. 2 Select the access group(s) that cardholder belongs to. 3 Select Add on the Property Page. To update a cardholder 1 Select a cardholder.
Chapter 3: First-Time NT500 Offline System Installation & Setup Operators Notes An operator is a cardholder who is allowed to make changes to the database determined by the operator privileges. For example, the receptionist in an organization may be allowed to add cardholders but not controllers or doors. To add an operator 1 From the Explorer Bar’s Navigator tab, click the Operator icon. 2 Select New. The Operator window appears. Figure 3.
Chapter 3: First-Time NT500 Offline System Installation & Setup Notes Expiration Date: The date the operator privileges will be removed from the cardholder if the Password Expired check box is selected (specified by data entry and drop-down calendar). Auto-Logout Delay (minutes): If selected, the operator will be logged out automatically if the system is not used for the specified time (range 1 to 120 minutes, specified by checkbox and data entry or increments).
Chapter 3: First-Time NT500 Offline System Installation & Setup Guard: Alarm Viewer only and no auto-logout. Notes Manager: Read access to all facilities except Operators; plus write access to cardholders and add access to event archiving. Security Manager: Read access to all facilities except Operators, Event Archiving and Audit Trail; plus write access to cardholders, access groups, areas, time/mode profiles, holiday profiles.
Chapter 3: First-Time NT500 Offline System Installation & Setup Notes 3 Select a Privilege Template from the drop-down list: ■ No privileges ■ Guest Administrator ■ Guest ■ Monitor ■ Guard ■ Manager ■ Security Manager ■ Operator ■ Supervisor ■ Installer Note: If specifying an installer or supervisor, system customization is only allowed if installer/supervisor privileges are given to all organizational units. 4 Repeat steps 1 through 6 for each organizational unit (No privilege is the default).
Chapter 3: First-Time NT500 Offline System Installation & Setup To identify and configure a lock To identify and configure a lock the laptop must be connected properly to the lock. The Stanley NT500 Software is used to choose the appropriate controller information to transfer. 1 From the Explorer Bar’s Navigator tab, click the Hardware icon. 2 Under Connected Controllers, highlight the controller you want to configure.
Chapter 3: First-Time NT500 Offline System Installation & Setup Notes A message appears stating, "Please check the connection or wake the controller." d) Swipe a temporary operator card to activate the lock. A message appears stating, "Successfully connected to controller." 5 Click OK. A message appears stating, "Events collection progress (100%)". 6 Click OK. The event history is transferred from the lock.
Chapter 3: First-Time NT500 Offline System Installation & Setup A message appears stating, "Events collection progress (100%)". 6 Click OK. The event history is transferred from the lock to the Stanley NT500 application. To reset the diagnostic code 1 Repeat Steps 1-6 from above (To transfer event history from the lock to Stanley NT500). 2 On the Details tab, click Tasks, then Reset diagnostic code. The diagnostic code is reset and a message appears stating, "Diagnostic code reset for controller.
Chapter 3: First-Time NT500 Offline System Installation & Setup Notes Figure 3.22 Configure Peripherals window 2 Select the Admin Reader tab. 3 Select a communication port from the drop-down list. The port selected should correspond to the port via which the reader is connected to the PC. 4 Select the Click to test checkbox. 5 Present a card to the reader. The card’s code should be displayed on the screen.
Chapter 3: First-Time NT500 Offline System Installation & Setup Viewing events, diagnostic information, and reports Notes Viewing events To view events 1 From the Explorer Bar’s Tools tab, click the Event Log icon. The filter functionality can be used to exclude specific event types from the event log. 2 To utilize the filter, Click the Filter Icon or select Filter from the Tools Toolbar. Figure 3.
Chapter 3: First-Time NT500 Offline System Installation & Setup Notes Firmware Type: The type of firmware in the controller. Different types may provide different features. Board Revision: The revision number of the printed circuit board of the controller. Power Status: The status of the controller's power supply. Battery Status: The status of the controller's battery. Backup Battery Status: The status of the controller's backup battery. Battery Level: The charge on the controller's battery.
Chapter 3: First-Time NT500 Offline System Installation & Setup Figure 3.26 Notes Standard reports list 2 Select a specific report from the options listed. The report details window appears. Figure 3.27 Report details window 3 Select the fields to be included in the report by highlighting the field name, then clicking the > icon. 4 To include all available fields in the report, select the first field in the list, then click the > > icon. 5 Click Save. 6 Name the search.
Chapter 3: First-Time NT500 Offline System Installation & Setup Notes 8 To print the report, click Print. To print a saved report 1 Click the Explorer Bar’s Reports tab. 2 Select a specific report from the options listed. A report preview appears. 3 Click Print.
Chapter 3: First-Time NT500 Offline System Installation & Setup Database backup and restoration Notes To backup the database 1 From the Explorer Bar’s Tools tab, click the Database Backup icon. The Backup window appears. Figure 3.28 Database backup window 2 Click the … icon to navigate to the desired destination for the database backup. 3 In the Filename field, enter a name for the backup file. 4 Click Save. 5 Click Backup.
Chapter 3: First-Time NT500 Offline System Installation & Setup Notes To obtain a fingerprint from the NT500 System software sever 1 From the main menu click Tools > Upgrade License. The license key window appears and the fingerprint is listed. 2 Record the fingerprint number and provide this information along with the license type needed (NT520, NT540, or NT550) to Tech Support. You may locate the representative nearest you by visiting us on the web at www.stanleysecuritysolutions.com.
A p p e n d i x A Glossary of Terms A–1
Appendix A: Glossary of Terms Notes Terms access group A way to organize multiple cardholders by granting members of the group access to specific areas. The access may be restricted by use of mode profiles. access level An access control relationship made between a reader or readers and a time profile or time profiles. An access level is assigned to a card for the purpose of granting access through a reader or readers during a specified time.
Appendix A: Glossary of Terms chassis type coercivity communication port The designation that defines the physical lock type. Three types exist: cylindrical, mortise, or exit hardware. See those terms for more information. The degree of magnetic force needed to encode a magnetic stripe card. The connector on the bottom of the NT500 Lock that allows the lock to be connected to a PDA running NT500 Transport.
Appendix A: Glossary of Terms Notes issue code Part of the access control information contained on a card that allows reuse of the card ID when a card is lost, damaged, or stolen. Usually one or two digits in length, this code increments forward when creating a new card. Access is granted only when the card ID and the issue code match the current database information.
Appendix A: Glossary of Terms security level A security level can be assigned to a card to determine which doors it can open or areas it can access. A door or area is also assigned a security level and the security level of the card must be equal to, or greater than the security level of the door or area to allow access. time interval A specific range of time, which corresponds to a particular day or days of the week. A time profile can be comprised of several, individual intervals.