Mini-high Speed Dome Installation and Operation Manual PDF created with pdfFactory Pro trial version www.pdffactory.
TABLE OF CONTENT 1.Precaution----------------------- -- --------------- ------------------------------------------------ 1 2.Performance & Feature--------------------------------- - ------- - -------------------------------2 2.1 Dome parameter--------------- ------------------------------- ------ ----- -----------------2 2.2 Camera parameter----------- ------------------------------------- ------------------------2 2.
7. Privacy zone masking---------------------------------------------------------------------------29 8. Installation instruction-------------------------------------------------------------------------30 8.1 Dimension of product--------------------------------------------------------------------- 30 8.2 Installation of product---------------------------------------------------------------------30 8.3 Installation of camera----------------------------------------------------------------------31 9.
Precaution 1、 Precaution Please read the manual and product label carefully before installing the speed dome. Ø Law 1.The product installation and use of the product must comply with the relevant laws of the country. Ø Electrical safety 1.Strictly conform to country and local electrical safety standard when using or installing the product. 2.Using factory's power adapter. This dome uses DC12V/1500MA DC power supply. About the rated inputting voltage, please refer to power label. Ø Transportation 1.
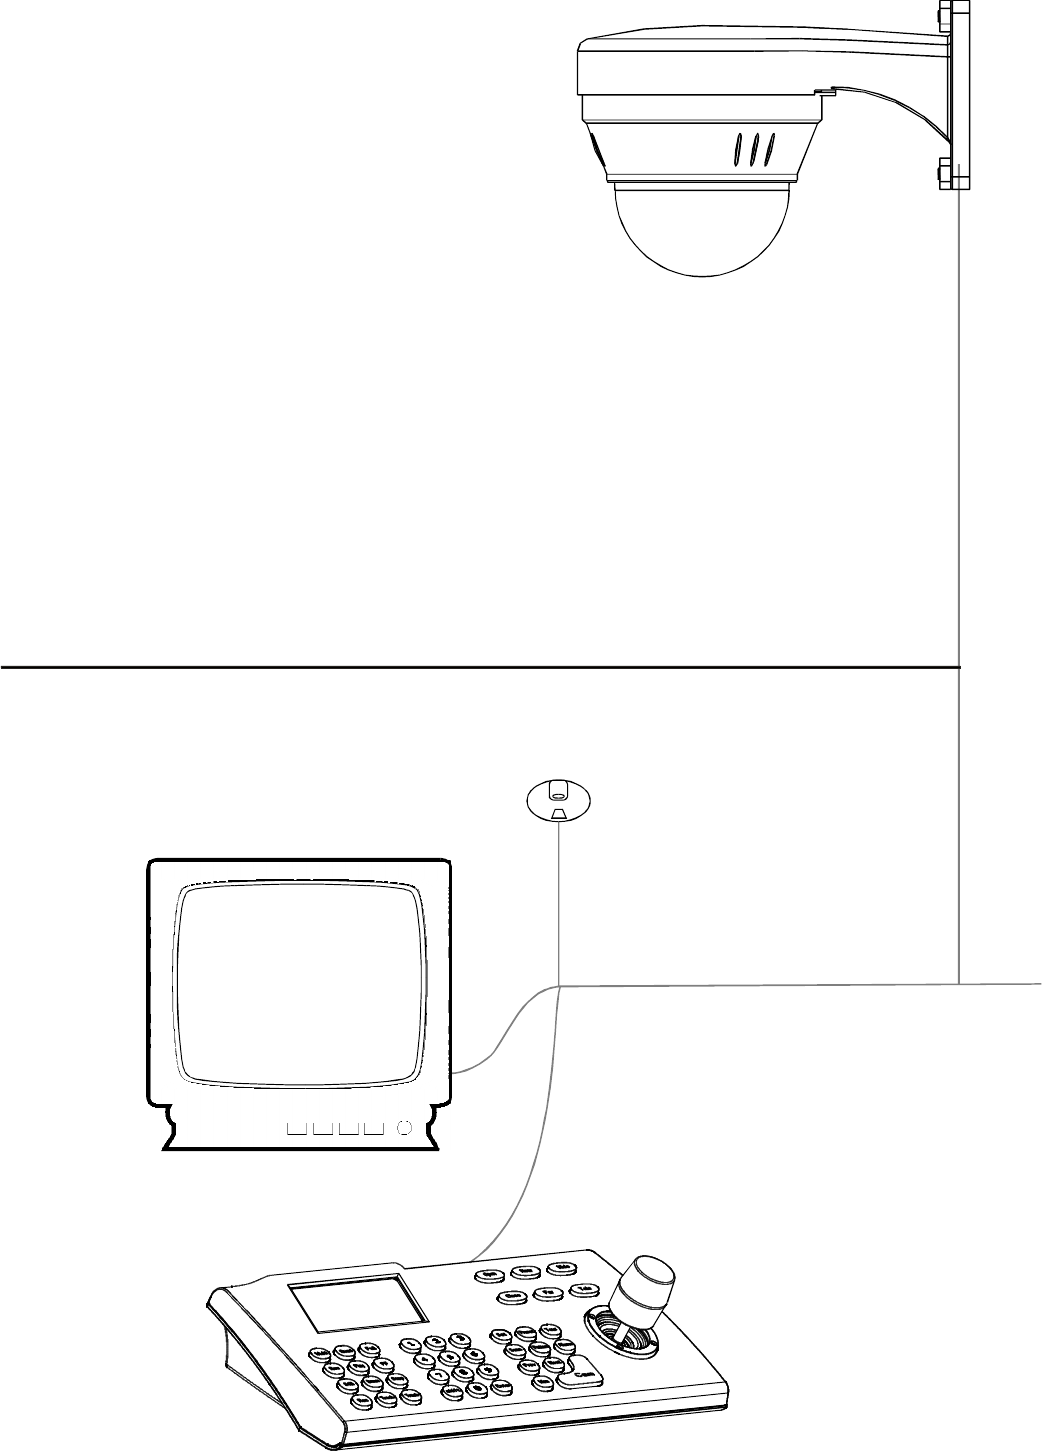
Installation instruction 2. Installation of product 1.2 Item no corresponding sheet P i c t u re M ou nt P l a ce C eil i ng I n door on ly W a ll I n d o or a nd ou t door 1 Get the products out from the packages. As Picture 2.1-1 1.3 details of relevant parts 1 2 3 # 2. 1 -1 4 5 1.wall bracke t 2.base board 3.power cable 4.spee d dome 5.transparent cover # 1-1 2 Drill holes and fix base board on the ceiling floor by using of 3 M4 bolts.(Like picture 8.2-2) 2. Installation instruction 2.
Installation instruction 3. Insert three screws in the mini dome into the apertures on the base board(pls refer to ), then turn 15 degrees in clockwise(pls refer to! ). 2.2 1. Dimension of product as picture below 249 ! # 2 . 1 -3 Picture2.2 4 . Using 3 additional M3*5 screws to lock tightly. 2. Installation of product 1 Get the products out from the packages. As picture 2.1-1 # 2. 1 -4 5. Connect the power cable, video cable and Rs485control-cable. As the picture below.
Installation instruction 2、Make the wall bracket as the model on installation wall, and draw the central position of the drill hole. (As picture 2.2-2) 75.00 Picture2.2-4 5、Pls make the wall bracket aims at the M8 screw, so that the output cable will be locked in the hole of motherboard bracket, and use the M8 screw to lock the wall bracket tightly. As picture 2.2-5. Picture2.
Dome performance 4.Dome performance 4. 1 Dome parameter Setting Power supply Power supply DC12V Baudrate(RS485) Cosumption 9W Communication Protocol 360° 0-255 Physical Built-in Pan rotation Pelco-D、Pelco-P、Factory ID setting Operational Decoder 2400/4800/9600/19200bps Operation temperature -10℃ — +50℃ Tilt rotation Tilt90°,with auto-flip Environmental humidity 0—95%(no condensation) Rotation speed Pan1°- 200°/S Tilt1°-150°/S Mount way Wall mount/Ceiling Preset 128 Weight N: 1.
Dome performance 3.3 Dome performance and features This product is high-technology surveillance product with high definition and color camera, variable-speed pan/tilt and multifunction decoder. It can reduce the connection and installation process between systematic parts at a max limit, and also can improve the stability and reliability of the system.
Function instruction 4.Function in structure This passage mainly describes the main function and general principle of integrated speed dome, and does not refer to the concrete operation methods. Different system platform has different operation methods, generally we should according to the system manufactory's operation manual. Please contact dealer to get necessary information, under some conditions there are have some particular requirements and operations. 4.
Function instruction Ø Iris control System defaults Auto Iris. Camera can rapidly adjust size of Iris, through the automaticly induct the changing of environment ray, and thus make the brightness of deferent image stable. User may adjust Iris by controller keyboard “open/close” to get required brightness that you need. User also can resume auto Iris by joystick operation.
System setting 5.System setting 5. 1 Basic operation 5. 1.
System setting MAIN MENU SYST EM SE TTIN G C AMERA SE TTI NG 5. 2 Edit dome label When using a lot of systems of the dome , in order to identify to each dome, the systems support title setting. The setting ways as follow: FUNC TIO N S ETT ING W IND OW BLANK ING EXIT 1、The system enters into the main menu by calling 95 preset or by calling 9 preset twice within 3 seconds. 2、Moving joystick to 【SYSTEM SETTING】press【OPEN】to enter the next menu.
System setting MAIN MENU 5. 3 Display initial information SYSTEM SETTIN G 1.The system enters into the main menu by calling 95 preset or by calling C AMERA SE TTI NG 9 preset twice within 3 seconds. FUNCTIO N S ETTING W IND OW BLANK ING 2、Tilt up/down joystick to 【SYSTEM SETTING】, press 【OPEN】 EXIT to enter submenu. 3、Tilt up/down joystick to【INITIAL INFO】, press 【OPEN】to display initial information, which as below the left picture shows.
System setting MAIN MENU 5. 4 Display setup 1.The system enters into the main menu by calling 95 preset or by calling SYST EM SETTIN G C AMERA SE TTING FUNC TIO N S ETT ING W IND OW BLANK ING EXIT 9 preset twice within 3 seconds. 2、Tilt up/down joystick to【SYSTEM SETTING】,press【OPEN】to enter submenu.
System setting 5. 5 Systematic motion control MAIN MENU Systematic motion controlling may control a series of motions of the SYST EM SE TTIN G dome, and plays an important role in controlling the image of the dome. C AMERA SE TTI NG FUNC TIO N S ETT ING W IND OW BLANK ING 1.The system enters into the main menu by calling 95 preset or by calling EXIT 9 preset twice within 3 seconds. 2、Tilt up/down joystick to 【SYSTEM SETTING】,press【OPEN】 to enter submenu.
System setting 6. 5. 3 Park action MOTION AUTO FLIP ON PROPORTION PAN ON PARK TIME 005 PARK ACTION SCAN POWER UP ACTION AUTO FAN ENABLED 040 BACK EXIT MOTION AUTO FLIP ON PROPORTION PAN ON PARK TIME 005 PARK ACTION SCAN POWER UP ACTION AUTO FAN ENABLED BACK EXIT 040 This setting allows the dome to run an appointed action after it enters vacancy for a few time (1-240minutes). If default sets as 0, it means not to run this action.
System setting MAIN MENU 6. 6 Clear 1.The system enters into the main menu by calling 95 preset or by calling SYST EM SETTIN G C AMERA SE TTI NG 9 preset twice within 3 seconds. FUNC TIO N S ETT ING W IND OW BLANK ING 2、Tilt up/down joystick to【SYSTEM SETTING】 ,press EXIT 【OPEN】to enter submenu. 3、Tilt up/down joystick to 【CLEAR】, press【OPEN】to enter submenu, as left picture shows.
System setting MAIN MENU 6. 7 Password Setting Password setting is the built-in function of high speed dome, By SYST EM SETTIN G C AMERA SE TTI NG setting password (6 bits) it is very useful to protect the dome setting, FUNC TIO N S ETT ING if no password, you can't enter the setting menu. the initial password W IND OW BLANK ING of the dome is "000000". EXIT 1.The system enters into the main menu by calling 95 preset or by calling 9 preset twice within 3 seconds. 2.
System setting MAIN MENU 6. 8 Date and clock setting 1.The system enters into the main menu by calling 95 preset or by calling SYST EM SETTING CAMERA SETTI NG 9 preset twice within 3 seconds. FUNCTION S ETTING WIND OW BLANKING 2.move the cursor to【System setting】by up and down the joystick, EXIT press【OPEN】to enter into the next menu 3.move the cursor to【Clock setting】by up and down the joystick.
System setting MAIN MENU SYST EM SETTIN G C AMERA SE TTI NG FUNC TIO N S ETT ING 6. 9 Setup Dome parameter 1.The system enters into the main menu by calling 95 preset or by calling 9 preset twice within 3 seconds. W IND OW BLANK ING 2.Moving joystick up and down to move the cursor to 【SYSTEM EXIT SETTING】, and pressing 【OPEN】to enter into the next menu. 3.Moving joystick up and down to move the cursor to 【COMM SETTING】, and pressing 【OPEN】to enter into Dome parameter setup menu.
Camera setting MAIN MENU SYSTEM SE TTIN G 7. Camera setting 7. 1 Zoom speed C AM ERA SE TTING 1.The system enters into the main menu by calling 95 preset or by calling FUNCTIO N SETTING 9 preset twice within 3 seconds. WINDOW BLANK ING EXIT 2、Tilt up/down joystick to【CAMERA SETTING】 , press 【OPEN】to enter submenu.
Camera setting 7. 2 Digital zoom control MAIN MENU 1.The system enters into the main menu by calling 95 preset or by calling SYST EM SE TTIN G 9 preset twice within 3 seconds. C AMERA SE TTI NG FUNC TIO N S ETT ING W IND OW BLANK ING 2、Tilt up/down joystick to 【CAMERA SETTING】, press 【OPEN】 to EXIT enter camera setting.
Camera setting MAIN MENU 7. 3 Back light compensation 1.The system enters into the main menu by calling 95 preset or by calling SYST EM SE TTIN G 9 preset twice within 3 seconds. C AMERA SE TTI NG FUNC TIO N S ETT ING W IND OW BLANK ING 2、Operate joystick, move the cursor to 【CAMERA SETTING】 to enter EXIT submenu.
Camera setting 7. 4 Slow shutter control MAIN MENU 1.The system enters into the main menu by calling 95 preset or by calling SYSTEM SETTIN G 9 preset twice within 3 seconds. C AMERA SE TTING FUNCTIO N SETTING W INDOW BLANK ING 2、Operate joystick, move the cursor to【CAMERA SETTING】 to enter EXIT submenu.
Camera setting MAIN MENU 7. 5 IR cut filter 1、The system enters into the main menu by calling 95 preset or by SYST EM SE TTIN G calling 9 preset twice within 3 seconds. C AMERA SE TTI NG FUNC TIO N S ETT ING W IND OW BLANK ING EXIT 2、Operate joystick, move the cursor to 【CAMERA SETTING】 to enter submenu.
Camera setting 7. 6 Advance setting MAIN MENU SYST EM SE TTIN G 1、The system enters into the main menu by calling 95 preset or by calling 9 preset twice within 3 seconds. C AM ERA SE TTI NG FUNC TIO N S ETT ING W IND OW BLANK ING 2、Operate joystick, move the cursor to 【CAMERA SETTING】 to enter submenu. EXIT 3、Operate joystick, move the cursor to 【ADVANCE SETTING 】; press 【OPEN】 to enter submenu, as left picture shows; 5. 6 .
Camera setting 7. 6. 2 White balance mode MAIN MENU System supports 【AUTO】 、indoor mode 【INDOOR】 、outdoor SYST EM SE TTIN G mode 【OUTDOOR】 、auto track mode 【ATW】 、single mode 【OPW 】 、 C AMERA SE TTI NG 【OPT】 mode、manual mode 【MANUAL】 and kinds of white balance FUNC TIO N S ETT ING W IND OW BLANK ING modes, etc. Detail setting as follow: 1、The system enters into the main menu by calling 95 preset or by calling EXIT 9 preset twice within 3 seconds.
Function instruction MAIN MENU 8. Function setting 8. 1 Preset setting SYST EM SE TTIN G C AM ERA SE TTI NG 1.The system enters into the main menu by calling 95 preset or by calling FUNC TIO N S ETT ING 9 preset twice within 3 seconds.
Function instruction 8. 2 Scan MAIN MENU SYST EM SETTIN G C AMERA SE TTI NG FUNC TIO N S ETT ING W IND OW BLANK ING EXIT FUNCTION SETTING PRESETS SCAN PAT TERNS TOUR ZONES TIM E RUNN ING BACK EXI T Scan is that pre-set two points , then the camera repeatedly scan between the two points at a stable speed, the same magnification and pan . A dome only has one scan tour. 1.The system enters into the main menu by calling 95 preset or by calling 9 preset twice within 3 seconds.
Function instruction 8. 3 Pattern MAIN MENU SYSTEM SE TTING Pattern is built-in function in camera; the speed dome can record tracks that are no less than 180s. (A series of pan/tilt controlling and CAM ERA SETTI NG lens controlling command). A dome may set up to 4 pattern tours. FUNCTION SETTING 1.The system enters into the main menu by calling 95 preset or by calling WINDOW BLANKING 9 preset twice within 3 seconds.
Function instruction 8. 4 MAIN MENU SYST EM SETTIN G Tour Tour is the built-in function in the speed dome, it will arrange the presets into the queue of auto-tour, and can set how long it will park C AMERA SE TTING at preset. Operate auto-tour is a process of incessantly transfer each FUNC TIO N S ETT ING preset. One tour can store 32 presets at most. W IND OW BLA NK ING 1.The system enters into the main menu by calling 95 preset or by calling EXIT 9 preset twice within 3 seconds.
Function instruction 8. 5 MAIN MENU Zone setting A dome may be set up to 8 zones; the regional scene can't be SYST EM SE TTIN G overlapped. User will set label for each zone. When setting【ZONE C AM ERA SE TTI NG LABEL】 as ON, the dome will display zone label as it runs some zone. FUNC TIO N S ETT ING W IND OW BLANK ING It is convenient to know the zone that the camera shoots by setting zone EXIT label. 1.
Function instruction 8. 6 Tour Time Setting MAIN MENU SYST EM SE TTIN G C AM ERA SE TTI NG 1.The system enters into the main menu by calling 95 preset or by calling 9 preset twice within 3 seconds. FUNC TIO N S ETT ING W IND OW BLANK ING EXIT 2.Operate joystick, move the cursor to【FUNCTION SETTING】, press 【OPEN】to call the submenu. 3.
Privacy zone masking 9、Privacy zone masking MAIN MENU Privacy function can show someone piece of regional shielding while protecting. For example, protect the window of bedroom or ATM of bank. A dome can set up to 24 privacy windows.(Masking setting function is relative with the model of camera module. The masking numbers will be different according to the different cameras.
Appendix 10. Appendix 10.
Appendix 10.
Appendix A+ 10. 4 Rs485Bus basic knowledge B- D A+ Ø Characteristics of Rs485 Bus As specified by Rs485 standard, Rs485 Bus is B- 120Ω 1# 120Ω 2# 3# 4# 32# of half-duplexed data transmission cables with Pict ure10-4.2 characteristic impedance as 120Ω.
Appendix Ø Problems in practical connection In some circumstances user adopts a star configuration in practical connection. The termination resistors must be connected to the two equipment 1# and 5# in picture 10-4.4. As the star configuration is not in conformity with the requirements of Rs485 standards, problems such as signal reflections, lower antiinterference performance arise when the cables are long in the connection.
Maintenance 7.Maintenance service terms 1.Range of warranty ● The product will be maintained free for one year. ● The product will be obtained the free maintenance service if the same malfunction appears again within three months. ● Malfunction of products caused by force majeure (such as war, earthquake, lightning strike and so on ), abuse, non-standard operation, change of construction, non-normal wear or accident are non-free of warranty.
Shortcut list for some Functions: Call preset 92 to save Left Limit (Scan) Call preset 93 to save Right Limit (Scan) Call preset 99 or 97 to Run Scan Call Preset 94 to restart the Camera Call Preset 98 to Run Tour.