Model SLW-164 Weatherproof Wi-Fi Color Camera w/ IR Owner’s Manual 15540 Herriman Blvd. Noblesville, IN 46060 - www.security-labs.
Contents Features …………………………………………………………… 3 Contents & Setup ………………………………………………… 4 Network Configuration …………………………………………… 7 Wifi Setup …………………………………………………………. 8 Additional Settings ……………………………………………..… 9 Factory Settings Restoration …………………………………... 13 Adding Cameras ………………………………………………… 14 DDNS ……………………………………………….…………….. 16 Email Settings ……………………………………………………. 17 FTP Settings ………………………………………………………18 Motion Detection ………………………………………………….
PLEASE NOTE BEFORE YOU BEGIN Make sure you only use the included power supply (Output: 5.0 VDC, 1.5A) connected to an indoor outlet. Do not attempt to open the case. There are no user serviceable parts inside. Do not aim the camera at the sun or similar intense light. The time allowed to power the camera on and off (reboot) should be a minimum of 10 seconds.
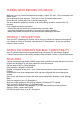
PACKAGE CONTENTS: 1) IR Bullet Camera 2) 3.5” Adjustable Antenna 3) Power Supply 4) Swivel Bracket & Mounting Hardware 5) LAN Cable 6) CD with Manual Glossary of terms: LAN – Local Area Network WAN – Wide Area Network (Internet) ISP – Internet Service Provider ADSL (or DSL) – Asymmetric Digital Subscriber Line DHCP – Dynamic Host Configuration Protocol DNS- Domain Name System (supplied by your ISP) DDNS – Dynamic Domain Name System DMZ – An unprotected zone outside of your firewall BASIC CAMERA SETUP 1.
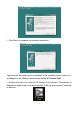
6. Click Next, to complete the software installation. The computer will restart upon completion of the installation and a new icon will appear on the desktop automatically called 'IP Camera Tool'. 7. Double click the icon to start the IP Camera Tool software. The software is designed to search the Local Area Network (LAN) for any similar IP cameras or devices.
After searching, the software will give one of 3 results: 1) Connected IP cameras are located on the LAN - All similar IP cameras will be displayed in the result field as shown below. 2) No IP Camera found within LAN - After a one minute search, the result field will show “Not Found - IP Server” and the software application will shut down automatically. Check your network connection cable to the camera and confirm the camera has power.
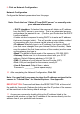
9. Click on Network Configuration Network Configuration Configure the Network parameters from this page. Note: Check the box “Obtain IP from DHCP server” or manually enter your address information. • DHCP checkbox: If checked, the camera will obtain an IP address from the DHCP server in your router. This is an automated process and perhaps the easiest to use. (Confirm your Router has the DHCP function enabled). A better solution compared to using DHCP is to enter an IP address that never changes (static).
9. The Camera Login page will pop up. Enter your account and password on the login page. By default, the administrator's username is: admin, leave the password box blank Click the 'Sign in' button as shown below: Note: If you are using a PC, follow the top link for IE Browsers. This will activate ActiveX which allows access to additional functions of the user interface. If you are a Mac or Firefox user, you can view the camera via the second link, Server Push Mode.
4. Click on 5. Click next to Wireless Network List. 6. Click on your network name (SSID) that appears in the scan box. 7. Confirm the Network Type and Encryption used are correct. 8. Enter your network password or share key. 9. Click , and return to . You may remove the LAN cable at this time, and place the camera at its intended location.
Camera(s) that are in the process of sending a Motion Alarm flash as a red icon. For Visitor If more than one camera has been added to the Multi-Device Menu in the ActiveX mode (Internet Explorer), you can view multiple cameras using the Internet Explorer web browser. Select the icons according to the view preferred; Full Screen , Quad, or 3 x 3. Multiple camera views are best accomplished with the included CMS software.
one function (listen or speak) at a time for best results. A feedback loop can be created by leaving both icons turned ON at the same time (audio functions are available for the indoor Model 163 PAN/Tilt camera only). Clicking the movie camera icon will start the process of saving live action video to your PC. The first click will bring up the “Save As” window where you can select the destination folder for your videos. The second click on the icon will stop the recording process. All videos are stored as .
number from the drop list, and click on “Go”. Resolution Select either VGA (640x480) for a better picture, or QVGA (320x240) for faster transmission or less storage space required for recordings.. Mode Select either 50Hz, 60Hz (USA indoors), or Outdoor to properly sync your camera to the lighting of the camera’s view. Brightness and Contrast parameters Click the + or - icons to adjust the brightness and contrast of the camera image. Default All Click to return the settings to the factory defaults.
User Settings - You can configure up to 8 user names and passwords and the permission level of each user as; Administrator, Operator or Visitor. Visitor: In this mode, you can view, create local recordings, snapshots, and control audio. Operator: You can control the image setting of the IP Camera, set visitor & PTZ controls. Administrator: You can setup advanced configurations of the IP Camera.
To add cameras on the LAN Click 'The 2nd Device' and double click the IP camera from the 'Device List in LAN'. The Alias Host and HTTP Port will fill in automatically. Enter the correct User Name and Password then click 'Add'. More cameras can be listed in the same way. Click “SUBMIT” at the bottom of the page when finished.
HTTP Port - In most cases, you can leave this value as 81, however, if your Internet Service Provider blocks this port, you may have to switch to another port number such as 8005. Wireless LAN Settings Enter the wireless settings page of the Wireless Router to find out the SSID, Channel, Encryption and Authentication details. This camera supports WEP and WAP security encryption.
ADSL Settings When connecting to the Internet via ADSL, enter the ADSL username and password obtained from your ISP. DDNS Service Settings If a static IP address (one that never changes) is not readily available from your ISP, a DDNS service can be used to provide an address for your camera that will remain the same, making it easier for you to contact your camera via the internet. The system supports protocols from some DDNS providers such as dyndns.org.
Mail Service Settings Configure the Email addresses that will receive and send e-mails after a motion detection alarm. Sender – Enter the e-mail addresses to be used for the sender.
Receiver – Enter up to four receiver e-mail address SMTP Server - The SMTP server for the sender mailbox. Need Authentication - Check the box if the email needs authentication then input the SMTP User Name & Password. Mail test: Set the Mail parameters then click 'Submit' first before sending a test email. “Success” will be the response on your screen if the e-mail parameters have been entered correctly. Report Internet IP by Mail – Sends an e-mail when the camera is powered up or the IP address is changed.
Alarm Service Settings (Motion Detection) Enter the Alarm Service Settings page to configure the Motion Detection function. When you enable motion detection, the camera can be triggered to send email alerts and upload images. Motion Detection Sensitivity - You can choose a level from 1 to 10. The most sensitive is 10. Send Mail on Alarm- Sends picture & mail information to the set Email address after a motion alarm is triggered.
ACCESSING YOUR WIFI CAMERA Via LAN (Local Area Network) Four ways: 1. Click on the shortcut on your computer to run the IP Camera Tool, then click on the camera listed that you wish to view. -or2. Enter the local IP address of the camera into the address bar of your preferred browser. -or3. Add the camera to the Multiple Device Settings in ActiveX Mode (Internet Explorer). -or4. Add the Local IP address to, and run the CMS software. Via Internet – WAN (Wide Area Network) Four ways: 1.
Via a Mobile Device (Smartphone) View your IP camera using your mobile device’s web browser. Enter the LAN IP and port number you assigned to the camera if you are within the range of your wireless router. Enter the WAN IP and port number into the address bar if you are trying to view your camera via the internet. After logging in with your User Name and Password (default User = admin, Password = (empty), sign in using the Server Push Mode button.
Port Numbers If you are running any firewall software, make sure it's allowing inbound connections to port 81. Also, if you are using a Cable or DSL router, make sure you've set up port forwarding properly (consult your router's documentation for more information). It is also possible that your ISP is blocking inbound connections to port 81. Many ISPs have done this because of internet worms such as Code Red.
UPnP (Universal Plug ‘n Play) option on your router and on the camera’s UPnP Settings Menu. C. If your router has a Virtual Map Function, add the camera’s IP address and port number to the Virtual Map List. Internet Explorer Security Settings If you see a message that Internet Explorer is blocking an ActiveX control, you will need to check your browser setup by following the procedure: a. Open Internet Explorer under “Tools”, select “Internet Options”.
Click the options as shown below: 24
Click ‘OK’ Further permission can be granted by clicking on Trusted Sites on the Security Page, and adding the IP address of the camera to the Trusted Sites list. Trusted sites can have their own set of security settings that are much less restrictive to ActiveX and other common internet threats.
SPECIFICATIONS MODEL 164 Wi-Fi Bullet Camera Image sensor 1/4 CMOS Lens Standard CS-mount 6MM Pixels Camera 300000 Infrared LEDs 18 LEDs Night Vision Up to 40’ for reflective objects AWS/AGC/AES Auto Minimum 0.01 Lux, 0 Lux S/N ratio ≥50dB Video compression Video MJPEG dual compression Stream type HTTP;RTP;RTCP;3GPP; Max.
Security Labs Limited Product Warranty Wireless IP Camera: ONE YEAR PARTS AND LABOR Should this product proves to be defective in material or workmanship under normal usage, we will provide without charge to the consumer, parts and/or labor necessary to remedy the defect for the period of ONE YEAR from the date of purchase. The warranty period commences on the date that the product is purchased by the consumer. Any implied warranty is also limited to the duration above.