Model SLW-163 Wireless Pan & Tilt IP Camera w/ IR Owner’s Manual 15540 Herriman Blvd. Noblesville, IN 46060 - www.security-labs.
PLEASE NOTE BEFORE YOU BEGIN This camera is designed for indoor use only. Make sure you only use the included power supply (Output: 5.0 VDC, 1.5A). Do not attempt to open the case. There are no user serviceable parts inside. Do not aim the camera at the sun or similar intense light. The time allowed to power the camera on and off (reboot) should be a minimum of 10 seconds.
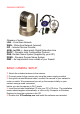
PACKAGE CONTENTS Glossary of terms: LAN – Local Area Network WAN – Wide Area Network (Internet) ISP – Internet Service Provider ADSL (or DSL) – Asymmetric Digital Subscriber Line DHCP – Dynamic Host Configuration Protocol DNS- Domain Name System (supplied by your ISP) DDNS – Dynamic Domain Name System DMZ – An unprotected zone outside of your firewall BASIC CAMERA SETUP 1. Attach the included antenna to the camera. 2. Connect power to the camera only using the power supply provided. 3.
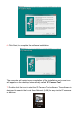
6. Click Next, to complete the software installation. The computer will restart upon completion of the installation and a new icon will appear on the desktop automatically called 'IP Camera Tool'. 7. Double click the icon to start the IP Camera Tool software. The software is designed to search the Local Area Network (LAN) for any similar IP cameras or devices.
After searching, the software will give one of 3 results: 1) Connected IP cameras are located on the LAN - All similar IP cameras will be displayed in the result field as shown below. 2) No IP Camera found within LAN - After a one minute search, the result field will show “Not Found - IP Server” and the software application will shut down automatically. Check your network connection cable to the camera and confirm the camera has power.
9. Click on Network Configuration Network Configuration Configure the Network parameters from this page. Note: Check the box “Obtain IP from DHCP server” or manually enter your address information. • DHCP checkbox: If checked, the camera will obtain an IP address from the DHCP server in your router. This is an automated process and perhaps the easiest to use. (Confirm your Router has the DHCP function enabled). A better solution compared to using DHCP is to enter an IP address that never changes (static).
Click the 'Sign in' button as shown below: Note: If you are using a PC, follow the top link for IE Browsers. This will activate ActiveX which allows access to additional functions of the user interface. If you are a Mac or Firefox user, you can view the camera via the second link, Server Push Mode. Server Push Mode offers a few less controls than ActiveX mode, but has proven to be more stable on some PCs. WiFi ACTIVATION Please complete the basic camera setup procedure before activating the WiFi feature.
7. Confirm the Network Type and Encryption used are correct. 8. Enter your network password or share key. 9. Click , and return to . You may remove the LAN cable at this time, and place the camera at its intended location. Please confirm WiFi transmission from the location of the camera before installing the accessory mounting bracket.
Select the icons according to the view preferred; Full Screen , Quad, or 3 x 3. Add timestamp on record When checked, a time/date stamp will be added in the bottom right corner of recorded videos. OSD (On Screen Display) Displays the date and time on live video. You can also choose the color of the OSD text. Audio buffer (Model 163 Pan/Tilt only) The audio buffer allows you to synchronize the audio with the video to best match your internet connection ‘s capabilities.
• Vista's Security level is higher than Windows XP/2000. For the 'Set Record Path' function, you will need to add the add the Device IP address to IE's 'Trusted sites' first. To do this go to: Tools > Internet Properties > Security >Trusted sites > Sites > Add. In Vista, there is a prompt to add Trusted sites when the Set Record/ Alarm Record path is clicked. • You cannot set the Windows System Root Directory as you will do for the Record/Alarm Record Path. This prompt only pops-up in Vista.
For Administrator When you login as an Administrator, the 'For Administrator' functions are enabled. Device Info - You can find information about the camera such as the Device ID, Firmware Version and Embeded Web UI (User Interface) Version. Note: Always click “Submit” at the bottom of any settings page to upload and store your changes to the camera. Alias Settings - You can change the name of your IP camera. Data & Time Settings - Set the time and date.
via the internet. Upgrade Device Firmware - If directed by our customer service technician, you can upgrade the camera's Firmware and device embedded web UI (User Interface) software on this page. Restore Factory Settings - Restore factory settings of the device. Reboot Device - Reboot the device. Multi-Device Settings Using Internet Explorer (ActiveX Mode) in the Multi Device Settings page, you can see all similar cameras found on your LAN. The '1st Device' is the default IP camera.
http://ipcamera.dyndns.org:9008). 9008 being the port number forwarded in the router at the location (LAN) of the camera. Enter in the Host box: 202.96.133.134, Http Port box:9008 or Host: ipcamera.dyndns.org, Http Port: :9008. Enter the correct User Name and Password then click 'Add'. More cameras can be listed in the same way.
ADSL Settings When connecting to the Internet via ADSL, enter the ADSL username and password obtained from your ISP. DDNS Service Settings If a static IP address (one that never changes) is not readily available from your ISP, a DDNS service can be used to provide an address for your camera that will remain the same, making it easier for you to contact your camera via the internet. The system supports protocols from some DDNS providers such as dyndns.org.
Mail Service Settings Configure the Email addresses that will receive and send mails after a motion detection alarm. Sender – Enter the e-mail address to be used for the sender. Receiver – Enter up to four receiver e-mail address SMTP Server - The SMTP server for the sender mailbox.
Need Authentication - Check the box if the email needs authentication then input the SMTP User Name & Password. Mail test: Set the Mail parameters then click 'Submit' first before sending a test email. “Success” will be the response on your screen if the e-mail parameters have been entered correctly. Report Internet IP by Mail – Sends an e-mail when the camera is powered up or the IP address is changed.
function. When you enable motion detection, the camera can be triggered to send email alerts and upload images. Motion Detection Sensitivity - You can choose a level from 1 to 10. The most sensitive is 10. Send Mail on Alarm- Sends picture & mail information to the set Email address after a motion alarm is triggered. Upload Image on Alarm - Enable this function to upload an image after a motion alarm.
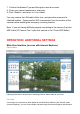
ACCESSING YOUR WIFI CAMERA Via LAN (Local Area Network) Four ways: 1. Click on the shortcut on your computer to run the IP Camera Tool, then click on the camera listed that you wish to view. -or2. Enter the local IP address of the camera into the address bar of your preferred browser. -or3. Add the camera to the Multiple Device Settings in ActiveX Mode (Internet Explorer). -or4. Add the Local IP address to, and run the CMS software. Via Internet – WAN (Wide Area Network) Four ways: 1.
Via a Mobile Device (Smartphone) View your IP camera using your mobile device’s web browser. Enter the LAN IP and port number you assigned to the camera if you are within the range of your wireless router. Enter the WAN IP and port number into the address bar if you are trying to view your camera via the internet. After logging in with your User Name and Password (default User = admin, Password = (empty), sign in using the Server Push Mode button.
Port Numbers If you are running any firewall software, make sure it's allowing inbound connections to port 81. Also, if you are using a Cable or DSL router, make sure you've set up port forwarding properly (consult your router's documentation for more information). It is also possible that your ISP is blocking inbound connections to port 81. Many ISPs have done this because of internet worms such as Code Red.
C. If your router has a Virtual Map Function, add the camera’s IP address and port number to the Virtual Map List. Internet Explorer Security Settings If you see a message that Internet Explorer is blocking an ActiveX control, you will need to check your browser setup by following the procedure: a. Open Internet Explorer under “Tools”, select “Internet Options”.
Click the options as shown below:
Click ‘OK’ Further permission can be granted by clicking on Trusted Sites on the Security Page, and adding the IP address of the camera to the Trusted Sites list. Trusted sites can have their own set of security settings that are much less restrictive to ActiveX and other common internet threats.
Security Labs Limited Product Warranty Wireless IP Camera: ONE YEAR PARTS AND LABOR Should this product proves to be defective in material or workmanship under normal usage, we will provide without charge to the consumer, parts and/or labor necessary to remedy the defect for the period of ONE YEAR from the date of purchase. The warranty period commences on the date that the product is purchased by the consumer. Any implied warranty is also limited to the duration above.