
Installation guide


20 LCD Keypad Installation Guide
LCD Keypad Installation Guide 21
User’s Guide
This User’s Guide covers 7063/7063A, 7073/7073A/7163/7173, and 693/793
keypads and contains three different sections: Keypad Arming and Disarming,
Keypad Door Strike, and Keypad Entry Delay. All of the examples displayed
assume that CLOSING CODE is YES in panel programming.
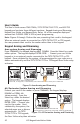
Note: Figures 9 through 12 show the user presenting their card to the keypad.
When an external reader is connected to a 7073/7073A/7173 or 793 keypad,
the user presents their card to the reader rather than to the keypad.
Keypad Arming and Disarming
Area system Arming and Disarming
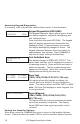
Press COMMAND, the keypad displays ARM DISARM. Press the Select key under
either option. The keypad displays ENTER CODE: -. Present your card to the
keypad or to an external reader connected to the 7073/7073A/7173 or 793
keypad. Once validated by the system, all areas assigned to your code arm or
disarm automatically and the 7073/7073A/7173 or 793 keypad Door Strike relay
activates.
ABC SECURITY
ARM DISARM
ABC SECURITY
ENTER CODE: –
ABC SECURITY
ALL? NO YES
Select NO to arm or disarm individual areas.
Select YES, or simply wait, to automatically arm or disarm all areas for which you are authorized.
Figure 9: Area Arming and Disarming
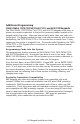
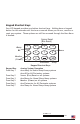
All/Perimeter System Arming and Disarming
Present your card to the reader or press COMMAND, the keypad displays
DISARM? or PERIM ALL
(when arming). Press the
Select key under the desired
option. The keypad displays
ENTER CODE: -. Present your
card to the reader. Once
validated by the system, the
selected areas arm or disarm
automatically. On 7073/
7073A/7173 or 793 keypads,
the Door Strike relay then activates.
PERIM ALL
DISARM?
or
The system arms or disarms the areas and
activates the door strike relay on the 7073, 7073A or 793 keypad.
Figure 10: All Perimeter Arming and Disarming