
User`s guide

18
18
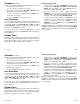
Custom User Codes continued
*NO makes this a permanent user code. YES makes this a
temporary code that expires in 7 days.
** YES requires user to properly exit (egress) an area they have
previously accessed. If they fail to exit through the proper card
reader location they will not be granted access on their next
attempt. In this case, the system administrator will need to use the
Forgive feature to clear the Anti-Passback Violation for this user.
Arming the area also clears the Anti-Passback Violation. See
Forgive Failure to Exit. Select this option NO if you are not using
the Anti-Passback feature on your system.
*** ALOW defines the time schedules that the code will operate for
door access and disarming. PRM (or PRI) indicates operation
during permanent (or primary) schedules. TMP (or SEC) indicates
operation during temporary (or secondary) schedules. ANY
indicates that the code will operate anytime, regardless of
schedules. Both PRM (PRI) and TMP (SEC) may be selected for
one user. If disarming is done outside of assigned schedules the
disarming will be allowed but an unauthorized entry will be
indicated at the Central Station. Menu access is not affected by
this option.
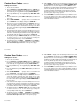
Forgive Failure to Exit (Anti-Passback)
1. After the user codes? menu has ben accessed and ADD DEL
CHG BAT is displayed, press COMMAND. The keypad displays
FRGV.
2. Press the top left key. The display changes to User Number:-
3. At the USER NUMBER:- prompt, enter the user number to be
forgiven and press COMMAND. The User Code Browser
described in the Appendix can help find the appropriate user by
name if you do not know the number.
4. To clear the Failure to Exit (Anti-passback) violation for all users
enter 000 at the User Number:- prompt.
5. The keypad will display User XXX Forgive to confirm, then
return to step 3 for the next user. Press the ARROW key to exit
this menu.
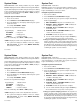
Ambush Codes
Your system may be programmed to allow user number 1 to be an
Ambush code. This Ambush code functions identically to a standard
code with the exception that it sends a silent alarm to the central
station. This silent alarm alerts the operator to a duress situation at the
premises and prompts the immediate notification of authorities.
Refer to the System Setup section of this guide to see if your system
is programmed for Ambush. If so, do NOT program a code for user
number 1 unless you intend to use the Ambush function.
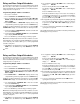
Custom User Codes continued
*NO makes this a permanent user code. YES makes this a
temporary code that expires in 7 days.
** YES requires user to properly exit (egress) an area they have
previously accessed. If they fail to exit through the proper card
reader location they will not be granted access on their next
attempt. In this case, the system administrator will need to use
the Forgive feature to clear the Anti-Passback Violation for this
user. Arming the area also clears the Anti-Passback Violation.
See Forgive Failure to Exit. Select this option NO if you are not
using the Anti-Passback feature on your system.
*** ALOW defines the time schedules that the code will operate for
door access and disarming. PRM (or PRI) indicates operation
during permanent (or primary) schedules. TMP (or SEC) indicates
operation during temporary (or secondary) schedules. ANY
indicates that the code will operate anytime, regardless of
schedules. Both PRM (PRI) and TMP (SEC) may be selected for
one user. If disarming is done outside of assigned schedules the
disarming will be allowed but an unauthorized entry will be
indicated at the Central Station. Menu access is not affected by
this option.
Forgive Failure to Exit (Anti-Passback)
1. After the user codes? menu has ben accessed and ADD DEL
CHG BAT is displayed, press COMMAND. The keypad displays
FRGV.
2. Press the top left key. The display changes to User Number:-
3. At the USER NUMBER:- prompt, enter the user number to be
forgiven and press COMMAND. The User Code Browser
described in the Appendix can help find the appropriate user by
name if you do not know the number.
4. To clear the Failure to Exit (Anti-passback) violation for all users
enter 000 at the User Number:- prompt.
5. The keypad will display User XXX Forgive to confirm, then
return to step 3 for the next user. Press the ARROW key to exit
this menu.
Ambush Codes
Your system may be programmed to allow user number 1 to be an
Ambush code. This Ambush code functions identically to a standard
code with the exception that it sends a silent alarm to the central
station. This silent alarm alerts the operator to a duress situation at the
premises and prompts the immediate notification of authorities.
Refer to the System Setup section of this guide to see if your system
is programmed for Ambush. If so, do NOT program a code for user
number 1 unless you intend to use the Ambush function.
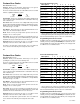
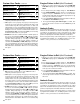
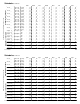
User Menu
User Menu
ARM/DIS
(arm & disarm) NO
SYS STAT
(system status) NO
ALM SLNC
(slarm silence) NO
SYS TEST
(system test) NO
SNSR RST
(sensor reset) NO
USR CODE
(user codes) NO
DOOR ACS
(door access) NO
SCHEDULS
(schedules) NO
ARM AREA
(armed areas) NO
TIME
(day, date & time) NO
OUTPUTS
(outputs ON OFF) NO
DIS EVNT
(display events) NO
ZN STATS
(zone status) NO
EXTEND
(extend closing) NO
BYPAS ZN
(bypass zones) NO
TEMP CODE
(temporary code) NO
ZONE MON
(zone monitor) NO
ANTI PASS
(anti-passback) NO
ALOW
(allow) PRM TMP ANY