
User`s guide

XR500 User’s Guide 21User Menu
User ProÞ les
Add, delete, or change User ProÞ les, that deÞ ne the authority of
each user code in the system. Several characteristics deÞ ne the
authority of each User ProÞ le within the system.
ProÞ le Number - Each proÞ le may be assigned a unique number
from 1 to 99.
ProÞ le Name - Each proÞ le may be assigned a 16-character name.
The ProÞ le Number is the default name.
Area Number - Each proÞ le may be assigned speciÞ c areas of
the system for arming and disarming. When proÞ les 1 to 98 are
created, NO areas are assigned by default. The default for proÞ le
99 is ALL areas assigned. ProÞ le 99 is predeÞ ned in the system by
the factory.
Access Area Number - Each proÞ le may be assigned door access
area assignments. Default for proÞ le 1 to 98 is NO areas assigned.
Default for proÞ le 99 is ALL areas assigned. ProÞ le 99 is predeÞ ned
at the factory.
Output Group Assignment - Each proÞ le may be assigned an output
group number from 1 to 10. Default for proÞ le 1 to 98 is NO output
group assigned. Default for proÞ le 99 is output group 10. Your
system may by programmed to turn on an output group at certain
keypads when door access occurs.
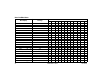
User Menu Assignments - Each user proÞ le may have any of the
menus assigned to it as shown in the User ProÞ le Record below. The
User ProÞ le Record lists the user menu proÞ le assignments and the
system functions users are allowed to access based on the proÞ le
numbers assigned to their codes.
Always make sure that at least one administrator in your system has
a proÞ le with all authorities and all areas.
Adding User Profiles
1. Access the User Menu. Press COMMAND to USER PROFILES?.
2. Press any Select key. The keypad displays ADD DEL CHG.
Press the Select key under ADD, to add a new user proÞ le.
3. At the PROFILE NO: - prompt, enter an unused proÞ le
number and press COMMAND. The display changes to
PROFILE NAME.
4. Press any Select key. Enter a proÞ le name of up to 16
characters. Press COMMAND. See Appendix B.
5. At the ARM/DIS AREAS: prompt, select the area numbers (1-
32) for arming and disarming assigned to this proÞ le.
6. The keypad displays ACCESS AREAS: . Select the area numbers
(1-32) assignment to allow door access for this proÞ le.
Press the COMMAND key.
7. The keypad displays OUTPUT GROUP: -. Enter the number
(1-20) for the Output Group assigned to this proÞ le. Press
the COMMAND key.
8. The keypad displays each of the menus as shown in the
ProÞ le Table on the following page for you to enable for this
proÞ le number. Select YES or NO and press the COMMAND
key to advance to the next menu Selection.
9. When you have completed selecting all User ProÞ le menu
assignments, the keypad displays the PROFILE ## ADDED
message for 4 seconds.