
Installation Instructions
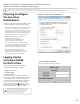
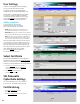

Time Settings
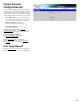
The Time Settings block on Configuration Page
(See page 24, circle) is where the time and date
are programmed into the Securitron Netlink. First,
select the correct time zone from the drop down
list and click Submit. After the time zone is set,
the time and date can be set one of three ways:
Manual Entry
Enter the correct time and date in the following
format and click the Submit button:
• For Date: YYYY MM DD
• For Time: HH MM SS
ALWAYS enter two digits in time field.. ie., 7AM = 07, not
7 The new date and time will take effect immediately.
Sync With Computer
The Sync Date/Time with computer button will
set the date and time of the Securitron Netlink
to match the computer currently being used
to access the Securitron Netlink. The new date
and time will take effect immediately.
Using an NTP Server
The NTP Server fields allow you to enter one or two NTP
servers for automatic setting of the time and date via the
internet. The Securitron Netlink must be configured for
internet access before this setting will work. Either the
IP address of the server or the DNS name of the server
may be entered. After entering at least one server, click
the Get GMT Time button to set the Securitron Netlink
time and date. Depending on server traffic, it could
take several seconds for the time setting to complete.
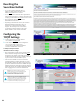
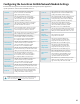
Configuring the SNMP Settings
Scrolling down in the Configure page reveals the “SNMP Settings” section.
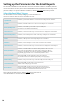
In the SNMP Setting block, under the “Basic” heading,
set Read and Write Community to “public” and set
Location to a meaningful name of your choice. This
entry will help you identify the specific Securitron
Netlink board when multiple Securitron Netlink
boards are installed on the same subnet. This entry
will be read by an SNMP system as “syslocation”,
OID .1.3.6.1.2.1.1.6. The port used for SNMP may also
be changed in this section (161 Default). Be sure to
open the SNMP port if accessing SNMP outside your
firewall. Below the port number setting, select the
trap type (Trap or Inform). Click the Submit button at
the bottom of the “Basic” section to save the settings,
otherwise you will lose the settings. These settings will
take effect after a reboot of the Securitron Netlink.
The “Security Name” section of the SNMP Setting
block allows you to grant only specified computers
(by IP address) SNMP v1 and v2 access. Since v1 and
v2 do not have password protection, the Security
Name settings add security to v1 and v2 access. The
web server is password protected and a user must
have the web server password in order to setup a
computer in the Security Name settings and gain v1
and v2 access. Multiple source networks can be added
to the Security Name Setting block. Be sure to click the
Submit button to save the settings. The settings will
take effect after a reboot of the Securitron Netlink.
The “V3 User” section of the SNMP Setting block
allows for a user to set up an SNMP v3 user name
and password. With a user name and password, the
Securitron Netlink board may be accessed from
anywhere via the internet by using the SNMP v3
protocol. No security name setup is required for v3 users
and multiple v3 users may be set up in the same table.
Click the Submit button to save the settings, which will
take effect after rebooting the Securitron Netlink.
The SNMP Trap Receiver IP and Port settings should
be set to the proper address for the SNMP Trap
receiver. Click the Submit button and reboot the
Securitron Netlink for the settings to take effect. The
SNMP Trap Version may be selected using “Select
Trap Version”. The SNMP Inform Log may be seen by
clicking the Show Inform Log button. If the trap type is
set to “Trap”, no data will be displayed in this section.
Click Hide Inform Log to hide the log window.
Typical Configuration page (upper-middle portion)
MSM Settings
Securitron AQL Power Supplies are not currently
compatible with the LSP MSM Enterprise Server.
LifeSafety Power FPO or FPG power supplies
are required for MSM compatibility.
25