
User's Guide


SecureDrive DUO User Guide • 13
20210715
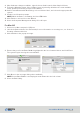
8. After Unknown changes to Online, right-click near Unallocated > New Simple Volume.
9. Follow the Wizard prompts. Select a Drive letter (it generally defaults to the next available
letter) and then follow the prompts in the Wizard.
10. At the Format Removable Disk dialog, select a Volume label, and select the appropriate file
system.
11. Continue to follow the prompts.
NOTE: While the Drive is formatting, the blue LED blinks.
12. Click Finish to end and close the Wizard.
13. Close the Computer Management dialog if it’s still open.
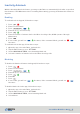
1. Connect to a Mac computer’s USB port.
2. Unlock the Drive with the User Password (for more information on creating one, see Section 3:
Creating a Password below.
3. Click Initialize in the popup message.
4. Ensure that your SecureDrive DUO is highlighted in the list of external drives and click Erase.
The system begins erasing the external Drive.
5. Click Done in the message dialog when available.
NOTE: SecureDrive DUO is now displayed under External in the left column.
6. Close the Disk Utility.
For Mac OS