
User's Manual
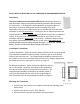

To remove cover, insert
Screwdriver here, and gently twist
Figure A
a. For doors that open on the left hand side, the round battery cavity
in the base should be at top when the base is mounted to the door
jam.
b. For doors that open on the right hand side, the round battery cavity
in the base should be at the bottom when the base is mounted to
the door jam.
4. Carefully replace the sensor on the base by aligning the tamper switch
with the plastic tamper tab (Figure 1) and snap the cover down on the
base.
The accessory package also includes self adhesive tape. The use of this tape is
not allowed in UL listed installations. For non-UL listed systems, once the proper
location for the SW-xxx-V2 has been determined it can be permanently mounted
using the supplied adhesive.
Using Adhesive Tape
Make sure that the surface is clean and dry. Apply the supplied tape to the back
of the SW-xxx-V2, press and hold firmly in the desired location for approximately
10 to 15 seconds. Note that it may take up to 24 hours for the tape to reach its
maximum bonding strength.
Note: Attaching the transmitter with Double-stick tape is not allowed in UL
installations.
Installing or Changing the Battery
The SW-xxx-V2 requires one CR2032 lithium battery.
To install the battery, remove the cover as indicated in
Figure A.
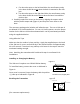
Once cover is removed, insert the battery with the positive
(+) side up as indicated in Figure B.
Enrolling the Transmitter
(Per customer requirements)
Figure B
Circuit Board
Tamper Switch
To remove battery, insert
screwdriver here and twist
+
Battery (+ side up)