
User's Manual
4. Verify programming and RF communication with the Digital Life
Controller.
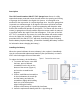
5. Replace the sensor cover on the base. Align the tamper switch with the
plastic tamper tap (See Figure 1) and snap the cover down on the base.
Locating the Transmitter
1. For Sectional Door Installation: The transmitter should be mounted
near the top of the top panel of the garage door.
2. Make sure that the tamper switch points to the floor.
3. Avoid mounting the sensor in areas where it will be exposed to moisture
or where the sensor will be exposed to temperatures outside its
operating range of 0 to 120° F (0 to 49° C).
4. Avoid mounting the sensor in areas with a large quantity of metal or
electrical wiring.
Mounting the Transmitter
1. To remove the sensor cover from the base, press a flathead
screwdriver into the slot on the bottom of the sensor (Figure 1) and turn
the screwdriver 90 degrees.
2. Use the base of the sensor as a template and mark the mounting holes
with a pencil.
3. Drill the holes for the screws
4. Mount the base with the screws provided.
5. Replace the sensor cover on the base by aligning the tamper switch
with the plastic tamper tab (Figure 1) and snap the cover down on the
base.
Note: Attaching the transmitter with Double-stick tape is not allowed in UL
installations.
Enrolling the Transmitter
(Per AT&T requirements)
Verifying the programming and RF communications
(Per AT&T requirements)