
User's Manual
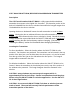

Mounting
1. Using an 11/16 in drill bit
slowly drill a hole for the
magnet
2. Drill the mating hole for the
sensor. Use either the
flush mount cap for a snug
fit or flanged cap for a door
or window frame.
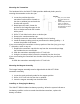
Mounting the Transmitter
The hardware kit for the SW-ATT-RDW provides additional plastic parts for
securing the transmitter to the door jam.
1. Locate the position where the
transmitter section will be located on
the door or window jam and mark the
location with a pencil.
2. Based upon this mark, locate the
position for the integral magnet in the
door or window and mark the location
with a pencil.
3. Drill a ¾” inch hole into the door or window jam.
4. Remove the round transmitter cap.
5. Carefully remove the transmitter assembly from its housing.
6. Install the battery making sure that you observe the battery polarity. + is
nearest the printed circuit board.
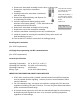
If you are mounting the transmitter on the top portion of the door jam, go to step
7. Otherwise, move to step 10
7. Replace the transmitter cap with the cap from the accessories package
that includes the two screw holes.
8. Slide the transmitter assembly into the ¾” inch hole.
9. Using the screws provided, secure the assembly into the door jam.
If you are mounting the transmitter into the side of the door jam, proceed as
follows.
10. Slide the transmitter assembly into the ¾” inch hole.
Mounting the Magnet Assembly
The integral magnet assembly must be aligned with the SW-ATT-RDW
transmitter assembly.
1. Locate the mark previously made for the magnet position.
2. Drill a 11/16” inch hole into the door or window.
3. Insert the magnet assembly into the drilled hole.
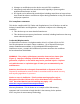
Installing or Changing the Battery
The SW-ATT-RDW includes low battery reporting. When the system indicates a
low battery condition on the recessed door/window transmitter, replace the
battery as follows.