
Installation guide


1-8 Chapter 1: Installation
SP201-SA™ Customization and Maintenance Guide
1.4 Connecting to the Power Source
The SP201-SA unit has one external power supply. The external power
supply receives input from a power source of 110 to 220 volts AC at 50 to
60 Hz. (The AC power supply autosenses the AC voltage.) The power
supply outputs 5.5 volts DC to the SP201-SA.
After completing all other connections, you can connect the SP201-SA to the
power source.
How to Connect the SP201-SA to the Power Source
1 Make sure the SP201-SA’s external power supply is not currently
connected to a power source.
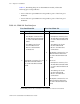
2 Connect a (minimum) 12 AWG wire to the large earth ground screw
located below the safety ground symbol on the rear of the SP201-SA
chassis. Use a ring terminal, such as an AMP (part number 36160) for
this connection.
Warning: An earth ground must connect to the SP201-SA
chassis itself so that the chassis remains grounded even when
the power connection is removed.
3 Connect the external power supply to the SP201-SA’s power supply
interface.
4 Connect an AC power cord to the external power supply’s AC
connector. (The power cord is shipped to destinations within North
America. Outside North America, contact your local distributor for
the proper power cord.)
5 Plug the power cord into a power outlet.
The SP201-SA powers on.
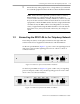
1.5 Connecting to the Control Console
You must connect a control console (for example, a personal computer) to
the SP201-SA. The connection to the control console lets you configure the
SP201-SA and maintain it once it is operational. (The control console is