
Installation guide


Connecting the SP201-SA to the Telephony Network 1-7
SP201-SA™ Customization and Maintenance Guide
Note: Regardless of port numbers or trunk numbers shown in the
procedures in this document, always type the port or trunk number that
corresponds to the SP201-SA port that you are configuring.
Some procedures may specify separate instructions for the two-port
SP201-SA and the four-port SP201-SA.
However, other procedures need to show the more extensive, general case.
In this case, instructions explain configuration of a four-port SP201-SA that
has all four ports connected to network devices.
1
In such procedures, when
you are configuring a two-port SP201-SA, interpret the instructions in the
following way:
• Configure port 1 (or trunk 1) of the two-port SP201-SA according to
instructions that mention port or trunk 1.
• Ignore instructions that mention port or trunk 2 (because the instructions
assume a four-port SP201-SA).
• Configure port 2 (or trunk 2) of the two-port SP201-SA according to
instructions that mention port or trunk 3.
• Ignore instructions that mention port or trunk 4 (because the instructions
assume a four-port SP201-SA).
For more information on the SP201-SA hardware, refer to the SP201-SA
Hardware Reference Guide.
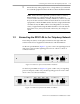
After you place the SP201-SA chassis on a tabletop or shelf, connect the
digital trunk line interface cables from the network devices to the SP201-SA.
Caution: To ensure compliance with the Class A FCC Limits, you
must use shielded cables with the SP201-SA unit.
1. The configuration of your four-port SP201-SA may differ. You do not have to
connect all four ports, even if the procedures list instructions for all four ports.
Both ports of the two-port SP201-SA must, of course, be connected to network
devices.
!