
Installation guide


1-2 Chapter 1: Installation
SP201-SA™ Customization and Maintenance Guide
This chapter walks you through the steps to complete the tasks listed above.
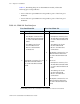
For this installation, you perform the following tasks:
1 Unpack, check, and install the SP201-SA on a tabletop.
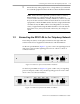
2 Connect the SP201-SA to the network.
3 Connect the power source and power up the system.
4 Connect the control console.
5 Once the system has been initialized, it is ready for configuration.
(See Chapter 2, Configuration Overview.)
1.1 Safety Precautions
Observe the following safety warnings when installing the equipment:
• Allow only qualified service personnel to install and maintain this
equipment.
• To prevent electrical shock, do not power on the equipment until all
cables are connected.
• Avoid contact with conductors on signaling cables. High voltage may be
present.
1.2 Unpacking and Inspecting the Equipment
Before you install the SP201-SA chassis, you need to check the equipment
carefully to make sure it is not damaged.
Carefully remove the unit from the shipping box. Save the box and the
packing material in case you need to return damaged equipment. Inspect the
equipment for signs of physical damage incurred during shipping. Verify all
materials received against the shipping invoice.
If the unit or any of its components is damaged, or if any items are missing,
file a claim with the shipper and contact Encore Networks, Inc., to obtain a
Return Material Authorization (RMA) number. Contact information and
detailed return shipping instructions are discussed in the procedure below.
Encore Networks is not responsible for items returned without an
authorized RMA and reserves the right to reject such returns.