
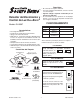
Use and Care Guide


5
598-1162-04
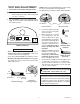
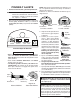
SPECIFICATIONS
Horizontal Range . . . . Up to 70 ft. (21 m); 100 ft.
(30.5 m) with Range Boost.
[varies with surrounding
temperature]
Vertical Range . . . . . . Upto15ft.(4.6m)
SensingAngle . . . . . . Upto240°horizontal.Upto80°
Vertical
ElectricalLoad . . . . . . Upto200WattMaximumTung-
stenHalogen[Upto100Watt
Maximumeachbulbholder.]
PowerRequirements . 120VAC,60Hz
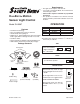
Operating Modes . . . . TEST, AUTO, and MANUAL
MODE
TimeDelay . . . . . . . . 1,5,20minutes
DualBrite
®
Timer . . . . 3,6hours,Dusk-to-Dawn
Replacementbulb . . . T4100W,G8halogenbi-pin120
VAC
HeathCoLLCreservestherighttodiscontinueprod-
uctsandtochangespecicationsatanytimewithout
incurringanyobligationtoincorporatenewfeaturesin
productspreviouslysold.
POSSIBLE CAUSE
1. Abulbispositionedtooclosetothe
sensor or pointed at nearby objects
that cause heat to trigger the sensor.
(Reposition the bulb away from the
sensor or nearby objects).
2. Sensor is pointed toward a heat source
likeanairvent,dryervent,orbrightly-
paintedheat-reectivesurface.(Repo-
sition sensor. Reduce RANGE).
3. Light control is in Manual Mode. (Switch
to Auto).
1. Heator light fromthebulbsmaybe
turning the light control on and off.
(Reposition the bulbs away from the
sensor).
2. Heatbeingreectedfromotherobjects
maybeaffectingthesensor.(Reposi-
tion sensor).
3. LightcontrolisintheTESTmodeand
warmingup.(Flashing is normal under
these conditions. Turn BOOST off).
1. Sensor is detecting its own lights.
(Reposition bulbs to keep area below
the sensor relatively dark).
SYMPTOM
Lights stay
on continu-
ously.
Lights flash
on and off.
Lights flash
once, then
stay off in
Manual Mode.
SYMPTOM
Lights will
not come on.
Lights come
on in day-
light.
Lights come
on for no
apparent
reason.
Lights turn
off too late
in Dusk-to-
Dawn setting.
POSSIBLE CAUSE
1. Lightswitchisturnedoff.
2. Light is loose or burned out.
3. Fuse is blown or circuit breaker is
turnedoff.
4. Daylightturn-offisineffect(Recheck
after dark).
5. Incorrectcircuitwiring,ifthisisanew
installation.
6. Re-aimthe sensorto cover desired
area.
1. Light control may be installed in a
relativelydarklocation.
2. LightcontrolisinTEST.(Set control
switch to an ON-TIME position).
1. Light control may be sensing small
animalsorautomobiletrafc.(Re-aim
sensor).
2. RANGE is set too high. (Reduce
RANGE).
3. DualBrite
®
Timerison.
1. Sensorisinarelativelydarklocation.
(Relocate sensor, or use 3 hr or 6 hr
setting).
TROUBLESHOOTING GUIDE
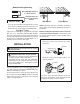
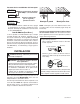
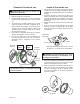
Bulb Replacement
CAUTION: When replacing the bulb, turn power
off and let the fixture cool.
Important:Useacleangloveorclothwhenhandling
thenewbulb.Useisopropyl(rubbing)alcoholtoclean
thebulbifitistouchedwithyourbarehands.
1. Toremovelampshade,loosenscrew2fullturns
withasmallphillips-headscrewdriver.Turnshade
counterclockwiseandremove.
2. Toremovebulb,pullstraightoutofxture.
3. Toreplacebulb,pushbulbpinsintolampsocket.
Check that the bulb is seated properly.
4. Toreinstalllampshade,placeshadeonxtureand
alignnotchesonshadewithtabsonxture.Turn
clockwise.Tightenscrewrmly.