
Use and Care Guide
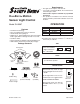


3
598-1162-04
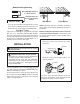
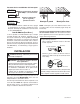
Keepbulbsatleast2"(51mm)fromthe
sensorand2"(51mm)fromcombustibles.
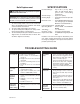
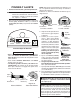
Lock Nuts
Mount the Light Control
1. Placethe mountingboltthrough thefront ofthe
junctionboxcover.Pushthesmallgasketholeover
themountingscrew.
2. Make sure the wire connectors and wires are inside
thejunctionbox.Alignthemountingscrewwiththe
centerholeinthemountingstrap.Securethexture
tothemountingstrap.
3. Pushtherubberplugrmlyintoplace.
4.
Ifawetlocationjunctionboxwasnotused,caulkthewall
platemountingsurfacewithsiliconeweathersealant.
LampShade
Screw
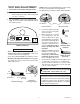
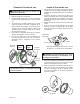
Wire the Light Control
White to
White
Black to
Black
Connect any fixture ground wire(s) and the cover
plate ground screw to the junction box ground
wire.
Gasket
Mounting
Strap
Mounting
Bolt
Rubber
Plug
WARNING: Turn power off at circuit breaker
or fuse.
1. Removetheexistinglightxture.
2. Installmountingstraptojunctionboxusingscrews
appropriateforyourjunctionbox.
3. Theplastichangercanbeusedtoholdthexture
whilewiring.Thesmallendoftheplastichanger
canbethreadedthroughtheholeinthecenterof
thecoverplate.Thesmallendthengoesintoone
oftheslotsonthemountingstrap.
4. Routeallxturewiresthroughthelargeholesin
the gasket as shown.
5. Connectthejunctionboxwirestothelightxture
wires as shown. Twist together and secure with wire
connectors.
5. Adjustthelampholdersbylooseningthelocknuts,
butdonotrotatethelampholdersmorethan180°
fromthefactorysetting.
6. Adjustlampshadesbylooseningthescrewsseveral
turns,turnshadescounterclockwiseandremove.
Reinstall the shades in the desired position and
tighten screws.
CAUTION: To avoid water damage and electrical
shock, keep lamp holders 30° below horizontal.
Screw