
Use and Care Guide


2
598-1162-04
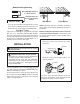
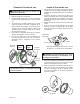
1. Swing the sensor head towards the clamp
screw joint.
Foreavemountonly:
2. Rotate the sensor head clockwise 180° so the
controlsfacedown.
Controls
Controls
ClampScrew
Controls
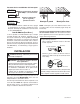
CAUTION: To Avoid Fire Or Burn Hazards:
•Allowxturetocoolbeforetouching.Thebulband
thextureoperateathightemperatures.
• Keepxtureatleast2"(51mm)fromcombustible
materials.Donotaimatobjectscloserthan3'(1m).
• UseonlyT4100W(max.),G8tungstenhalogen
bi-pin120VACbulbs.
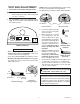
Ifthe sensorpops outoftheballjoint, loosenthe
clampscrewandpushthesensorbackintotheball
joint.Tightentheclampscrewwhendone.
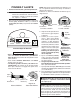
Move ON-TIME Switch to
1, 5, or 20 minutes
Mode Switching Summary
Flip light switch off
for one second then
back on*
MANUAL MODE
AUTO
TEST
INSTALLATION
CAUTION: Keep the sensor at least 2" (51 mm)
away from the bulbs.
* Ifyougetconfusedwhileswitchingmodes,turnthe
poweroffforoneminute,thenbackon.Afterthecali-
brationtimethecontrolwillbeintheAUTOmode.
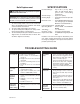
DualBrite
®
Timer
Lightcomesonhalfbrightforselectedtimeafterdusk
(Off,3hr.,6hr.,untildawn).SelectingOFFdisables
thisfeature.Themotionsensingfeatureswillcontinue
toworkasdescribedinthismanual.Ifmotionissensed,
thelightturnsonfullbrightfortheON-TIME(1,5,or
20minutes)thenreturnstodimmode.
Foreasyinstallation,selectanexistinglightoperated
byawallswitchforreplacement.IMPORTANT:Do
NOTusewithdimmersortimers.
Forbestperformance,mountthextureabout8feet
(2.4m)abovetheground.NOTE:Ifxtureismounted
higherthan8feet(2.4m),aimingthesensordownwill
reducecoveragedistance.
Before installing the light fixture under an eave, the
sensor head must be rotatedasshowninthenext
twostepsforproperoperationandtoavoidtheriskof
electrical shock.
NOTE: Lightxtureandsensorshouldbemountedas
shownabovewheninstalled(dependingupontypeof
installation).
Wall Mount Eave Mount