
Use & Care Guide


3
598-1343-01
+/- 4°
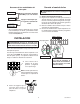
Mount the Light Control
❒ Alignthelightcontrolcoverplateandcoverplate
gasketandthejunctionbox.Insertandtightenthe
mountingscrews.
❒ Ifnotinstalledonaweatherproofboxorifanadaptor
plateisused,caulk the wall plate and mounting
surfacewithsiliconeweathersealant.
Thehalogenlightmustbe
mountedhorizontally(+/-4°).
MOUNT HORIZONTALLY
Bulb Installation and Re-lamping
❒ Whenre-lamping,turn power offandletthexture
cool.
❒ Removeglasscoverandremovetheoldbulbby
pushingthebulbtowardstherightuntiltheleftside
ofthebulbisclearoftheleftsocket.
❒ Toinsertthenewbulb,pushthebulbintotheright
socket so the bulb ts completely into the left
socket.
❒ Checkthatthebulbisseatedproperly.
❒ Re-installtheglasscover.
For proper operation and safety, the light fixture must
be above the sensor and the sensor head must be
rotated so that the controls are on the bottom.
CAUTION: To Avoid Fire Or Burn Hazards:
• Allowxturetocoolbeforetouching.Thebulband
thextureoperateathightemperatures.
• Keepxtureatleast2"(51mm)fromcombustiblema-
terials.Donotaimatobjectscloserthan3ft.(1m).
• Re-lampwithtypeThalogen,500Wmax.,120VAC
lamponly.