
Use & Care Guide


2
598-1343-01
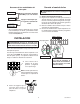
Cover Plate
Gasket
❒ Drillouttheholesifneeded
tomountthebackplatetothe
junctionbox.
White to White
❒ Attachthelamparmto
thebackplatearmand
secure with the long
bolt.
Note: When tightening the arm
screw,pullonthewirestomake
surethewiresarenotpinched
bythejoint.
❒ Remove the existing light fixture.
❒ TheS-hookcanbeusedtoholdthexturewhile
wiring.Thesmallendofthehookcanbeinserted
intoaholeinthejunctionbox.Thelargeendgoes
aroundthe“neck”ofthexture.
❒ Route thelight control’swires through thelarge
holeinthegasket.
❒ Twistthejunctionboxwiresandxturewirestogether
asshown.Securewithawireconnector.
Black to Black
Junction box ground wire to
green ground wire on fixture.
Wire the Light Control
WARNING: Turn power off at circuit breaker
or fuse.
INSTALLATION
Move ON-TIME Switch
to 1, 5, or 10 minutes
Mode Switching Summary
Flip light switch
off for one second
then back on*
MANUAL MODE
AUTO
TEST
* Ifyougetconfusedwhileswitchingmodes,turnthe
poweroffforoneminute,thenbackon.Afterthecali-
brationtimethecontrolwillbeintheAUTOmode.
CAUTION: Risk of fire. This fixture is designed
for wall mounting only. DO NOT install on a ceiling
or soffit.
Foreasyinstallation,selectanexistinglightoperated
byawallswitchforreplacement.
Forbestperformance,mountthextureabout8feet
(2.4m)abovetheground.NOTE:
Ifxtureismounted
higherthan8ft.(2.4m),aimingthesensordownwillreduce
coveragedistance.