
Installation Guide


7
200478-03
Note: When rst turned on wait about 1
1
/
2
minutes for
the circuitry to calibrate.
* resets to Auto Mode at dawn.
Mode: On-Time Works: Day Night
Test
5 Seconds x x
Auto
1, 5, or 10 Minutes x
Accent
3, 6 Hour, To Dawn x
Manual
To Dawn* x
Final Setup
1.
Adjust the sensitivity (SENSITIVITY) to increase or
decrease the range as needed. Too much sensitivity may
cause false triggering due to heat sources in the cover-
age area (see
Testing and Adjustments
or
Troubleshooting
section).
2. Set the amount of ON-TIME you want the light to
stay on after motion is detected (1, 5, or 10 minutes).
3. Set the DB® switch to o, 3 hours, 6 hours,
or dusk-to-dawn.
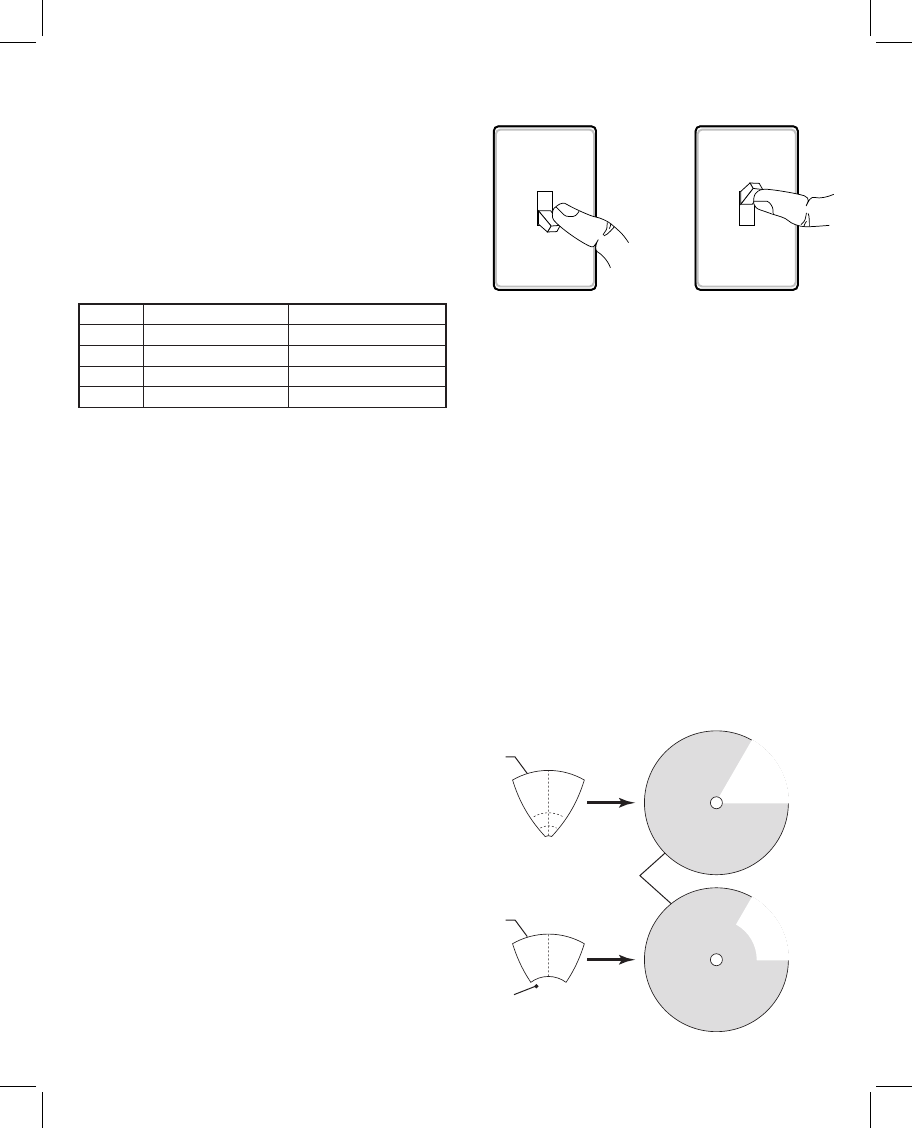
Operating Modes
Turn Switch OFF for
1 to 2 seconds
Turn Switch
Back ON
• Motion Sensor (AUTO) – is light xture is designed
to automatically turn on when the sensor detects a tem-
perature dierence moving across the front of the motion
sensor. e light will turn o automatically after a set
amount of time. e ON-TIME control should be set
to 1, 5, or 10 minute setting and the wall switch should
be left in the ON position at all times.
• Optional DualBrite® Control – is optional feature
allows the light xture to turn on at a lower light level
after dusk (sunset) for the amount of time selected. When
motion is detected, the lights will turn on full bright. is
feature can be turned OFF and the motion sensor will
continue to work in AUTO mode.
• Manual Mode – is light can be activated to stay on full
bright after dusk (sunset) for only one night at a time. It
automatically resets to motion sensing at dawn (sunrise).
Manual mode must be re-activated each night. Note: If
power to the light xture is o for more than 5 seconds,
allow the electronic circuitry in the sensor to calibrate
(90 seconds) prior to switching to manual mode.
1. To turn on MANUAL mode, switch the light o at
the wall switch for 1 to 2 seconds and then back on.
2. To return to AUTO mode, switch the light o at the
wall switch for 1 to 2 seconds and then back on.
Note: e sensor will also reset to AUTO mode at
sunrise.
ADJUSTMENT OF COVERAGE AREA
e sensor on this light xture detects “motion” by the move-
ment of heat (body heat) across the coverage area. However,
following are examples of objects that also produce heat and
can cause the sensor to false trigger:
• Pools of Water • Air Conditioners
• Dryer Vents • Fenced-In Animals
• Heating Vents • Automobile Trac
If you suspect that a heat source of this type is falsely trig-
gering the sensor and reducing the sensitivity does not solve
the problem, then a lens shield (included) can be installed.
e plastic lens shield is divided into 6 sections. Each sec-
tion will reduce the coverage angle by 30 degrees. Also, the
tip of each section may be removed to change the eective
range of the sensor.
1. Break o the amount of lens shield needed to block
the desired area of coverage.
2. Cut desired amount of foam tape needed to adhere the
lens shield to the sensor lens.
Area
Blocked
Area
Blocked
Lens
Shield
Lens
Shield
Portion
Removed
Eective Coverage
Area (Top View)