
User`s manual

HCO 3-Quick Start SG550/SG530
Page 6
connected, the camera will enter the Live mode. The indicator LED (red) will blink for about
10 s. This period is for you to make the camera ready for the working condition: close the
bottom cover and lock it, mount the camera on a tree and walk away. After entering the Live
mode, the camera will begin to take picture or video according to the previous programmed
setting when human or animal enters monitor area.
If the device is previously in the Test mode, you just need to disconnect the remote control to
let the camera enter the Live mode.
Before enter the Live mode please pay attention to the following:
• The polarity of the power is correct and the power is sufficient
• The SD card has sufficient space and its write-protection is disabled
• The Power switch is at the ON position
• The remote control is disconnected
• Avoiding temperature and motion disturbances in front of the device such as big leaf,
curtain, air-conditioner, air outlet of the chimney and other heat sources to prevent
false trigger.
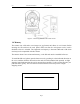
3.6 Manual Capture
Under the Test mode, you can use camera to take pictures as a regular digital camera
by pressing SHOT button.
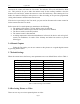
3.7 Default Settings
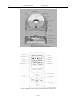
When the camera leaves the factory, most parameters are set as default. Please refer to Table 1.
Parameter name Default Other sets
Camera Mode Camera Video
Image Size 3M pixel 5M pixel
Video Size 640x480 320x240
Capture Number 1 photo 2 photos, 3 photos
Video Length Avi 10 Second 1-60 seconds
Interval 1 minute 0-59 seconds, 1-60 minutes
Sense Level Normal High, Low
Time Stamp On Off
Timer Switch Off On (00:00 – 23:59)
Table 1: Default settings of the
camera
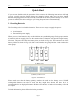
3.8 Reviewing Picture or Video
There are two ways to review captured picture or video: