
User manual


Getting Started
13
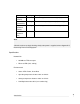
LAN subnet mask: 255.255.255.0
The SG unit needs an IP address suitable for your LAN before it is connected. You may
choose to use the SG unit’s initial network settings above as a basis for your LAN
settings.
Connect the supplied power adapter to the SG unit.
If you are setting up the SG300, attach your PC’s network interface card directly to
any network port on its LAN switch using the supplied network cable.
If you are setting up the SG560, SG565 or SG580, attach your PC’s network interface
card directly any network port on switch A (A1 – A4) using the supplied network
cable.
Otherwise, connect the SG unit’s LAN network port directly to your PC’s network
interface card using the supplied network cable.
Note
At this point, if you attach the SG unit directly to a LAN with an existing DHCP server, or
a PC running a DHCP service, it will automatically obtain an additional address. The SG
unit will still be reachable at 192.168.0.1.
However, we strongly recommend that you do not connect the SG unit to your LAN until
instructed to do so by this guide.
All other network ports are by default inactive, i.e. they are not running any network
services such as DHCP, and they are not configured with an IP address.
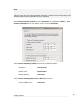
Next, modify your PC’s network settings to enable it to communicate with the SG unit.
Click Start -> (Settings ->) Control Panel and double click Network Connections (or in
95/98/Me, double click Network).
Right click on Local Area Connection and select Properties.