
Instruction manual


7
Zur Gewährleistung der Sicherheit
und richtigen Funktion, nur Origi-
nal SEBO Ersatzfilter verwenden.
Alle Filtermedien dürfen auf
keinen Fall gewaschen werden.
12.Verstopfungen beseitigen
Erscheint das orangefarbene Signal (27) am
Filterdeckel (6) bei neuwertiger Filtertüte,
kann eine Verstopfung vorliegen.
Zuerst den Schlauch (8) an der Schlauchdüse
überprüfen. Wenn dort nur eine geringe
Saugwirkung spürbar ist, ist er verstopft.
Zuerst den Schlauch durch Drehen des
Sicherungsrings (32) an der Innenseite des
Deckels lösen. Stecken Sie dann die
Schlauchdüse (9) in den Schlauchstutzen des
Filterdeckels (6) und saugen sie von der
anderen Seite aus. Dazu den Schlauch an der
Verstopfung dehnen und mit der flachen
Hand auf die Öffnung des Schlauches
klopfen.
Überprüfen Sie auch den Saugkanal an der
Einsteckstelle (33) für die Schlauchdüse (9). !
Den Schlauch niemals mit
einem Stab reinigen!
Danach das Gelenk (14) des Saugvorsatzes
an der Einsteckstelle des Staubsaugers und
dann ggf. durch die Klappe (34) auf der
Unterseite der Elektroteppichbürste* über-
prüfen. Stellen Sie sicher, dass sich
zwischen der Klappe und der Einsteckstelle
im Gelenk keine Verstopfung befindet.
* je nach Ausstattung.
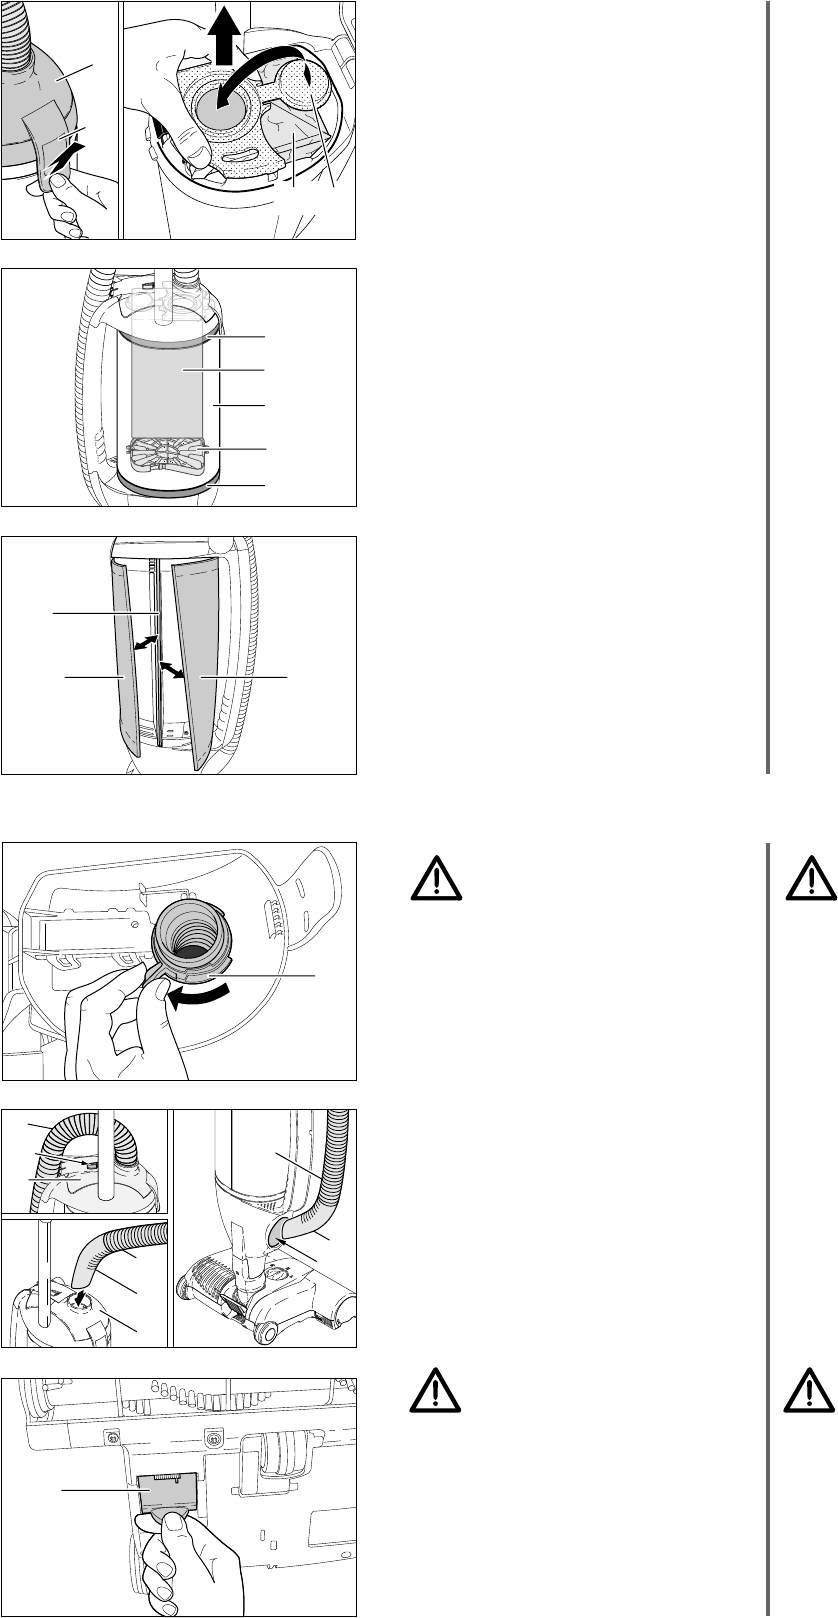
10.Wechsel der Filtertüte
Zum Wechseln der Filtertüte (28) den Filter-
deckel (6) auf der Oberseite an der Ver-
schlusslasche (29) entriegeln und auf-
schwenken. Die Filtertüte mit dem Filter-
tütendeckel (30) schließen und aus dem
Filterraum herausheben. Der Wechsel der
Filtertüte ist auf deren Vorderseite illustriert.
Ohne korrekt eingelegte Filtertüte lässt sich
der Filterdeckel nicht schließen.
11.Motorschutzfilter
Abluftfilter
Der Motorschutzfilter (31) ist nur zugänglich
nach Entnahme der Filtertüte. Ziehen Sie
nun den Filter an seinem Bügel nach oben
heraus. Beim Einsetzen eines neuen Motor-
schutzfilters muss dieser fest angedrückt
werden. Der Motorschutzfilter muss ge-
wechselt werden, wenn er stark verschmutzt
ist oder spätestens nach 20 Filtertüten.
Gleichzeitig sollte auch der außen liegende
Abluftfilter (11) gewechselt werden. Hierzu
müssen die beiden Filterbefestigungsringe
(12) vorsichtig gelöst und seitlich entfernt
werden. Dann die beiden Kunststoffschienen
aus der Nut im Filtergehäuse (5) herauszie-
hen und den Abluftfilter entfernen. Die
Montage erfolgt in umgekehrter Reihenfolge.
Nur wenn der Abluftfilter richtig montiert ist,
d.h. die Kunststoffschienen richtig in der Nut
liegen und die Filterbefestigungsringe den
Filter abdichten und verschlossen sind, kann
der Abluftfilter seine Wirkung entfalten.
Use only genuine SEBO replace-
ment bags and filters to ensure
effectiveness and safety.
Do not wash any filters.
12.Removing Blockages
If the orange bag full indicator (27) is
showing after the filter bag has been
changed and the filters are in good condition,
there is likely a blockage in the system. First,
check for suction at the end of the hose (8). If
you can only feel a small amount of suction,
the blockage is in the hose. To unblock,
loosen the safety ring (32) on the lid. Remove
the hose from the machine and reverse the
airflow through the hose by putting the hose
handle (9) in the connecting tube of the filter
cover (6). Stretch the hose in the spot where
the blockage is and open and close the end
of the hose.
Also check the suction opening, which the
hose handle (9) fits into.
Note – Never clean down the hose
with a stick or pointed object.
Other places to check for a blockage include
the suction neck (14) of the power head* and
the orange trap-door (34) on the bottom of
the power head. Also check between these
two openings in the power head.
* depending on model.
10.Changing the Filter Bag
To remove the filter bag (28), open the latch
on the side of the bag housing (29). Close the
filter bag with the sealing cap (30) and lift it
out. The procedure to replace the bag is
illustrated on the front of each bag. You
cannot close the bag housing if the bag is
fitted incorrectly.
11.Motor Protection Filter
and Exhaust Filter
The motor protection filter (31) is only
accessible by removing the filter bag. Lift the
motor protection filter up by the bracket.
When replacing the motor protection filter
make sure that it is pressed in position
tightly. The motor protection filter should be
changed when it is dirty or at the latest when
you have used 20 filter bags.
Change the exhaust filter (11) at the same
time as the motor protection filter. To do this,
carefully remove the filter retaining rings
(12) and put them to the side. Next pull the
enforcement strips of the exhaust filter out
of the housing slot (5) and remove the
exhaust filter from the housing.
When reassembling, please ensure the
exhaust filter is fitted correctly in the
housing slots and the filter retaining rings
are installed correctly. Otherwise the filter
will be ineffective.
34
6
9
8
8
6
27
33
9
8
1111
5
12
12
11
28
31
32
30
28
6
29