ENGLISH SEBO ET-H Power Head For Household Use Only © Copyright SEBO America, LLC • All rights reserved.
SEBO ET-H Power Head Owner’s Manual Table of Contents Technical Details Important Safety Instructions Special SEBO Product Features Identification of Parts Attaching the Power Head to the Telescopic Tube Operating Instructions Starting the Machine Operating the Machine The Brush Pressure Adjustment Feature Indicator Lights Maintenance Changing the Brush Rollers Cleaning the Brush Rollers Clog Removal Clogs in the Airflow Pathway Clogs in the Swivel Neck Trouble-Shooting Guide 2 3 4 5 5 6 6 6 7 7 8 8 8 8 8
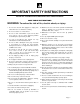
! IMPORTANT SAFETY INSTRUCTIONS READ ALL INSTRUCTIONS BEFORE USING THIS MACHINE SAVE THESE INSTRUCTIONS. WARNING: To reduce the risk of fire, electric shock, or injury: 1. Do not leave vacuum while plugged in. Unplug from outlet when not in use and before servicing. 2. Do not use outdoors or on wet surfaces. 3. Do not use near small children or pets. Do not allow to be used as a toy. Use of this product by children should always be supervised by an adult. 4. Use only as described in this manual.
SPECIAL SEBO PRODUCT FEATURES Your SEBO ET-H Power Head is designed specifically for use with the SEBO C3.1 and K3 canister vacuum cleaners. These vacuums are among the most technically advanced canister vacuum cleaners in the world. For example, the ET-H Power Head has warning systems and automatic shut-off capabilities that are designed to alert the user to machine problems that, if ignored, will damage the machine or diminish performance. Your SEBO ET-H Power Head’s most unique features are: 1.
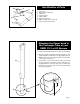
4 7 Identification of Parts 2 3 5 1 6 6a 1. Power head 2. Brush pressure adjustment 3. Swivel neck 4. Connection plug 5. Indicator lights 6. Brush roller end cap 6a. Edge-cleaning brush roller end cap 7. Telescopic Tube release button Attaching the Power Head to the Telescopic Tube of your SEBO C3.1 or K3 Vacuum 1. Find the connection tab (A) at the base of the telescopic tube (B). 2. Move the connection tab (A) OUT away from the tube (C). See enlarged detail below.
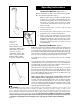
Operating Instructions Starting The Machine - Figures 1 & 2 A. Before turning on your canister, make sure that the vacuum handle is in its upright locked position (figure 1). 8 Figure 1 Switch Position #8, Figure 2 0 = Zero Suction MAX = Maximum Suction ON position - Slide the slider down toward 0 suction till it “clicks” out of position. OFF position - Pull the slider up to 0 suction then continue pulling the slider up until it “clicks” into the OFF position. Figure 2 1.
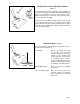
2 8 The Brush Pressure Adjustment Feature Figure 4 The brushing pressure that your ET-H power head applies to your carpet is adjustable from SOFT through HARD. When the brush is set on SOFT, the brush pressure is decreased for a lighter brushing action. For thorough, deep brushing, set the pressure adjustment to HARD. The brush pressure adjustment dial is located on the top side of the power head (# 2, figure 4). To adjust the dial to SOFT, spin the dial in the direction of the arrow (#8, figure 4).
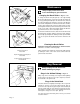
6 Maintenance 9 10 9a ! Always unplug vacuum from outlet before dismantling any part of machine! Changing the Brush Rollers - Figures 6 & 7 6a 10a Figure 6 9 9a To change the brush roller (#9, figure 6) or the edge-cleaning brush roller (#9a, figure 6), release the end caps (6 and 6a, figure 6) by pushing the button (#10 for the brush roller, #10a for the edge-cleaning brush). Rotate the end caps in the direction of the arrows and pull them off.
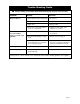
Trouble-Shooting Guide ! Always unplug vacuum from outlet before dismantling any part of the machine! PROBLEM REASON Does not turn on 1. Telescopic tube not inserted properly. 1. See page 5. SOLUTION 2. Not plugged into good outlet. 2. Use another outlet. 3. Cable worn. 3. Replace cable. 4. The power control slider switch is set to “0” (“off” position). 4. Slide the power control slider switch to “on” position. 1. Jammed brush roller. 1. Remove brush roller obstruction. See page 8. 2.
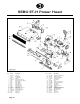
SEBO ET-H Power Head Schematic and Parts List Pos. 1 2 3 4 5 6 7 8 9 10 11 12 13 14 15 16 17 17A 17B Part # Description 2701 2708 2729 2707 2704 2730 2733 2735 2737 2749 2753 2750 2702 2736 0102 2791 2758 2754 2756 Chassis Sealing strip Internal cable Wire tie Rear bottom plate, cpl. Brush motor 120 V 150 W Motor pulley Motor support Motor gasket Drive belt, motor Brush drive unit Drive belt, brush Motor cover Transmission shaft, cpl. Screw F 3.
SEBO Vacuum Cleaner Warranty Three Years Non-Wear Parts - One Year Labor 1. 2. Your authorized SEBO dealer or SEBO will provide the original product purchaser with replacement of Non-Wear Parts which fail due to a material or workmanship defect for a period of three (3) years from the original date of purchase of new product.