
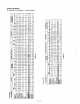
Troubleshooting guide


1
t.
Installing
the Pedestal
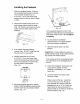
Open
the
pedestal
drawer. Remove
the envelope taped inside
the drawer.
This envelope
contains four
(4)
#12x
5/8"
(1.6
cm) hex
head sheet
metal screws
that will be
used in Steps
4
and 5.
Remove
the
Phillips
head
screw from
both drawer
sides and set
the aside.
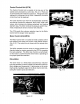
(Fig.
1-3) Remove
the drawer
and set it
aside. Push the
slides back into the
pedestal.
Fig. 1-3
lf the washer has feet
installed,
remove
them. DO NOT install
the feet
that came
with
a new washer.
Partially install the
two
(2)
lower
#12 x
5/8"
(1
.6 cm) hex head
sheet
metal screws leaving
a space of about
318"
(2
cm) between
the screw head
and the bottom of the washer.
(Fis.
1-4)
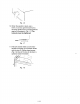
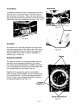
Move
the
pedestalagainst
the
washer
bottom. Slide the
pedestal's
keyhole
slots
over the
lower
two
(2) partially
installed
screws.
(Fig.
1-5)
Fig. 1-5
Lift the
pedestal
toward
the front of the
washer and
install
the two
(2)
remaining hex
head sheet metal screws. Do not tiqhten
completely.
6.
Tip
the
washer
and
pedestal
assembly back to an
upright
position.
Remove
protective
cardboard.
7. Slide the washer close
to
its final
location.
Helpful
Tip:
to
make
sliding the
washer
to
its
final location
easier, spray the
floor
behind
the
washer with window
cleaner.
lf the
washer
is still in its
packaging,
follow
the instructions on the
packaging
and
re-
move it.
8.
Follow
the
Installation
lnstructions that
came with the washer to finish
installing or reinstalling.
(i.e.,
hoses,
vents,
etc.)
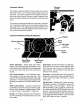
9. Level the
washer
from side to side
and front to back.
Place a
level
on the top. Locate the
114"
(6.4
mm) hex nut on the top of
each
pedestal
foot. Reach inside
the
pedestal
and use a 114"
(6.4
mm) hex
head ratchet or open-end wrench to
adjust the
feet
up or down as needed to
levelthe washer.
(Fig.
1-6)
z.
4.
rir|ltr
!*lm
lN!r*firn|
Fig. 1-4
1-7