
User Manual
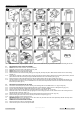
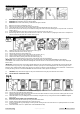


10.4. INSTALLING THE FOAM SLEEVE FILTER
10.4.1. Make sure the power cord is disconnected from the outlet. (g.9.1).
10.4.2. Remove the power head and place upside down. Follow instructions to remove cloth lter, refer to 9.3.
10.4.3. Carefully slide foam lter down over the lter cage, making sure the whole cage is covered. (g.9.2 & 9.3).
10.4.4. Replace the power head on the container.
10.5. CLEANING THE FOAM SLEEVE FILTER
10.5.1. With the removed power head in the upside down position, carefully remove the foam lter. (g.9.4).
10.5.2. Use mild soap and water solution to wash foam lter and rinse again with clean water. (g.9.5).
10.5.3. Allow lter to air dry before installing and using again.
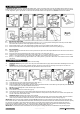
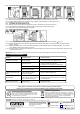
10.6. RESETTING THE REMOTE CONTROL
10.6.1. Have the remote control accessable. Set the power switch on the vacuum to remote control position . (g.10.1).
10.6.2. Press the RESET button on the side of the power head with a pointed object such as a paper clip or a pen tip until the indicator
lights up. (g.10.2).
10.6.3. Release the RESET button once the red indicator light lights up and immediately press and hold the 'ON' button on the remote
control handle until the vacuum powers on. (g.10.3).
10.6.4. If the 'ON' button is not pressed and held within a 15 second window, the reset will not be sucessful. Repeat steps 10.6.2 and 10.6.3
to reset the remote control.
IMPORTANT: When the vacuum is not in use make sure the switch is in the 'O' OFF position and the power cord is disconnected.
Problem Possible Causes Corrective Action
Vacuum will not operate. No power supply Check power supply: cord, breakers, fuses
Faulty power cord Unplug and check the power cord.
If damaged, have it repaired by a professional.
Container full Empty container.
Switch in wrong position. Press the ON 'I' button on the power head.
Dust comes from the motor The reuseable cloth lter is Attach or replace cartridge lter.
cover. missing or damaged.
Reduced efciency and motor Blockage in the nozzle, hose, Check nozzle, hose and container inlets for
speed/vibration. or the vacuum inlets. Or the dust blockage. Take off the lter and clean it, or install a
lter is blocked by ne dust. new cartridge lter.
Remote will not operate. Battery is dead. Replace the battery.
01284 757500
01284 703534
sales@sealey.co.uk
Sole UK Distributor, Sealey Group,
Kempson Way, Suffolk Business Park,
Bury St. Edmunds, Suffolk,
IP32 7AR
www.sealey.co.uk
Web
email
NOTE: It is our policy to continually improve products and as such we reserve the right to alter data, specifications and component parts without prior notice.
IMPORTANT: No liability is accepted for incorrect use of this product.
WARRANTY: Guarantee is 12 months from purchase date, proof of which will be required for any claim.
Parts support is available for this product. To obtain a parts listing and/or diagram,
please log on to www.sealey.co.uk, email sales@sealey.co.uk or telephone 01284 757500.
Environmental Protection.
Recycle unwanted materials instead of disposing of them as
waste. All tools, accessories and packaging should be sorted,
taken to a recycle centre and disposed of in a manner which
is compatible with the environment.
WEEE Regulations.
Dispose of this product at the end of its working life in compliance
with the EU Directive on Waste Electrical and Electronic Equipment.
When the product is no longer required, it must be disposed of in an
environmentally protective way. Contact your local solid waste
authority for recycling information.
fig.10
fig.9
11. TROUBLESHOOTING
Original Language Version
GV180WM Issue No.2(I) 02/04/15
© Jack Sealey Limited