
Operating instructions


15
Un-crating and Moving The Image 60C/S
Your Image 60C/S laminator is supplied in its own custom designed box with integral 4-way entry
pallet and its wrapped in plastic film to prevent moisture penetration.
WARNING
: If lifting the pallet from the end the forklift must be fitted with extensions that support the
whole length of the box.
NOTE:
If future transportation of the laminator is a possibility, the pallet, crate and securing bolts
should be kept in safe place.
To remove laminator from its box, please follow the instructions below:
Step 1 –
Cut the straps securing the carton to the pallet and remove the carton.
Step 2 –
Remove the plastic bag.
Step 3 –
Remove the four securing bolts, (located on the back and front of each cabinet at the
bottom) that hold the laminator to the pallet using the provided 19mm open-ended spanner. Push
down the internal thread end at the front of the right hand cabinet side (underneath green switch).
Step 4 –
Turn down the four laminator levelling feet (4x) to lift the laminator, use the provided
17mm open-ended spanner.
Step 5 –
Remove the wooden blocks (2x) sideways. Put the two ramps to the pallet.
Step 6 –
Unscrew the support block on one side, to make it turn 90
0
.
Step 7 –
Turn away the block to make room for the laminator to pass by.
Step 8 –
Turn up by going round the four laminator levelling feet (4x) to make the laminator stand
on the wheels. The laminator is now standing on its four swivel castors.
Step 9 –
Pull the laminator off the pallet and slowly roll the laminator down the ramps onto the floor.
Carefully push the laminator to its final location.
WARNING:
Step 9 should only be carried out by two or more people. Do not attempt to do it your
own.
Step 10 –
Cut the ties securing the two wooden blocks to the rollers, move up the top roller and
remove the wooden blocks.
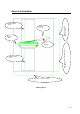
Wooden Blocks
Wooden block