
User manual


English
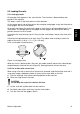
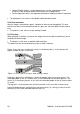
5.4.3 Webbing both upper and lower films.
The film in the upper section is webbed first
a. Remove the image guide.
b. Feed the film underneath the splitter bar (between splitter bar and upper roller).
• Pressure sensitive film (without a release liner) from the top unwind shaft must be
fed over the splitter bar.
c. Pull the film forward until it almost reaches the in-feed table and apply it to the upper
roller.
If the film has a release liner:
• Peel off the release liner.
• Pull it up and stick it onto the cylinder on the wind-up shaft.
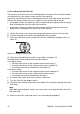
Now web the lower section
d. Lift the in-feed table and put it in the upper position.
e. Unwind the film from the lower unwind roll.
• Feed a pressure sensitive film without release liner underneath the splitter bar.
• Feed all other films over the splitter bar.
f. Pull the film forward until the end reaches above the nip and stick it to the film from the
upper section.
If the film has a release liner:
• Peel off the release liner.
• Pull it underneath the wind-up shaft.
• Stick it from below onto the cylinder on the wind-up shaft.
g. Lower the in-feed table.
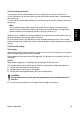
When encapsulating:
• Set the top pull roller in the raised position.
h. Push the films with a leader panel into the nip using slow mode.
i. Lower the pull rolls onto the leader panel.
Note:
Use a leader panel of the same material, thickness and width as the panels to process.
When encapsulating, it is recommended to use a thin release board as a leader.
j. Stick the front end of the image to the leader panel, or butt up the next panel.
k. When the leader panel is through the nip, set the pressure for optimum result.
l. Refit the image guide.
While feeding the images:
• Check and adjust the tension on the unwind- and wind-up shafts.
• Check and adjust the pressure setting.
• Now speed can be set to normal.
Machine Operation 45