
User manual PC-9 EP 1.3m Seagull (SEAX-8)


www.seagullmodels.com
13
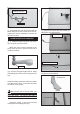
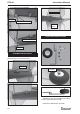
Insert two wing panels as pictures below:
ATTACHMENT WING-FUSELAGE.
Attach the aluminium tube into fuselage.
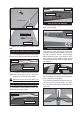
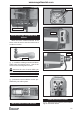
!1) It is critical that your airplane be bal-
anced correctly. Improper balance will cause
your plane to lose control and crash. The cen-
ter of gravity is locate
5.5-6.5cm back from
the leading edge of the wing, measured at wing
tip.
BALANCING.
!2) If the nose of the plane falls, the plane
is nose heavy. To correct this first move the
battery pack further back in the fuselage. If
this is not possible or does not correct it, stick
small amounts of lead weight on the fuselage
sides under the horizontal stabilizer. If the tail
of the plane falls, the plane is tail heavy. To
correct this, move the battery and receiver for-
ward orif this is not possible, stick weight onto
the firewall. When balanced correctly, the air-
plane should sit level or slightly nose down
when you lift it up with your fingers.
!1) We highly recommend setting up the
EP-PC9 using the control throws listed at right.
We have listed control throws for both Low
Rate (initial test flying/sport flying) and High
Rate (aerobatic flying).
CONTROL THROWS.
INITIAL FLYING/SPORT FLYING
Ailerons: 3/8” up 3/8” down
Elevator: 3/8 ” up 3/8” down
Rudder: 1/2” right 1/2” left
AEROBATIC FLYING
Ailerons: 1/2” up 1/2” down
Elevator: 5/8” up 5/8” down
Rudder: 1” right 1” left
Do not use the aerobatic settings for
initial test flying or sport flying.
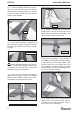
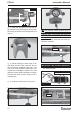
! 3) When the elevator, rudder and aileron
control surfaces are centered, use a ruler and
check the amount of the control throw in each
surface. The control throws should be
measured at the widest point of each sur-
face!
!2) Turn on the radio system, and with the
trim tabs on the transmitter in neutral, center
the control surfaces by making adjustments
to the clevises or adjustable servo connectors.
The servo arms should be centered also.
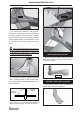
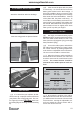
! 4) By moving the position of the adjust-
able control horn out from the control surface,
you will decrease the amount of throw of that
control surface. Moving the adjustable con-
trol horn toward the control surface will in-
crease the amount of throw.