..................................... HAWK 2XL Family: ..................................... ST32151N/W/WC ..................................... ST31051N/W/WC ..................................... ST32155N/W/WC ..................................... ST31055N/W/WC ..................................... Installation Guide .....................................
Contents Preface ........................................................................... 1 Electromagnetic interference ..................................... 1 Things you may need to install the drive ................... 3 Before you begin ............................................................ 6 Drive configuration ......................................................... 10 Set drive ID ................................................................ 11 Select operating features .................
Hawk 2XL Family Installation Guide, Rev. C 1 ___________________________________________________________________________________________________________________ Preface This manual is organized to assist you in the installation and operation of your Seagate Hawk 2XL Family disc drive. Family models are listed in Hawk 2XL Family Product Information section. It also provides information to aid in obtaining service for the drive.
2 Hawk 2XL Family Installation Guide, Rev. C _______________________________________________________________________________________________________________________ The physical design characteristics of the drive models described herein, serve to minimize EMI radiation when installed in an enclosure that provides reasonable shielding. As such, the drive(s) are capable of meeting the Class B limits of the FCC Rules and the Regulations of the Canadian Department of Communications. Note.
Hawk 2XL Family Installation Guide, Rev. C 3 _______________________________________________________________________________________________________________________ You may find helpful the following booklet prepared by the FCC: How to Identify and Resolve Radio-Television Interference Problems. This booklet is available from the Superintendent of Documents, US Government Printing Office, Washington, DC 20402. Refer to publication number 004-000-00345-4.
4 Hawk 2XL Family Installation Guide, Rev. C _______________________________________________________________________________________________________________________ • A SCSI* host adapter card for the PC You may need this if your computer does not already have a hard drive, if your present drive does not connect to a SCSI host adapter, or if your present SCSI adapter card cannot address a drive having the capacity the Hawk 2XL has.
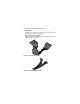
Hawk 2XL Family Installation Guide, Rev. C 5 ___________________________________________________________________________________________________________________ • A frame kit You will need a frame kit if you wish to mount a 3.5-inch disc drive in a 5.25-inch drive bay. • Extra configuration jumpers A small plastic bag of two types of configuration jumpers is included in drive package. Figure 1. Two drive I/O cable Figure 2.
6 Hawk 2XL Family Installation Guide, Rev. C __________________________________________________ Before you begin Verify that the system is switched off but remains connected to the main power before any installation is attempted. Protect yourself, the drive, and your valuable programs and data by reading the following cautions and warnings. • Do not tamper with sealed top cover. Doing so voids your warranty. The drive contains no user serviceable components. See Product Repair section for more information.
Hawk 2XL Family Installation Guide, Rev. C 7 _______________________________________________________________________________________________________________________ • When transporting or shipping a drive or system, please ensure that they are correctly packed in original Seagate approved (or equivalent) container and shipped via an airride carrier experienced in handling computer equipment. • Do not unpack drive from its static shielded bag until you are ready to install it in the system.
8 Hawk 2XL Family Installation Guide, Rev. C _______________________________________________________________________________________________________________________ Safety instructions 1. The disc drive is to be installed in a customer supplied enclosure where the surrounding air does not exceed 50oC. 2. Four (4) 6-32 UNC-2A screws are required for installation. Maximum screw length into side of drive is 0.15 inches (9/ 64 inch) (3.81 mm). Maximum screw length into bottom is 0.20 in. (3/16 inch) (5.
Hawk 2XL Family Installation Guide, Rev. C 9 _______________________________________________________________________________________________________________________ Sicherheitsanleitung 1. Däs Gerät ist ein Einbaugerät, vorgesehen für eine maximale Umgebungstemperatur von 50oC. 2. Zur Befestigung der Drive werden 4 Schrauben benötigt (632 UNC-2A). Die maximale Länge der Schrauben in der unteren Seite des Chassis darf nicht mehr als 0.20 in (5.08 mm) betragen, die in der Seiten 0.15 in (3.81 mm).
10 Hawk 2XL Family Installation Guide, Rev. C _______________________________________________________________________________________________________________________ Drive configuration You can easily install your new Seagate disc drive as your first ever hard drive, a replacement or as a second drive in a computer system with an existing hard disc drive.
Hawk 2XL Family Installation Guide, Rev. C 11 _______________________________________________________________________________________________________________________ Caution. Note that the jumper plugs used on J2 are shaped differently and are smaller than those used on J6 or J1-Auxiliary. Do not use J2 plugs on J6 or J1-Auxiliary as this will damage the internal contacts so they will not subsequently stay on J2.
12 Hawk 2XL Family Installation Guide, Rev. C _______________________________________________________________________________________________________________________ Table 1.
Hawk 2XL Family Installation Guide, Rev. C 13 _______________________________________________________________________________________________________________________ ("X" means the function selection can be made with jumpers on that connector; "Y" means the signal is available to host through that connector). Notes[ ] for Table 1: [1] Use either J6 or J1-Aux, but not both. [2] I/O connector J1 plugs directly into host. No jumper can be installed on J1.
14 Hawk 2XL Family Installation Guide, Rev. C _______________________________________________________________________________________________________________________ Select Operating Features If your new drive replaces an existing drive, you must set up the new drive to operate as the old drive did. Check the documentation for your old drive to see how the drive was set to operate. Look at Figure 3d or 3e.
Hawk 2XL Family Installation Guide, Rev. C 15 _______________________________________________________________________________________________________________________ Drive model "WC" plugs directly into a bulkhead or PCB mounted connector. Systems using these drives have made provisions for terminators and selecting most options, so only "Write Protect" and "Parity Disable" options (on J2) must be considered for possible setting by a person installing a replacement drive (usually no change is needed).
16 Hawk 2XL Family Installation Guide, Rev. C _______________________________________________________________________________________________________________________ If your drive is to be connected at the cable connector that is not at the end of the cable (it is a second hard drive for your system), the "Terminator Enable" jumper should not be installed. Remove and store the jumper if there is one on the "Terminator Enable" position. If installing a "WC" model drive see system documentation.
Hawk 2XL Family Installation Guide, Rev. C 17 _______________________________________________________________________________________________________________________ N drives Drive Front Jumper Plug (enlarged to show detail) J6 Pin 1 PCB LRR Reserved E E E D S S A2A1A 0 SCSI ID = 0 (default) SCSI ID = 1 SCSI ID = 2 SCSI ID = 3 SCSI ID = 4 SCSI ID = 5 SCSI ID = 6 SCSI ID = 7 Remote LED 11 Do not remove 12 cover or install any jumpers Drive Activity LED CATH Figure 3a.
18 Hawk 2XL Family Installation Guide, Rev. C _______________________________________________________________________________________________________________________ W/WC drive Pin 1 J6 PCB Reserved A3 A2 A1A0 SCSI ID = 0 (default) SCSI ID = 1 SCSI ID = 2 Drive Front SCSI ID = 3 SCSI ID = 4 SCSI ID = 5 SCSI ID = 6 SCSI ID = 7 SCSI ID = 8 Jumper Plug (enlarged to show detail) SCSI ID = 9 PCB SCSI ID = 10 SCSI ID = 11 SCSI ID = 12 SCSI ID = 13 SCSI ID = 14 Shipped with cover installed.
Hawk 2XL Family Installation Guide, Rev.
20 Hawk 2XL Family Installation Guide, Rev. C _____________________________________________________________________________________________________________ N/W drives Drive Front Drive PCB Jumper Plug (enlarged to show detail) J2 Jumper Positions Terminator Enable R T D MW P E T T E S E P D S P P (default) Delay Motor Start Enable Motor Start Write Protect Parity Disable Term. Power from Drive (default) Term. Power to SCSI Bus Term. Power from SCSI Bus Figure 3d.
Hawk 2XL Family Installation Guide, Rev. C 21 ___________________________________________________________________________________________________________________ WC drives Drive Front Drive PCB Jumper Plug (enlarged to show detail) J2 Jumper Positions R T D MW P E T T E S E P D S P P Delay Motor Start Enable Motor Start Write Protect Parity Disable * Not used. Figure 3e.
22 Hawk 2XL Family Installation Guide, Rev. C _______________________________________________________________________________________________________________________ Mounting the drive Important Precautions: • Make sure your computer is turned off before beginning installation. • Although switched off, your computer must remain plugged into an electrical outlet with an earth ground. This minimizes the possibility of damage from static discharge.
Hawk 2XL Family Installation Guide, Rev. C 23 _______________________________________________________________________________________________________________________ 2. Does your system have 5.25-inch drive bays?Your Seagate drive is designed to fit into a 3.5-inch wide drive bay. If your computer has 5.
24 Hawk 2XL Family Installation Guide, Rev. C _______________________________________________________________________________________________________________________ pin 1 on the Seagate disc drive is the pin closest to the HDA, on the side closest to the four-pin powersupply connector as shown in Figure 4a or 4b. Plug the interface cable into the drive connector firmly but carefully. The connector should cover both rows of pins.
Hawk 2XL Family Installation Guide, Rev. C 25 _______________________________________________________________________________________________________________________ • Using a conversion frame kit: To mount a 3.5" drive in a 5.25" drive bay, install the drive in the frame kit (installation instructions and required hardware are included with a frame kit). Then mount the frame kit in the drive bay. If you are installing two disc drives, repeat the appropriate procedure above for the second drive.
26 Hawk 2XL Family Installation Guide, Rev. C ___________________________________________________________________________________________________________________ 50-pin drive HDA Pin 1 * * Illustrates "N" model I/O Figure 4a. Fifty-pin I/O connection to drive 68-pin drive HDA Pin 1 Figure 4b.
Hawk 2XL Family Installation Guide, Rev. C 27 _______________________________________________________________________________________________________________________ Multiple drive “N” Model Drive SCSI ID 6 (or last drive) 2 through 6 SCSI devices Pin 1 (check your adapter for Pin 1 location) SCSI ID 1 SCSI ID 7 SCSI ID 0 Host Adapter PCB Figure 4c.
28 Hawk 2XL Family Installation Guide, Rev. C _______________________________________________________________________________________________________________________ W drive “W” Model Drive SCSI ID 15 (or last drive) 2 through 15 SCSI devices Pin 1 (check your adapter for Pin 1 location) SCSI ID 1 SCSI ID 7 SCSI ID 0 Host Adapter PCB Figure 4d.
Hawk 2XL Family Installation Guide, Rev. C 29 _______________________________________________________________________________________________________________________ WC drive Note: This drive model plugs directly into a backplane connector and therefore uses no cables. Figure 4e.
30 Hawk 2XL Family Installation Guide, Rev. C _______________________________________________________________________________________________________________________ 6. Attach a system power cable to the power connector on each drive as shown in Figure 5. If your system does not have an extra power cable for the hard drive, you can purchase a Y-shaped power cable, such as the one shown in Figure 2. 7. Review each of the previous steps to verify that you have completed the installation correctly. 8.
Hawk 2XL Family Installation Guide, Rev. C 31 _______________________________________________________________________________________________________________________ [4] C [3] G L D [1] F E A Notes: [1] Mounting holes three on each side, 6-32 UNC. Max screw length into side of drive 0.15 in. (3.81 mm). Screw tightening torque 6.0 in-lb (.675 NM) max with minimum thread engagement of 0.12 in. (3.05 mm). [2] Mounting holes four on bottom, 6-32 UNC. Max screw length into bottom of drive 0.20 in. (5.
32 Hawk 2XL Family Installation Guide, Rev. C _______________________________________________________________________________________________________________________ Configuring the computer for your drive The hardware part of your installation should now be complete. Software installation informs your computer operating software about your Seagate disc drive characteristics. You can then divide your drive into partitions called "logical drives.
Hawk 2XL Family Installation Guide, Rev. C 33 _______________________________________________ • Setup presents a menu. Choose the menu item that asks you to declare the drive type. If the screen says the drive type is "not installed" or something similar, save that and leave setup. If it asks you to enter a drive type, enter "none," "drive not installed," "type 0" or whatever similar response is given as a choice on the menu. • Save and leave this screen. The computer will probably boot up again.
34 Hawk 2XL Family Installation Guide, Rev. C _______________________________________________________________________________________________________________________ Caution. Do not try to change the partitions set up for an existing in-use drive. If you change any partitions or logical (simulated) drive assignments on your existing drive, you will lose all data stored. Always backup the existing drive's data on diskettes, tape, or other media before changing the drive's configuration.
Hawk 2XL Family Installation Guide, Rev. C 35 _______________________________________________________________________________________________________________________ Formatting Caution. Do not format the existing drive that contains user data that you don't want to lose, as all user data will be lost when a drive is formatted. When a second drive is installed, the drive letters assigned by DOS to the first drive may change. Be careful not to accidently format a logical drive with existing data.
36 Hawk 2XL Family Installation Guide, Rev. C _______________________________________________________________________________________________________________________ Note: Seagate Technology assumes no liability for lost user data. From the C/> prompt, try to switch to each logical drive (C:, D:, E:, etc.) to see if you can get a prompt for each logical drive (C\>, D\>, E\>, etc.). With each prompt that you select, type CHKDSK. This shows if the logical drives are usable for storing data and programs.
Hawk 2XL Family Installation Guide, Rev. C 37 _______________________________________________________________________________________________________________________ Macintosh installation To configure this drive in a Macintosh system, you must use a third-party hard disc initialization application. Most software vendors and computer stores that carry Macintosh software will have hard disc drivers available for purchase.
38 Hawk 2XL Family Installation Guide, Rev. C __________________________________________________________________________________________________________________ Troubleshooting Before calling Seagate Technical Support, please read and consider the possibilities discussed below. The suggestions presented here will resolve the majority of installation problems. General installation troubleshooting • Check system compatibility. This is a SCSI interface device.
Hawk 2XL Family Installation Guide, Rev. C 39 _______________________________________________________________________________________________________________________ • Check to ensure that drive is receiving power. Insert the drive into your system. Listen carefully for the sound of the drive motor spinning up. There should be the rotational spin up noise, with no interruption, followed by seeking noises and clicks. If the drive motor does not spin up, check the power supply.
40 Hawk 2XL Family Installation Guide, Rev. C _______________________________________________________________________________________________________________________ Product repair information Service requirements The special facilities required for the manufacture of these drives generally prohibit repair in the field. If problems occur during installation, please contact your supplier for assistance. Do not attempt to disassemble or repair.
Hawk 2XL Family Installation Guide, Rev. C 41 _______________________________________________________________________________________________________________________ Product repair and return information Seagate customer service centers are the only facilities authorized to service Seagate drives. Seagate does not sanction any third-party repair facilities. Any unauthorized repair or tampering with the factory-seal voids the warranty.
42 Hawk 2XL Family Installation Guide, Rev. C ________________________________________________________________________________________________________________________ Technical support services Seagate Technology provides technical support literature and diagnostic utilities to Authorized Distributors. Please contact your dealer for technical support and installation troubleshooting.
Hawk 2XL Family Installation Guide, Rev. C 43 _______________________________________________________________________________________________________________________ BBS location Modem number Maximum baud rate Australia England France Germany Korea Singapore USA Thailand 61-2-756-2359 44-62-847-8011 33-1-40-67-1034 49-89-140-9331 82-2-556-7294 65-292-6973 408-438-8771 662-531-8111 9600 9600 9600 9600 9600 9600 9600 9600 2.
44 Hawk 2XL Family Installation Guide, Rev. C 5. SeaFONE™: Technical support specialists are available to answer questions by telephone from 8:00 a.m. to 5:00 p.m. (Pacific time), Monday through Friday. The SeaFONE enhanced phone system also provides recorded technical information on selected Seagate products whenever callers are placed on hold. This recorded information is accessible 24 hours daily. To reach SeaFONE dial: _______________________________________________ PHONE 408/438-8222 6.
Hawk 2XL Family Installation Guide, Rev. C 45 _______________________________________________________________________________________________________________________ Hawk 2XL Family product information Characteristics of the various drives covered by this manual are listed in the following table.
46 Hawk 2XL Family Installation Guide, Rev. C _______________________________________________________________________________________________________________________ Notes. [1] Standard units are factory formatted with 512 data bytes per sector with 10 spare sectors per cylinder for ST32151/ ST32155, 5 spare sectors per cylinder for ST31051/ ST31055 and 2 cylinders at inner tracks reserved for spares in addition to capacity listed. All spare sectors are on one track.
Seagate Technology, Inc. 920 Disc Drive, Scotts Valley, CA. 95066-4544, USA Publication Number: 77767490, Rev.