Seagate Lyve Mobile Shuttle User Manual Model: Click here to access an up-to-date online version of this document. You will also find the most recent content as well as expandable illustrations, easier navigation, and search capability.
Cont ent s 1 Introduction . . . . . . . . . . . . . . . . . . . . . . . . . . . . . . . . . . . . . . . . . . . . . . . . . . . . . . . . . . . . . . . . . . . . . . . . . . . . . . . . . . . . .5. . . . . . . . . . .content . . . . . . . . . . . . . . . . . . . . . . . . . . . . . . . . . . . . . . . . . . . . . . . . . . . . . . . . . . . . . . . . . . . . . . . . . . . . . . . . . . . . . . . . . . . . . . . . . . . . . . . . . . . .5. . . . . . . . . Box . . . . . . . . . .system . . . . . .
. . . .credentials Set . . . . . . . . . (Volume . . . . . . . . password) . . . . . . . . . . . . . . . . . . . . . . . . . . . . . . . . . . . . . . . . . . . . . . . . . . . . . . . . . . . . . . . . . . . . . . . . . . . . . . . . . . . . . . . . . . .19 .......... . . . . . network . . . . . . . .configuration . . . . . . . . . . . . . . . . . . . . . . . . . . . . . . . . . . . . . . . . . . . . . . . . . . . . . . . . . . . . . . . . . . . . . . . . . . . . . . . . . . . . . . . . . . . . . . . . .
. . . . . . . RoHS Taiwan . . . . . . . . . . . . . . . . . . . . . . . . . . . . . . . . . . . . . . . . . . . . . . . . . . . . . . . . . . . . . . . . . . . . . . . . . . . . . . . . . . . . . . . . . . . . . . . . . . . . . . . . .34 ..........
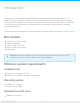
Introduc on Take control of your data transfer and transport costs when moving data around your enterprise. The Seagate ® Lyve Drive™ Shuttle is available in storage options that are simple and affordable for emerging edge environments, regardless of cloud service provider. This shuttle supports most industry-standard file systems and network protocols for easy ingestion from direct-attached, network-attached, and other external storage devices.
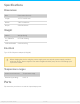
Specifica ons Dimensions Side Dimensions (in/mm) Length 12.717 in/323 mm Width 7.087 in/180 mm Depth 3.543 in/90 mm Weight Model Weight (lb/kg) 2 x 4TB SATA SSD 8.774 lb/3.98 kg 16TB SATA HDD 9.921 lb/4.5 kg Electrical Type C PD 3.0 power adapter (15V@3A) When charging the device using the power supply port, use only the power supply provided with your device. Power supplies from other Seagate and third-party devices can damage your Lyve Drive Shuttle.
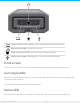
Host port (USB 3.1 Gen 2 Type C)—Connect to Windows and macOS computers. Ethernet port (10 GbE) 1—Connect to a network. Power port (Type C PD 3.0)—Connect the power adapter (15V@3A). Peripheral port (USB 3.1 Gen 2 Type C)—Connect to external USB storage. E-Ink screen To open the cover on the E-Ink screen, push the button and slide the button away from the screen. Carrying handle Press the two handle release buttons on each side of the handle.
Shipping case A shipping case is included with Lyve Drive Shuttle. Always use the case when transporting and shipping the device. Lyve Drive Shuttle is well protected in its hard enclosure but is not manufactured to withstand the potentially damaging impacts that can occur with transport. 1Performance up to 5GbE.
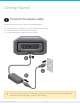
Ge ng Started Connect the power cable Connect the included power supply in the following order: A. Connect the power supply to Lyve Drive Shuttle's power input. B. Connect the power cord to the power supply. C. Connect the power cord to a live power outlet. Use only the power supply provided with your device. Power supplies from other Seagate and third-party devices can damage your Lyve Drive Shuttle.
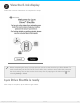
View the E-Ink display Follow the onscreen instructions to complete the setup. When completing the setup, a popup prompts you to set the clock for Lyve Drive Shuttle. To make certain that your device has the correct date, time, and time zone, follow the prompt to the clock setting. You can also set the clock at any time by tapping on the Menu icon ( ) and selecting Settings > Clock. Lyve Drive Shu le is ready After setup is complete, tap an action to get started.
For advanced network features such as NFS, site configurations, and volume passwordprotection, tap on the Menu icon ( ) and select Settings > Network. Ini al configura on Storage Format exFAT for compatibility with Windows and macOS. Internet Protocol DHCP for easy network connectivity. Network Protocol SMB to share and password-protect the network volume. Site creden als In addition to DHCP, you can set up unique network credentials for all your sites.
Get the most from Lyve Drive Shuttle with easy access to information and support. To register your device: 1. 2. 3. 4. 5. 6. On the Home screen, tap the Menu icon ( ). Tap Support. Tap Register. Tap on the Name field and enter your name. Tap on the Email field and enter your email address. Tap Register. Power off/on Lyve Drive Shu le To power off Lyve Drive Shuttle: 1. On the Home screen, tap the Menu icon ( ). 2. Tap Shut Down. Lyve Drive Shuttle does not have a power button.
Security Securely encrypt stored data on Lyve Drive Shuttle with Seagate Secure™, which protects data via industry standard AES-based hardware encryption. Lyve Drive Shuttle's enhanced encryption keeps your data safe should someone attempt to remove the storage device. The storage device can only be unlocked when it is safely housed within Lyve Drive Shuttle and will not work if it is removed. Create a password Lyve Drive Shuttle can only be unlocked by the device password.
To unlock the device: 1. Connect the power cable to power on the device. 2. Enter your password. 3. Tap Unlock. Lock device To lock the device: 1. On the Home screen, tap the Menu icon ( ). 2. Tap Lock.
Desktop Opera ons You can connect a computer to Lyve Drive Shuttle's USB host port. Once connected, you can copy files to Lyve Drive Shuttle. Connect a computer To connect a computer: 1. On the Home screen, tap Connect to Computer. 2. Connect a computer to Lyve Drive Shuttle's USB host port. 3. Wait for Lyve Drive Shuttle to detect and connect to your computer.
Copy files To copy files to Lyve Drive Shuttle: 1. With your computer connected to Lyve Drive Shuttle, open a computer file browser window and navigate to the location on Lyve Drive Shuttle where you want to locate your copied files. 2. Open a second file browser window and select files to copy. 3. Drag the files to the target location on Lyve Drive Shuttle. 4. Wait for the copy operation to complete. Eject drive and disconnect computer To eject and disconnect Lyve Drive Shuttle: 1.
3. At the prompt, confirm by tapping Disconnect.
Network Configura on Use the Network Settings screen to select a network service, configure sites, and create user credentials for accessing Lyve Drive Shuttle's volume. To navigate to the Network Settings screen: 1. On the Home screen, tap the Menu icon ( ). 2. Tap Settings. 3. Tap Network. Choose a network service Lyve Drive Shuttle supports two communication protocols used for sharing access to network resources: SMB (Default) SMB supports any storage format. SMB supports network volume credentials.
Configure sites Some of the sites you connect to may require static IP addresses rather than Dynamic Host Configuration Protocol (DHCP). Lyve Drive Shuttle walks you through adding network information for sites using static IP addresses. Once a site is configured, you can choose it when selecting a network connection from the Home screen. To add a site: 1. On the Network screen, tap Configure Sites. 2. Tap Add site. 3.
Accessing Lyve Drive Shuttle on a Windows computer connected to a domain If you're using a Windows machine connected to a domain, your Lyve Drive Shuttle username/password credentials must match your domain credentials in order to access the Lyve Drive Shuttle's volume over the network. See this knowledge base article for more details. View network configura on You can view and edit configuration details of Lyve Drive Shuttle's current network. To view configuration details of the current network: 1.
Network Opera ons No sites configured To connect to a network: 1. On the Home screen, tap Connect to Network. 2. Connect Lyve Drive Shuttle's Ethernet port to a network. 3. Once Lyve Drive Shuttle is connected, you can copy data from computers on the network to Lyve Drive Shuttle’s volume. 4. If you need details on the configuration of the connected network, tap Info. 5. When you're finished, tap Disconnect. Sites configured To connect to a network: 1. On the Home screen, tap Connect to Network. 2.
Copy Storage Devices You can initiate an automated copy of data from a USB-connected device. To begin the copy: 1. On the Home screen, tap Copy a Drive. 2. Connect a device to Lyve Drive Shuttle's USB port. 3. Lyve Drive Shuttle searches for connected devices. At the prompt, select the source to copy to Lyve Drive Shuttle and tap Copy. 4. When copying is complete, view the results and tap OK.
MM Minutes UUID Universally unique identifier designating the device from which the files were copied N Session number Take for example the following directory: 20201001.1306.XFGT6G.1 Lyve Drive Shuttle would have created this directory on October 1, 2020, at 1:06pm. The source of the content was a device with a UUID of XFGT6G. This was the first upload of content from this device on this day.
Enabling incremental copies To enable incremental copies: 1. 2. 3. 4. 5. On the Home screen, tap the Menu icon ( ). Tap Settings. Tap Copy Storage Device. Make sure the Incremental checkbox is selected. Tap Back. Performing verifica ons Verification checks the integrity of files for all copies. Enabling this option doubles the time to copy. Enabling copy verifica ons To enable copy verifications: 1. 2. 3. 4. 5. On the Home screen, tap the Menu icon ( ). Tap Settings. Tap Copy Storage Device.
Crypto Erase A crypto erase securely deletes all data on Lyve Drive Shuttle. Data cannot be recovered after a crypto erase. Your security settings and password remain unchanged. To crypto erase the device: 1. 2. 3. 4. 5. 6. 7. On the Home screen, tap the Menu icon ( ). Tap Crypto Erase. At the prompt, tap Next. Enter your password and tap Next. The drive will be reformatted after erasing data. Select a storage format and tap Erase. At the prompt, tap Erase to confirm the crypto erase.
Recovery If an internal issue is detected when starting, Lyve Drive Shuttle may automatically initiate a recovery. To complete the recovery: 1. Tap to choose one of the recovery options: 2. 3. 4. 5. Revert all settings Revert only settings to factory defaults. Data and password remain untouched. Erase data and reset device Erase all data and revert settings to factory defaults. You must reconfigure the device after the reset. This option permanently removes all data and cannot be undone. Tap Apply.
Manual recovery To initiate a manual recovery: 1. On the Home screen, tap the Menu icon ( ) and select Support > Recovery. 2. Follow the instructions above.
Se ngs To view and change Lyve Drive Shuttle settings: 1. On the Home screen, tap the Menu icon ( ). 2. Tap Settings. 3. Select an option from the Settings menu. Network Network settings let you configure network sites, services, and credentials. See Network Configuration for details. Copy storage device You can initiate an automated copy of data from a USB-connected storage device. See Copy Storage Devices for details. To view and change copy settings: 1. In the Settings menu, tap Copy Storage Device. 2.
Tap 12H or 24h to set the clock (12-hour/24-hour). Tap Edit. On the Choose time zone screen, tap on the Search icon. Enter a time zone, city, or country and tap Search. Select a time zone from the search results and tap Next. On the Set clock screen, tap the Up/Down arrows to change the Month/Day/Year and Hour/Minutes settings. If the device is using a 12-hour clock, you can also set AM/PM. 8. Tap Apply. 2. 3. 4. 5. 6. 7. Change password A device password is created during the initial setup (see Security).
Support Get the most from Lyve Drive Shuttle with easy access to information and support. To select support activities: 1. On the Home screen, tap the Menu icon ( ). 2. Tap Support. 3. Select an activity from the menu. Update Lyve Drive Shuttle's firmware may need to be updated as part of routine maintenance or in order to resolve a specific issue. To initiate a firmware update: 1. In the Support menu, tap Update. 2.
Automa c To complete an automatic firmware update: 1. After the update is downloaded, Lyve Drive Shuttle will power off. 2. You're prompted to power on the device to run the update. Disconnect and reconnect the power cable. Lyve Drive Shuttle will automatically update when powering on. Generate diagnos c If you've contacted Seagate support about a technical problem with Lyve Drive Shuttle, a representative may ask you to download a diagnostic report to aid in troubleshooting the issue.
1. 2. 3. 4. In the Support menu, tap Register. Tap on the Name field and enter your name. Tap on the Email field and enter your email address. Tap Register. About The About screen displays details about Lyve Drive Shuttle. To view the About screen: 1. In the Support menu, tap About. 2. Review the following device details: Product name Device name Model name Firmware version Serial number 3. Tap Back. Lyve Drive Shuttle uses open source libraries. You can download acknowledgements and licenses: 1.
Regulatory Compliance Product Name Regulatory Model Number Seagate Lyve Drive Shuttle SUP001S FCC DECLARATION OF CONFORMANCE This device complies with Part 15 of the FCC Rules. Operation is subject to the following two conditions: (1) this device may not cause harmful interference, and (2) this device must accept any interference received, including interference that may cause undesired operation.
China RoHS 2 refers to the Ministry of Industry and Information Technology Order No. 32, effective July 1, 2016, titled Management Methods for the Restriction of the Use of Hazardous Substances in Electrical and Electronic Products. To comply with China RoHS 2, we determined this product’s Environmental Protection Use Period (EPUP) to be 20 years in accordance with the Marking for the Restricted Use of Hazardous Substances in Electronic and Electrical Products, SJT 11364-2014.
Seagate Lyve Mo bile Shuttle 6/3/22 35