Seagate® FireCuda® PCIe NVMe M.
Revision History Version and Date Description of Changes Rev B, November 2019 Applies to all products in the Seagate FireCuda PCIe NVMe M.2 SSD series. Rev A, September 2019 First document release. © 2019, Seagate Technology LLC All rights reserved. Publication number: 100850350, Rev B, November 2019 Seagate Technology reserves the right to make changes to the product(s) or information disclosed herein at any time without notice.
Contents Introduction . . . . . . . . . . . . . . . . . . . . . . . . . . . . . . . . . . . . . . . . . . . . . . . . . . . . . . . . . . . . . . . . . . . . . . . . . . . . . . . . . . . . . 4 Warranty . . . . . . . . . . . . . . . . . . . . . . . . . . . . . . . . . . . . . . . . . . . . . . . . . . . . . . . . . . . . . . . . . . . . . . . . . . . . . . . . . . . . . . . . . . . . . . . . . . . . . . . . . . . 4 Preparing for Installation . . . . . . . . . . . . . . . . . . . . . . . . . . . . . . . .
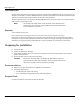
www.seagate.com Introduction This document describes how to install the Seagate® FireCuda® PCIe NVMe M.2 SSD on your computer. The Seagate FireCuda SSD is a versatile NVMe SSD that is specifically developed for the needs of professional-level gamers. See the SSD product documentation for warranty and more details. The FireCuda SSD comes in the double-sided M.2 2280 form factor and can be used in any computer system with an 80 mm long M.2 M-key slot.
www.seagate.com Installing the SSD 1. Open the case or cabinet. 2. Remove the existing storage devices if any. 3. Power on your computer. 4. Access the BIOS setup while the computer is booting. Usually, the computer screen displays the keys to be pressed to access the BIOS setup during the boot process. See the computer or motherboard documentation for information on how to access the BIOS. 5. Ensure that a PCIe device is set in the BIOS boot sequence or boot priority list.
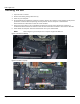
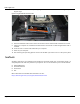
www.seagate.com 7. Insert the FireCuda SSD with the pinside going into the M.2 slot and the label side facing the top at a 30 degree angle. Figure 3 Seagate M.2 SSD in the M.2 Slot 8. Press the SSD down and mount it above the screw slot of the motherboard and fasten the screws. 9. Follow your computer or motherboard manufacturer's instructions to install integrated heat sink if available. 10. Close the case or cabinet and reassemble your computer. 11. Power on your computer. 12.
www.seagate.com DiscWizard Seagate DiscWizard is an integrated software suite that ensures the security of all of the information on your PC. It can clone, back up the operating system, applications, settings and all of your data, while also securely destroying any confidential data you no longer need. With this software, you can back up the entire disk drive or selected partitions.
Seagate Technology LLC AMERICAS Seagate Technology LLC 10200 South De Anza Boulevard, Cupertino, California 95014, United States, 408-658-1000 ASIA/PACIFIC Seagate Singapore International Headquarters Pte. Ltd. 90 Woodlands Avenue 7, Singapore 737911, 65-6412-3666 EUROPE, MIDDLE EAST AND AFRICA Seagate Technology (Netherlands) B.V.