
Installation Guide


June 2022
INSTALLATION INSTRUCTIONS
Silhouette Comfort
Tub/Shower Seat
LIFESTYLE & WELLNESS ®
LIFESTYLE & WELLNESS®
Patent Pending
Page 4
of 5
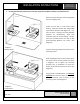
Diagram 4
Step #3
Secure the Seat Mounting Brackets to the wall
using the four (4) #14 Flat Head Phillips sheet
metal screws (supplied by manufacturer) and
screw into the solid wood backing, starting with
the top two hole locations. (See Diagram 3).
Secure the Seat Mounting Brackets with the
mounting screws but DO NOT tighten the
mounting screws completely.
Step #4
Fully insert the Arm Rest Brackets into the cutouts
on both sides of the Seat Mounting Brackets until
they fit snug inside the cutouts when flush on the
mounting surface. (See Diagram 4).
Using a pencil or suitable marker, mark the center
of each of the four (4) mounting holes on the Arm
Rest Brackets precisely on the mounting surface.
Repeat steps #1 and #2 to mount the Arm Rests
on the mounting surface.
Secure the Arm Rest Brackets to the wall using
the four (4) #14 Flat Head Phillips sheet metal
screws (supplied by manufacturer) and screw
into the solid wood backing, starting with the
top two hole locations. (See Diagram 4)
Secure the Arm Rest Brackets with the
mounting screws but DO NOT tighten the
mounting screws completely.
Step #5
Tighten the four (4) screws on both of the Arm
Rest Brackets, then tighten the four (4) screws on
the Seat Mounting Brackets so that ALL eight (8)
screws have been tightened completely.
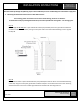
Diagram 3