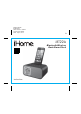
Model: iBT22A IB (English) Size: 153mm x 120mm Printing color: Black Date : July 8, 2013 P1 iBT22A Bluetooth Wireless Dual Alarm Clock instruction manual
P4 Information FCC Déclaration FCC quant à l'exposition à la radiation iBT22A FCC ID: EMOIBT22A Cet équipement est conforme aux limites FCC relatives à l'exposition à la radiation par radiofréquences IC: 986B-IBT22A établies pour les environnements non contrôlés. Cet émetteur ne doit pas être colocalisé ou utilisé en conjonction avec tout autre émetteur ou antenne. Cet appareil est conforme à la norme RSS-210 des règlements relatifs aux circuits intégrés.
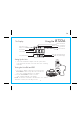
P6 iBT22A Included Installing the Backrest • iBT22A Alarm Clock 1 • 100V-240V universal AC adaptor • Backrest • 3 AAA batteries 2 • 12” patch cord 1) Insert the front tabs of the included backrest at a slight angle into the slots on top of the unit (behind the buttons). 2) Grip the unit in both hands from front to back as shown and squeeze the unit slightly towards you while pressing down firmly on the backrest until it clicks into place.
P7 Meet Your iBT22A Top iBT22A Back Rest Lower Volume Button Sleep Button Raise Volume Button Alarm Reset/Power Button Fwd/+ Setting Button Alarm 1 Button Alarm 2 Button Rev/– Setting Button Play/Pause Button Snooze Dimmer Button Back Aux-in Jack DC Jack Bluetooth/Pairing Button USB Charging Port Clock Adj.
P8 Replacing & Installing Clock Backup Batteries Using the iBT22A The iBT22A uses 3 AAA batteries (included) for backup to provide continuous alarm operation and clock settings in the event of a power failure. If the backup batteries have been installed and a power failure occurs or the AC adaptor is accidentally disconnected, the display backlight will not remain lit, but current time and alarm time settings will be temporarily maintained. Otherwise, you must reset the time and alarm settings.
P9 Using the The Display iBT22A Bluetooth Indicator DST indicator Battery Low Indicator PM Indicator SLEEP AUX-IN Alarm 1 & Alarm 2 Indicators Sleep Indicator Aux-in Indicator PM Time Display PM AM ALM. YEAR DATE Alarm time AM/PM Indicator Alarm Time/Date Display Setting Up the Unit outlet Turning the Unit ON and OFF 1. Once the AC adaptor is properly connected, press the Power Button located on top of the unit to turn the unit ON. “ON” will appear briefly on the display. 2.
P10 Using the Setting the Time iBT22A 1. Press and hold the Clock Adjust Button (located on the back of the unit) until the time flashes in the display and a beep sounds. 2. Press and release the – or + Buttons to adjust the clock to the current time (hold to advance or reverse rapidly). Make sure to set the correct AM/PM time. The PM indicator appears to the left of the time display; there is no AM indicator. 3. Press and release the Clock Adjust Button.