
User's Manual


HBH34
Staff Quick Start Guide
Included
• HBH34 system
• Security tether
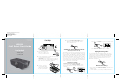
Set Up
Setting the Time Zone and Clock
(Factory Preset Clock)
Connect AC plug
to a working outlet
that is not controlled
by an On/Off switch.
Press Time Zone Button again to confirm.
Set the Volume Limiter Switch on the
back of the unit (Off for large rooms,
On for smaller rooms).
Security tether
2 SECS
HBH34 Quick Start Guide - Front
Size: 432 x 140 mm
Printing Color: Black
Mat’l: 100 gsm WF paper
Nov 11, 2016
Daylight Saving Time
The unit ships with the Daylight Saving Time (DST)
switch in Auto position, and will automatically adjust
when the time changes in March and November. If
Daylight Saving Time is NOT observed in your loca-
tion, move the DST switch from AUTO to -1 or +1
BEFORE setting time.
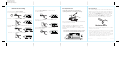
Bluetooth Pairing
1. Press and hold the Bluetooth Button. Unit will enter
pairing mode.
2. Select “HBH34” on your device’s Bluetooth menu.
outlet
1
2
3
4
o on
volume limit
+1 -1 auto
dst
time zone
Remove thumbscrew
and remove back cover
to access staff controls.
The first time you connect your new preset clock to
the AC outlet, the unit will automatically show the
correct Eastern Standard time, which is the default
setting. If you are not in the Eastern time zone, you
must change the default setting to match your time
zone (see Time Zone Setting below). Once the
correct time zone is set, if the time displayed is not
correct, follow steps under Manual Clock Setting to
set the correct time, year and date.
Time Zone Setting
Make sure unit is in Power OFF mode.
Press and hold the Time Zone Button on the
back of the unit for 2 seconds. The time zone
will flash.
Press the – or + Button to cycle to local time zone.
Secure the attached Security Tether to a wall
or other permanent surface.
CAUTION: DO NOT attach to an AC outlet or
cause it to become entangled with anything
that can create a hazardous situation.
FCC ID: EMOHBH34
IC: 986B-HBH34