
User's Manual
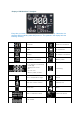


Stage 0) Entering set mode
*03MA10
1. Press the SET/PRT button (on the top side of the analyzer) during 3 seconds to
enter set mode after turn on and standby state. If you want to leave the set mode
instead (this is only possible if a date and time setting is made) in any set mode, press the
SET/PRT button.
2. If the displayed setting is, you can continue directly to the next setting by pressing
the Enter button.
3. Press the ◀ or ▶ button to change the currently flashing setting. You can press
the ◀ or ▶ button as many times as needed (or keep it pressed) until the
desired setting (value) is reached.
4. Press the Enter button again to confirm (store) the current setting and go to the
next setting. You can only move forward through the settings. Moving backwards
is not possible. Corrections can only be made by repeating the settings. The
setting procedure can be terminated at any time by pressing the Enter button. The
settings made up to that point will be stored.
If you want to exit the setting mode without changing, press the set button