
User's Manual


STEP 1-1. Insert batteries
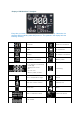
1. Ensure the analyzer is switched off and turn it over.
2. Open the battery compartment lid by slightly pressing the tab towards the centre of
the analyzer.
3. Lift the lid upwards to remove it from the analyzer.
4. Insert four batteries into the compartment according to the illustrations. Please note
the orientation of the “+” (battery head) and “–” terminals (fl at end). Use only alkaline
manganese batteries (1.5 V, AA).
5. Close the battery compartment lid.
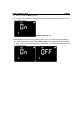
6. Turn the analyzer on to test the function of the new batteries.
7. Check that the display is functioning correctly to prevent misinterpretations due to
defective display elements.
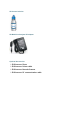
STEP 1-2. Connect DC adapter jack
1. Ensure the DC adapter jack is provided by SD Biosensor, inc.
(DC adapter jack is 4 mm external-diameter and 1.7 mm internal-diameter, and output
is 5V/2A.)
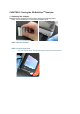
2. Connect DC adapter jack to the dc jack port in the back of analyzer
Always replace all four batteries at the same time because batteries with different
capacities may impair the function of the analyzer. Do not use rechargeable batteries.
Note.
n If you think the display screen does not appear for long enough, you can hold
down the Enter button (the next time you switch on the analyzer). The display
screen is then shown for the time the button is pressed.
n After inserting or replacing batteries, confirm that the time and date are set
correctly. If they are not, reset the analyzer before testing.
Note.
n If the batteries are already inserted and if DC adapter jack is connect, the
analyzer use a power only from dc jack