
Operator`s manual

TTM 57SL FOR SERATO SCRATCH LIVE • OPER ATOR’S MANUAL 1.9.2
30
ADDITIONAL SETUP
This section covers general preferences and
adjustments you can make to improve the
performance of Scratch Live. Click on setup to
get to this area.
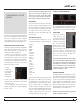
HARDWARE
USB BUFFER SIZE (LATENCY)
Scratch Live processes audio in small chunks.
When smaller chunks are used, the movement
of the record is translated into audio more often,
which results in a lower overall system latency.
However, this requires more processing and
therefore a higher CPU load, so lower buffer size
settings require a more powerful computer to
produce uninterrupted audio. If you want tighter
control, you should try decreasing this setting,
on the other hand, if you experience audio
dropouts, you need to increase this setting (or
use a more powerful computer).
UPDATING FIRMWARE
If a rmware update is available after installing
a new Scratch Live software release, an update
rmware button appears in the setup screen.
The rmware upgrade takes approximately 10
seconds, during which time the mixer will not be
usable. If for any reason the rmware upgrade
does not work, just turn the mixer off and back
on again. It’s not possible to damage the mixer
whilst performing a rmware upgrade.
NOTE: Newer firmware may not work with
older versions of Scratch Live The mixer
will still be usable with older Scratch Live
versions, but the effects do not display
parameter values onscreen so you will not be
able to see how the effects are configured.
You will have the same control over the
effects that you have when using effects
without Scratch Live connected.
If you are using a mixer that is not yours and
shared by other people please DON’T UPGRADE
their rmware without their permission. If you
don’t click on rmware update, the mixer will
run ne on the older rmware without the new
effects. If you have upgraded your firmware
and you need to downgrade please do the
following:
1. Run the older version of Scratch Live with the
mixer attached.
2. Power off the mixer.
3. Hold the two High kill buttons down while
powering on the mixer.
4. The kill lights will all be lit up red, and the
rmware will downgrade to the version that
shipped with that Scratch Live version. When
the kill lights go out, the update is complete.
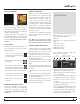
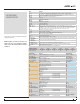
SAVE TO MIXER
Click these buttons to transfer settings to
the mixer. The save to mixer buttons in the
Effects sections save to the mixer processors
independently so it can be used without Scratch
Live running and attached. The following
settings are transferred to the mixer in the main
setup section.
• Transform direction.
• Latched or momentary kill switch preference.
• Phono sensitivity.
• Meter setting (Stereo House / Dual Mono Cue)
• Phones setting (Master / Cue)
• Effect 1
• Effect 2
PHONO SENSITIVITY
Set the phono sensitivity at the level of your
cartridge (see your cartridge documentation for
the value). This will make your turntable inputs
the same level as your line inputs.
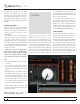
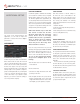
TRANSFORM DIRECTION
The Joysticks also double as transform switches.
To change the joystick from software control to
transform, press the joystick down – as if you
were trying to push it down into the mixer, you’ll
hear a click – and hold it down until the green
LED lights.
The 8 check boxes around the joystick image
show the directions you can move the joystick.
The audio will cut out when the joystick is moved
in a direction that is checked.
LATCH KILL SWITCHES
The EQ kill switches on the mixer can be set to
be either momentary (on while the button is held
down) or latched (on until the button is pressed
on). Select this option to keep the kills on until
you press the button again.