
Operator`s manual
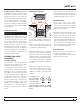

TTM 57SL FOR SERATO SCRATCH LIVE • OPER ATOR’S MANUAL 1.9.2
17
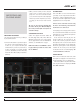
1. Start the track playing on the right deck.
After a few seconds, blue peaks appear in
the Tempo Matching display.
2. Adjust the pitch of the right turntable until
the blue peaks sit under the orange peaks in
the Tempo Matching display. Once they are
aligned, the two tracks have the same tempo.
3. Next align the markers in the Beat Matching
display. Watch the color of the items passing
by in the Main Waveform display. Remember
that a kick or bass drum will be red in color,
and a snare drum will be green or blue. This
technique will by no means guarantee perfect
mixes, but may help to speed up the process
of beat matching.
MASTER GAIN
The master output of Scratch
Live can be controlled using
the master gain control. This
adjusts the output volume of all tracks played.
NOTE: For best results, set the master gain
to the 12 o’clock position, and adjust the
volume of individual tracks using the track
gain adjustment. SEE “TRACK GAIN” ON PAGE 17.
33 / 45 SPEEDS
Set this to match the speed of your
turntable for normal playback.
TRACKING INDICATOR
The tracking indicators
on the main screen show the quality of the signal
coming from the control record or CD. The length
of the bar indicates the speed of the record or
CD. The color indicates the amount of position
information Scratch Live is receiving. When
you are playing the record at normal speed, the
tracking indicator should be grey. If it is mostly
red there is a problem reading the control signal.
Make sure your needles are clean, and check the
calibration in the setup screen.
NOTE: It is normal for the tracking indicator
to be red when cueing or scratching.
TAP TEMPO
For tracks with no BPM information,
there is a tap tempo button
displayed where the BPM usually
is, in the song info area. Pressing alt-space bar
activates the tempo tapper (press alt-space bar
a second time to activate the tempo tapper on
the right Virtual Deck). Tap the space bar along
with the beat. After you’ve tapped the rst beat,
you can switch to double time tapping, half
time, start of each bar etc. The range is set by
the rst two taps, after that you can switch to
any steady rhythm you feel comfortable with –
quarter notes, half note, whole notes. Esc resets
the BPM, Enter saves the BPM to the track. You
can use the mouse if you prefer. Your CD player
or turntable’s pitch slider doesn’t need to be at
zero, we do the math for you. You can also use
the tempo tapper when no song is loaded, for
nding the BPM of regular records, for example.
KEY LOCK
When Key Lock is on, the key or pitch of
the song stays locked at what it would
be if the track was playing at normal speed,
regardless of the platter speed of the turntable
or CD player. Key Lock has scratch detection,
so that it automatically turns off when scratching
for a natural scratching sound. Turn Key Lock on
or off by pressing the button to the top right of
the Virtual Deck.
TIP: F5 and F10 will turn Key Lock on and off
for the left and right decks respectively.
REPEAT
Use the repeat function to repeat the
song across the entire length of the
control record.
TIP: Short “loop” samples can be turned into
a continuous track using the repeat function.
The loops must be less than 10 seconds long,
and cut at the start and end of a bar.
CENSOR
Use the censor button to ‘mask’ parts
of a song, or use as a special effect.
When you press the censor button, the track
starts playing backwards from that point. When
you release the censor button, the track plays
forward from the point you would have been,
had you not pressed the censor button. Censor
is available only in rel and int modes.
EJECT
This ejects the track playing or loaded
track from the Virtual Deck.
AUTOPLAY
Click the autoplay button to
enable autoplay. With this setting
turned on, when one track nishes playing,
the next track starts automatically. Load from
a crate to play through the songs in that crate,
or from your library to play through your library.
Autoplay works in both rel and int modes. Play
from start must be checked in the setup screen
for autoplay to work correctly.
INPUT REVERSE
Swaps the Program 1 input
with the Program 2 input of
the TTM 57SL.
This transfers control over to the alternate
virtual deck. For example, the physical record
on the right hand side now controls the left
hand side virtual deck. This essentially lets you
continue mixing, but just using one turntable.
TRACK GAIN
Use the track gain adjustment to balance
the volume of the tracks in your library.
Any adjustment made to the gain of a
track is saved with the le, and will be
reapplied to the entire track when it is
loaded again. The level meter shows the
level sent to the hardware interface after
both individual track gain and master
gain adjustment. For automatic gain
setting of your tracks, SEE “USE AUTO GAIN”
ON PAGE 31.