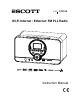
r x 400wl Wi-Fi Internet / Ethernet/ FM PLL Radio Instruction Manual
PRECAUTIONS Follow the advice below for safe and appropriate operations. ON PLACEMENT . Do not use the unit in places, which are extremely hot, cold, dusty, or humid. . Place the unit on a flat and even surface. . Do not restrict the airflow of the unit by placing it in a place with poor airflow, by covering it with a cloth, or by placing it on a carpet. ON SAFETY . When connecting and disconnecting the AC/DC adapter from the AC mains outlet, grip the plug and not the cord itself.
TABLE OF CONTENTS PRECAUTIONS…………………………………………………………………… TABLE OF CONTENTS………………………………………………………….. BOX CONTENTS……..…………………………………………………………… FEATURES…….…………………………………………………………………... LOCATION OF CONTROLS……………………………………………………... PREREQUISITES FOR INTERNET RADIO…………………………………… CONNECTIONS…………………………………………………………………… INSTALLING BATTERIES……………………...……………….……………….. BASIC OPERATIONS……………………………….……………………………. FM RADIO OPERATION……….………………………………………………… INTERNET RADIO OPERATION…………….…………………….………….
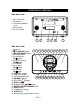
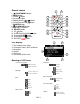
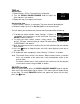
LOCATION OF CONTROLS Unit back view 1. Bass reflex hole 2. FM antenna 3. Time back up battery cover 4. Ethernet jack 5. DC IN 12V jack 1 2 3 4 5 1 Unit front view 1. Speakers 1 2 3 4 5 6 7 8 9 10 11 1 ALARM OFF button 2. 3. ( ) ON/STANDBY button 4. Preset P1 button 5. Preset/Previous P2/ button 6. Preset/Play/Pause P3/ button 7. LCD display 8. Preset/Next P4/ button 9. Preset/Stop P5/ button 10. VOLUME + button 11. VOLUME - button 12. Interchangeable inlay 21 20 19 18 17 16 15 14 13 12 13.
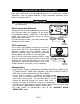
Remote control 7 1. ( ) ON/STANDBY button 2. BACK button 3. DOWN button 4. Preset P1 button 5. Repeat/Shuffle / button button 6. Preset/Previous P2/ 7. SNOOZE button ALARM OFF button 8. 9. VOLUME +/- buttons 10. SELECT button 11. UP button 12. Preset/Play/Pause P3/ button 13. Preset/Stop P5/ button 14. Preset/Next P4/ button 15. RECORD button 1 9 2 10 3 11 4 12 5 13 6 14 15 LCD display 1 1. The heading of the menu 2. Connection status (Wi-Fi or Wired) 3. Navigation 4. Volume 5.
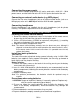
PREREQUISITES FOR INTERNET RADIO First of all, you will need a broadband Internet connection and a wireless access point (Wi-Fi) connected to the broadband Internet via a router and a modem (cable/DSL). You can choose between a wired connection (Ethernet) and a wireless connection (Wi-Fi). CONNECTIONS Note: In order to avoid any malfunctions, do not turn on the unit before making any connections.
Connecting the power supply Insert the AC/DC adapter plug into an AC mains outlet with a 230V AC ~ 50Hz power source, and the other end to the DC IN 12V jack at the back of the unit. Connecting an external audio device (e.g. MP3 player) Connect the line out or headphones jack on an external audio device (such as a MP3 player) to the unit’s AUX IN jack with the AUX IN cable (supplied). Connecting headphones Plug the headphones (not supplied) into the unit’s headphones jack for private listening.
BASIC OPERATIONS ON/ STANDBY mode After connecting the power supply (refer to previous section - CONNECTIONS), press the ( ) ON/STANDBY button to turn on the unit or go to standby mode. Navigation and number/character entry Using the buttons on the unit Turn the SCROLL/SELECT/SNOOZE knob to scroll through the menu and press it to enter the highlighted item. You can press the BACK button to return to previous menu. Press and hold the BACK button to return to the main menu. When entering numbers, e.g.
TIME set Set the clock 1. Select Settings ÆTime. The clock time is displayed. 2. Turn the SCROLL/SELECT/SNOOZE knob to adjust the hour and press it to confirm. 3. Repeat the step (2) to adjust the minutes. Set the alarm time 1. Select Settings ÆAlarm Æ set/enable. The alarm time will be displayed. 2. Follow the steps (2) to (3) in “Set the clock” to set the alarm time. The unit allows you to choose the sound to which you would like to wake up. 1.
FM RADIO OPERATION This mode allows you to listen to local FM radio stations. Listen to FM radio 1. Press the ON/STANDBY ( ) button to turn on the unit. 2. Select FM Radio ÆTune. 3. To search automatically, turn the SCROLL/SELECT /SNOOZE knob on the unit (or the UP or DOWN button on the remote control) and release to tune to a station. 4. To search manually, press the SCROLL/SELECT/SNOOZE knob once to go to manual search mode and then turn it to search for a station.
INTERNET RADIO OPERATION Your unit can be connected to a wireless network (Wi-Fi) or an Ethernet. This allows you to enjoy the vTuner live Internet radio service. Note: Before operating this mode, make sure that you have read and understood the instructions in “PREREQUISITES FOR INTERNET RADIO” and “CONNECTIONS”. Configurations setup Wired connection (Ethernet) 1. Connect the unit to the broadband Internet using an RJ45 Ethernet cable (not supplied). Refer to “CONNECTIONS” for more details. 2.
Listening to a web radio station After successfully connecting to the Internet, you can enjoy the vTuner live internet radio service by selecting “Internet Radio”. The following options are available: Options Descriptions The unit can automatically detect the country in which the unit Country is located and display the web radio stations in that country. The “Favorites” option allows you to find your favorite stations.
USB DEVICE AND SD/MMC CARD OPERATION This unit allows you to listen to files on a USB device or SD/MMC card. You can also copy files from your USB device to your SD/MMC card and vice-versa. You can also record web radio and FM radio to a USB device or SD/MMC card. Playback 1. Insert a USB disk into the USB port or/and an SD/MMC card into the SD/MMC card slot on the front of the unit. 2. Select “USB/SD/MMC” Æ”Playing” Æ”USB” or “SD/MMC”. 3.
RECORD FUNCTION You can record a web radio or FM radio broadcast on a USB device or SD/MMC card for private use only, or record an audio file read by an appliance connected via the AUX IN jack. Recording web and FM radio station broadcasts 1) Insert a USB device and/ or SD/MMC card into the unit and listen to the desired web or FM radio station. button and if both devices are inserted, 2) Press the select the destination device (USB or SD/MMC). Press the SELECT button to confirm.
2. In the Media Sharing dialogue box, select the Share my media check box. 3. Check the “share my media to” box. In the list, click your Radio*, click Allow, the selected device will now show a green tick and then click OK. z If your device does not appear in the list of devices, perform the following steps; From the main menu of your internet radio select "Media Server". A list of available computers will appear. Select the required computer. Your device will now appear in the list.
TROUBLE SHOOTING GUIDE Problems Recommendations FM Radio 1. Noise or distorted sound 1.1 Extend and position the FM antenna to achieve the best reception. Internet Radio 2. Does not connect to the Internet 3. The Internet connection is successful but cannot play a particular station 2.1 Ensure that you have configured your home network correctly by connecting to the Internet from a PC using the same network. 2.2 For a wired connection (Ethernet), check that the Ethernet cable is properly plugged in.
TECHNICAL SPECIFICATIONS Amplifier Output power……………………………. 6 W (2 x 3W) Speakers.………………………………… 3” 4 Ohm FM Radio Tuning range…………………………….. 87.5 – 108 MHz Number of stations that can be stored... 5 FM antenna…………………………....... Telescopic type, external Internet Radio Wired connection……………………….. Wireless (Wi-Fi) connection…………… vTuner live internet radio service……… Number of stations that can be stored... Wi-Fi antenna……………………………. Network 10/100 RJ 45 Ethernet jack 802.