
Instruction manual


GB-4
POWER SUPPLY
Using AC power supply
Insert the AC power cord into the AC mains outlet with a 230V AC ~ 50Hz power source and the
other end to the AC ~ socket at the back of the unit.
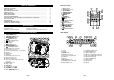
Using batteries
1. Open the battery compartment.
2. Insert 6 x UM2/ “C” size batteries (not supplied) with the polarities (+/-) matching the
engraved markings in the battery compartment. Reversed batteries may damage the unit.
3. Close the battery compartment.
Note: When AC power is supplied, the battery power is cut off automatically.
When an AC power failure or interruption occurs and the unit does not have batteries
installed, the time and preset stations will be lost. It is recommended to install the batteries
as back up. When replacing batteries replacement, always connect the AC power supply to
avoid losing the time and preset stations.
Installing the remote control battery
1. Remove the battery compartment cover on the bottom of the remote control, by pressing the
tab to the right while removing the cover.
2. Insert a 3V lithium battery (CR2025 or equivalent) with the polarity (+) matching the
indication inside the battery compartment cover.
3. Replace the battery compartment cover.
Note: The remote control battery normally lasts for about one year, although it depends on how
often and for what operations the remote control is used.
If the remote control fails to work even when it is operated near the unit, replace the
battery.
Precautions when using batteries
1. CAUTION: Danger of explosion if battery is incorrectly replaced. Replace only
with the same or equivalent type.
2. Do not mix different types of batteries together (e.g. alkaline, rechargeable and
standard (carbon zinc)) or old batteries with fresh ones.
3. Exhausted batteries must be removed to prevent any battery leakage.
4. Dispose of batteries properly according to environmental regulations.
GB-5
BASIC OPERATION
ON/ Standby mode
After connecting the power supply (refer to “POWER
SUPPLY”), the unit goes to standby mode and the clock time
is displayed. Press the ON/STANDBY button to turn on the unit and press it again to go to
standby mode.
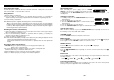
Setting the clock time
1. In standby mode, press the SOURCE/CLOCK button. The hour
digits will flash.
2. Press the / buttons to set the hour.
3. Press the SOURCE/CLOCK button to confirm and the minute
digits will flash.
4. Press the / buttons to set the minutes.
5. Press the SOURCE/CLOCK button again to confirm the time setting.
Selecting the source
When the unit is switched on, press the SOURCE/CLOCK button repeatedly to select one of
the following sources: iPod, USB, AUX or Radio.
VOLUME control
Press the VOLUME +/- buttons to adjust the volume level.
MUTE function
Press the MUTE button on the remote control to turn off the sound. The symbol “ ”is displayed.
Press it again or use the VOLUME +/- buttons to resume the sound.
XBASS function
Press the
button to boost the bass effect. The symbol “ ” is displayed.
Surround sound
Press the SURROUND button repeatedly to select the surround sound effect: Low ,
High
or off.
EQ function
Press the EQ button on the remote control repeatedly to select your desired music mode in the
following sequence:
FLAT
ROCK POP JAZZ CLASSIC
Connecting headphones
Plug in headphones (not supplied) to the headphones jack at the side of the unit for private
listening. The speaker output will be shut off automatically.