
User guide


PACKAGE
DVD player A/V cable Stand
Remote control Instruction manual AC adapter
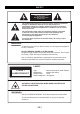
MOUNTING
Mounting on the stand
Insert the stand into the unit’s slot at the back and rotate the stand around 90°.
Place the unit in an upright position.
Wall-mounting
You can remove the stand and mount the unit on a wall with the slots at
the back of the unit and two screws (not supplied).
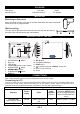
DESCRIPTION OF THE UNIT
2
3
4
5
6
7
8
9
10
11
12
13
14
1. ON/STANDBY button
2. Disc slot
9. DC 5V jack
4. Infrared (IR
10. Composite AV output
5. OPEN/CLOSE
button
11. HDMI output
6. SD/MMC/MS card slot
12.
(earphones)/Digital COAXIAL output jack
7. PLAY/PAUSE
button
13. Slots for wall mounting
8. USB Port
14. Stand
CONNECTIONS
Note: Open the side cover to connect earphones/coaxial and AV output.
Connecting to a TV
The way in which the unit is connected and the kinds of cables used can make a noticeable difference to
picture and sound quality. Before selecting one of the options, please make sure that any other
equipment has the required input/output connections. Use any of the options below:
Different options for connecting your DVD player to a TV
Output(s)
Picture
quality
Cable
Cable
supplied
(Yes/No)
Video mode
(Press the SETUP button
on the remote control and
select “SYSTEM SETUP”
menu)
Composite AV
(Audio/VIDEO) output
Normal
A/V cable
(yellow, white and
red)
Yes Select “VIDEO” – “CVBS”)
HDMI Excellent HDMI cable No Select “HDMI OUTPUT”
GB-3
3. LED display
) remote control sensor